Page 120 of 539

119 Controls in detail
Locking and unlocking
�
Pull remote tailgate switch1 until
tailgate begins to open.
The tailgate opens. The indicator lamp
in the remote tailgate switch comes on
and remains lit until the tailgate is
closed. While the tailgate is opening an
acoustic signal sounds.Limiting opening height of tailgate*
Vehicles with tailgate opening/closing
system*:
The tailgate opening height can be limited
when transporting goods on a roof rack
(e.g. presence of an MB sport luggage con-
tainer*). When activated, the tailgate
opens to approximately 6.4 ft (1.95 m).
�
Activate the limiting opening height of
tailgate using the control system
(�page 173).
Warning!
G
Maintain sight of the area around the rear of
the vehicle while operating the tailgate with
the door-mounted remote tailgate switch or
with the Šbutton on the SmartKey or
SmartKey with KEYLESS-GO*. Monitor the
opening procedure carefully to make sure
no one is in danger of being injured.
To interrupt the opening procedure, press or
pull the door-mounted remote tailgate
switch or press the Šbutton on the
SmartKey or SmartKey with KEYLESS-GO*.
!The tailgate swings open upwards auto-
matically. Always make sure there is
sufficient overhead clearance. To stop
the opening procedure, press or pull re-
mote tailgate switch1 or press the
Šbutton on the SmartKey or
SmartKey with KEYLESS-GO*. The
tailgate stops moving.iVehicles with tailgate opening/closing
system*:
The tailgate can also be opened using
the buttonŠ on the SmartKey or
SmartKey with KEYLESS-GO*.
Page 131 of 539

130 Controls in detailSeatsLumbar support
The curvature of the driver’s seat can be
adjusted to help enhance lower back sup-
port and seating comfort.
1Adjustment lever�
Move adjustment lever1 in the direc-
tion of arrows until you have reached a
comfortable seating position.
Rear seat head restraints Head restraint heightWarning!
G
For safety reasons, always drive with the
rear head restraints in the upright position
when the rear seats are occupied.
Keep the area around head restraints clear
of articles (e.g. clothing) to not obstruct the
folding operation of the head restraints.
Warning!
G
For your protection, drive only with properly
positioned head restraints.
Adjust head restraint so that the center of
the head restraint supports the back of the
head at eye level. This will reduce the poten-
tial for injury to the head and neck in the
event of an accident or similar situation.
Do not drive the vehicle without the seat
head restraints. Head restraints are
intended to help reduce injuries during an
accident.
Do not interchange head restraints from
front and rear seat.
Page 132 of 539

131 Controls in detailSeats
Raising:�
Manually adjust the height of the head
restraint by pulling it upward.
If the head restraint is fully retracted,
push release button in direction of ar-
row and pull the head restraint out.
Lowering:
�
To lower the head restraint, push
release button in direction of arrow and
press down on the head restraint.For more information on seats, see the
“Getting started” section (
�page 38).Removing and installing rear seat head
restraints
iAdjust the head restraint in such a way
that it is as close to the head as possi-
ble.
Warning!
G
For your protection, drive only with properly
positioned head restraints.
Adjust head restraint so that the center of
the head restraint supports the back of the
head at eye level. This will reduce the poten-
tial for injury to the head and neck in the
event of an accident or similar situation.
Do not drive the vehicle without the seat
head restraints. Head restraints are intend-
ed to help reduce injuries during an acci-
dent.
Do not interchange head restraints from
front and rear seat.
Page 133 of 539
132 Controls in detailSeatsRemoving rear seat head restraints�
Pull head restraint to its highest
position.
�
Push release button in direction of ar-
row and pull out head restraint.
Installing rear seat head restraints
�
Insert head restraint and push it down
until it engages.
�
Push release button and adjust head
restraint to the desired position
(�page 131).
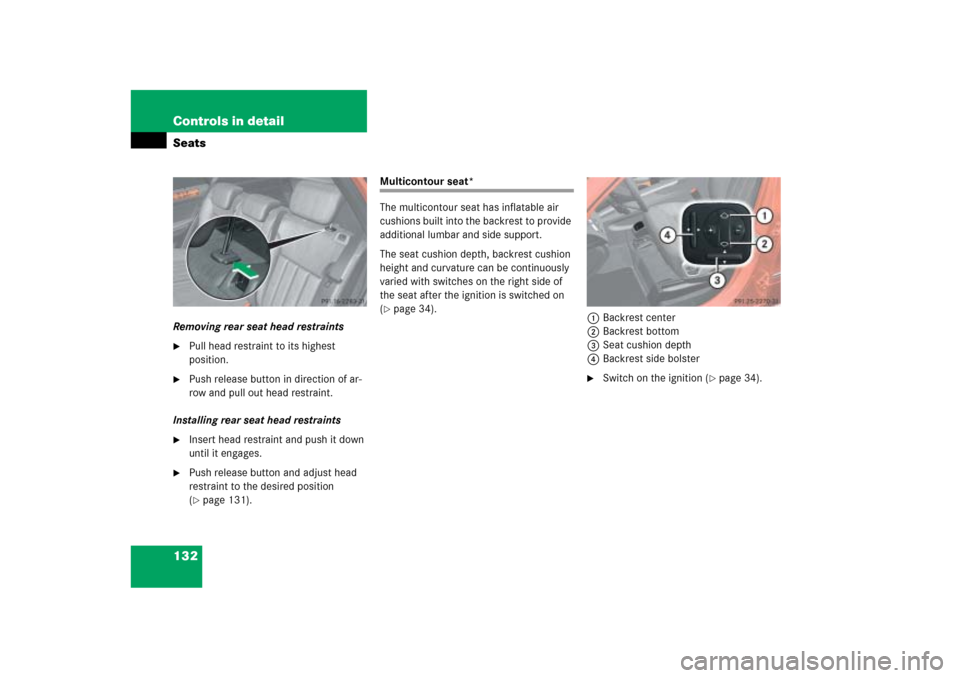
Multicontour seat*
The multicontour seat has inflatable air
cushions built into the backrest to provide
additional lumbar and side support.
The seat cushion depth, backrest cushion
height and curvature can be continuously
varied with switches on the right side of
the seat after the ignition is switched on
(�page 34).
1Backrest center
2Backrest bottom
3Seat cushion depth
4Backrest side bolster
�
Switch on the ignition (
�page 34).
Page 136 of 539

135 Controls in detail
Memory function*
�Memory function*
You can store up to three different settings
for each SmartKey or SmartKey with
KEYLESS-GO*.
The following settings are saved for each
stored position on the entry side of the
driver seat:�
Driver’s seat, head restraint height and
backrest position
�
Steering wheel position
�
Driver’s side exterior rear view mirror
position
�
Passenger-side exterior rear view
mirror position
The following are saved for each stored po-
sition on the entry side of the front passen-
ger seat:
�
Front passenger seat, head restraint
height and backrest position
!Prior to operating the vehicle, the
driver should check and adjust the seat
height, seat position fore and aft, and
seat backrest angle if necessary, to
ensure adequate control, reach and
comfort. The head restraint should also
be adjusted for proper height. See also
the section on air bags (
�page 67) for
proper seat positioning.
In addition, adjust the steering wheel to
ensure adequate control, reach, opera-
tion and comfort. Both the interior and
exterior rear view mirrors should be
adjusted for adequate rear vision.
Fasten seat belts. Infants and small
children should be seated in a properly
secured restraint system that complies
with U.S. Federal Motor Vehicle Safety
Standard 213 and 225 and Canadian
Motor Vehicle Safety Standards 213
and 210.2.
Warning!
G
Do not activate the memory function while
driving. Activating the memory function
while driving could cause the driver to lose
control of the vehicle.
Page 164 of 539
163 Controls in detail
Control system
The table below shows what settings can
be changed within the various menus. De-
tailed instructions on making individual
settings can be found on the following pag-
es.INSTRUMENT CLUSTER
TIME/DATE
LIGHTING
VEHICLE
CONVENIENCE
Select speedometer display
mode
Set time (hours)
Set daytime running
lamp mode (USA only)
Adjusting compass
zone
Activate easy-entry/exit
feature*
Select language
Set time (minutes)
Set locator lighting
Calibrating compass
Set parking position for
exterior rear view mirror*
Select display (speed display
or outside temperature) for
status line
Set date (month)
Exterior lamps delayed
shut-off
Display when ignition is
switched off
Set fold-in function for
exterior rear view mir-
rors*
Set date (day)
Interior lighting delayed
shut-off
Set automatic locking
Set date (year)
Limiting opening height
of tailgate*
Page 172 of 539

171 Controls in detail
Control system
Vehicle submenu
Access the
Vehicle
submenu via the
Settings...
menu. Use the
Vehicle
sub-
menu to make general vehicle settings.
The following functions are available:Adjusting compass zone
This function is not available if your vehicle
is equipped with the Modular COMAND
System and navigation module*.
Use this function to set the compass zone.
To set the compass zone:
�
Move the selection marker to the Vehicle
submenu using theæ
orç button.
�
Press buttonj ork repeatedly
until you see this message in the dis-
play:
Compass Adjustment Zone
.
The selection marker is on the current
setting.
�
Press buttonæ orç to set the
respective compass zone.For information on how to select the prop-
er geographic zone, see “Compass”
(
�page 295).
Calibrating compass
This function is not available if your vehicle
is equipped with the Modular COMAND
System and navigation module*.
Use this function to calibrate the compass
zone.
To calibrate the compass:
�
Move the selection marker to the Vehicle
submenu using theæ
orç button.
�
Press buttonj ork repeatedly
until you see this message in the dis-
play:
Compass Calibration
.
The selection marker is on the current
setting.
Function
Page
Adjusting compass zone
171
Calibrating compass
171
Display when ignition is
switched off
172
Set automatic locking
172
Limiting opening height of tail-
gate*
173
��
Page 174 of 539

173 Controls in detail
Control system
Limiting opening height of tailgate*
Use this function to activate or deactivate
the limiting opening height of tailgate.�
Move the selection marker to the Vehicle
submenu using theæ
orç button.
�
Press buttonj ork repeatedly
until you see this message in the dis-
play:
Opening limiter Tailgate
.
The selection marker is on the current
setting.
�
Press buttonæ orç to switch Opening limiter Tailgate On
or
Off
.Convenience submenu
Access the
Convenience
submenu via the
Settings...
menu. Use the
Convenience
submenu to change the settings for a num-
ber of convenience features. The following
functions are available:
Activating easy-entry/exit feature*
Use this function to activate and deacti-
vate the easy-entry/exit feature
(
�page 128).Function
Page
Activating easy-entry/exit
feature*
173
Set parking position* for exteri-
or rear view mirror
174
Setting fold-in function* for
exterior rear view mirrors
175
Warning!
G
You must make sure no one can become
trapped or injured by the moving steering
wheel and driver’s seat when the
easy-entry/exit feature is activated.
To stop seat/steering wheel movement, do
one of the following:�
Press seat adjustment switch
(�page 39).
�
Move steering column stalk*
(�page 42).
�
Press one of the memory position but-
tons or the memory button
M*
(
�page 136).
Do not leave children unattended in the
vehicle, or with access to an unlocked
vehicle. Children could open the driver’s
door and unintentionally activate the
easy-entry/exit feature, which could re-
sult in an accident and/or serious per-
sonal injury.