Page 145 of 539

144 Controls in detailLightingSwitching off corner-illuminating front
fog lamps
The combination switch for the turn signal
resets automatically after major steering
wheel movements. This will switch off the
corner-illuminating front fog lamps if they
were activated by switching on the left or
right turn signal.
If the turn signal should stay on after mak-
ing the turn, the turn signal and cornering
fog lamp can be switched off by returning
the combination switch to its original posi-
tion.Driving rearward
Switching on corner-illuminating front
fog lamps
�
Shift the automatic transmission in
positionR.
The inverse front fog lamp comes on
automatically depending on the
steering direction and steering angle.
Switching off corner-illuminating front
fog lamps
�
Shift the automatic transmission out of
positionR.
The respective front fog lamp goes out.
Hazard warning flasher
The hazard warning flasher can be
switched on at all times, even with the
SmartKey removed from the starter switch
or with the SmartKey with KEYLESS-GO*
removed from the vehicle.
The hazard warning flasher switches on
automatically when an air bag deploys.
The hazard warning flasher switch is
located on the upper part of the center
console.
1Hazard warning flasher switch
Page 148 of 539

147 Controls in detail
Lighting
Switching right front reading lamp on
and off�
Press button5.
The right reading lamp comes on.
�
Press button5 again.
The right reading lamp goes out.
Switching rear interior reading lamps on
and off
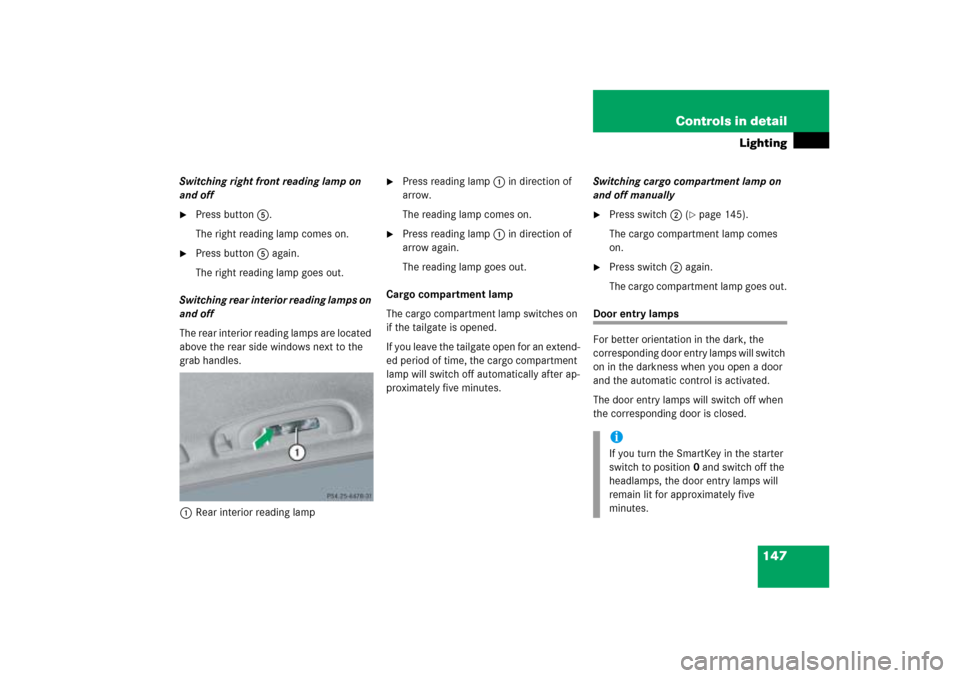
The rear interior reading lamps are located
above the rear side windows next to the
grab handles.
1Rear interior reading lamp
�
Press reading lamp1 in direction of
arrow.
The reading lamp comes on.
�
Press reading lamp1 in direction of
arrow again.
The reading lamp goes out.
Cargo compartment lamp
The cargo compartment lamp switches on
if the tailgate is opened.
If you leave the tailgate open for an extend-
ed period of time, the cargo compartment
lamp will switch off automatically after ap-
proximately five minutes.Switching cargo compartment lamp on
and off manually
�
Press switch2 (
�page 145).
The cargo compartment lamp comes
on.
�
Press switch2 again.
The cargo compartment lamp goes out.
Door entry lamps
For better orientation in the dark, the
corresponding door entry lamps will switch
on in the darkness when you open a door
and the automatic control is activated.
The door entry lamps will switch off when
the corresponding door is closed.
iIf you turn the SmartKey in the starter
switch to position0 and switch off the
headlamps, the door entry lamps will
remain lit for approximately five
minutes.
Page 164 of 539
163 Controls in detail
Control system
The table below shows what settings can
be changed within the various menus. De-
tailed instructions on making individual
settings can be found on the following pag-
es.INSTRUMENT CLUSTER
TIME/DATE
LIGHTING
VEHICLE
CONVENIENCE
Select speedometer display
mode
Set time (hours)
Set daytime running
lamp mode (USA only)
Adjusting compass
zone
Activate easy-entry/exit
feature*
Select language
Set time (minutes)
Set locator lighting
Calibrating compass
Set parking position for
exterior rear view mirror*
Select display (speed display
or outside temperature) for
status line
Set date (month)
Exterior lamps delayed
shut-off
Display when ignition is
switched off
Set fold-in function for
exterior rear view mir-
rors*
Set date (day)
Interior lighting delayed
shut-off
Set automatic locking
Set date (year)
Limiting opening height
of tailgate*
Page 196 of 539

195 Controls in detail
Good visibility
Auto-dimming rear view mirror*
The reflection brightness of the exterior
rear view mirror on the driver’s side and
the interior rear view mirror will respond
automatically to glare when�
the ignition is switched on
�
incoming light from headlamps falls on
the sensor in the interior rear view
mirror
The rear view mirror will not react if
�
reverse gearR is engaged
�
the interior light is turned on
Warning!
G
The auto-dimming function does not react if
incoming light is not aimed directly at sen-
sors in the interior rear view mirror.
The interior rear view mirror and the exterior
rear view mirror on the driver’s side do not
react, for example, when transporting cargo
which covers the rear window.
Glare can endanger you and others.Warning!
G
In case of an accident, liquid electrolyte may
escape from the mirror housing if the mirror
glass breaks.
Electrolyte has an irritating effect. Do not
allow the liquid to come into contact with
eyes, skin, clothing, or respiratory system.
In case it does, immediately flush affected
area with water, and seek medical help if
necessary.
!Electrolyte drops coming into contact
with the vehicle paint finish can be
completely removed only while in the
liquid state and by applying plenty of
water.Warning!
G
Exercise care when using the passen-
ger-side exterior rear view mirror. The mirror
surface is convex (outwardly curved surface
for a wider field of view). Objects in mirror
are closer than they appear. Check your
interior rear view mirror or glance over your
shoulder before changing lanes.
Page 222 of 539

221 Controls in detail
3-zone automatic climate control*
Rear air conditioning
You can switch on and off the rear air con-
ditioning with the climate control panel in
the front.
Deactivating�
Press button> on the climate con-
trol panel (
�page 218).
The indicator lamp on button>
comes on. The rear air conditioning is
switched off. REAR OFF
appears in the
climate control display.
Activating
�
Press button> on the climate con-
trol panel (
�page 218).The indicator lamp on button>
goes out. The rear air conditioning is
adjusted automatically.
REAR ON
ap-
pears in the climate control display.
For more information on rear air condition-
ing, see “Rear air conditioning”
(
�page 227).
Setting the temperature
Use temperature control1 and9
(�page 218) to separately adjust the air
temperature on each side of the passenger
compartment. You should raise or lower
the temperature setting in small incre-
ments, preferably starting at 72°F (22°C).
The climate control will adjust to the set
temperature as fast as possible.Increasing
�
Turn the temperature control1
and/or9 slightly to the right.
The climate control system will corre-
spondingly adjust the interior air tem-
perature.
Decreasing
�
Turn the temperature control1
and/or9 slightly to the left.
The climate control system will corre-
spondingly adjust the interior air tem-
perature.
iFor information on operating the rear
climate control panel from the rear
seats, see “Rear air conditioning”
(�page 227).
iYou can switch on and off the rear air
conditioning by pressing the respective
button on the rear climate control pan-
el.
Page 230 of 539
229 Controls in detail
3-zone automatic climate control*
Increasing/decreasing the temperature�
Turn the temperature control3 slight-
ly left or right until the desired temper-
ature is selected.
The rear air conditioning will corre-
spondingly adjust the interior air tem-
perature for the rear passenger
compartment.
Adjusting air volume
�
Press� to decrease orQ to in-
crease air volume to the desired level.
Page 231 of 539

230 Controls in detailPower windowsOpening and closing the windows
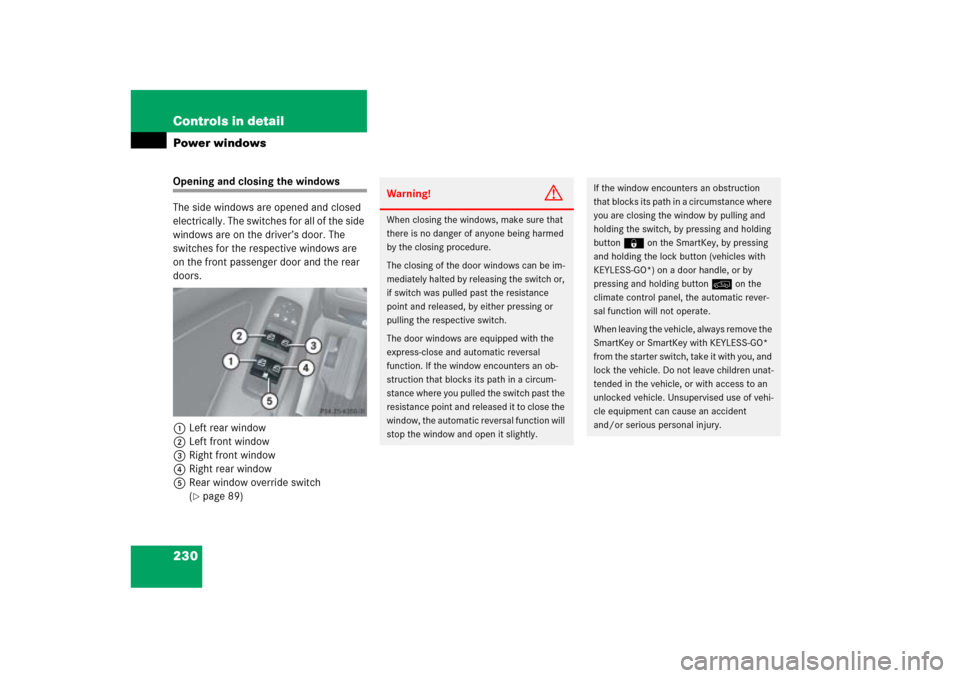
The side windows are opened and closed
electrically. The switches for all of the side
windows are on the driver’s door. The
switches for the respective windows are
on the front passenger door and the rear
doors.
1Left rear window
2Left front window
3Right front window
4Right rear window
5Rear window override switch
(
�page 89)
Warning!
G
When closing the windows, make sure that
there is no danger of anyone being harmed
by the closing procedure.
The closing of the door windows can be im-
mediately halted by releasing the switch or,
if switch was pulled past the resistance
point and released, by either pressing or
pulling the respective switch.
The door windows are equipped with the
express-close and automatic reversal
function. If the window encounters an ob-
struction that blocks its path in a circum-
stance where you pulled the switch past the
resistance point and released it to close the
window, the automatic reversal function will
stop the window and open it slightly.
If the window encounters an obstruction
that blocks its path in a circumstance where
you are closing the window by pulling and
holding the switch, by pressing and holding
button‹on the SmartKey, by pressing
and holding the lock button (vehicles with
KEYLESS-GO*) on a door handle, or by
pressing and holding button: on the
climate control panel, the automatic rever-
sal function will not operate.
When leaving the vehicle, always remove the
SmartKey or SmartKey with KEYLESS-GO*
from the starter switch, take it with you, and
lock the vehicle. Do not leave children unat-
tended in the vehicle, or with access to an
unlocked vehicle. Unsupervised use of vehi-
cle equipment can cause an accident
and/or serious personal injury.
Page 238 of 539

237 Controls in detail
Power tilt/sliding sunroof*
Opening and closing the power
tilt/sliding sunroof�
To open, close, raise, or lower the
tilt/sliding sunroof, move the sunroof
switch to the resistance point in the
required direction of arrows1to4.
Release the sunroof switch when the
tilt/sliding sunroof has reached the de-
sired position.
Fully opening (Express-open) and
closing (Express-close) the power
tilt/sliding sunroof
�
To open or close the tilt/sliding sun-
roof, move the sunroof switch past the
resistance point in the direction of
arrow1to2 and release.
The tilt/sliding sunroof opens or closes
completely.Stopping the power tilt/sliding sunroof
during Express-open
�
Move the sunroof switch in any direc-
tion.
The movement of the tilt/sliding sun-
roof stops.
Synchronizing the power tilt/sliding
sunroof
The tilt/sliding sunroof must be
synchronized each time�
after the battery has been
disconnected or discharged
�
after the tilt/sliding sunroof has been
closed manually (
�page 439)
�
after a malfunction
�
the tilt/sliding sunroof does not open
smoothly
�
Switch on the ignition (
�page 34).
�
Press and hold the sunroof switch in
the direction of arrow1 (
�page 235)
until the tilt/sliding sunroof is fully
raised at the rear.
Keep holding the sunroof switch in the
direction of arrow1 for approximately
one second.
�
Check the Express-open feature
(�page 237).
If the tilt/sliding sunroof opens
completely, the tilt/sliding sunroof is
synchronized. Otherwise repeat the
above steps.
iIf the movement of the tilt/sliding sun-
roof is blocked during the closing pro-
cedure, the tilt/sliding sunroof will
stop and reopen slightly.