Page 143 of 539
142 Controls in detailLightingFront fog lamps�
Switch on the low beam headlamps
(�page 54).
�
Pull out the exterior lamp switch to first
stop.
The front fog lamps switch on.
The green indicator lamp‡ in the
exterior lamp switch comes on.
�
Push in the exterior lamp switch.
The front fog lamps switch off.
The green indicator lamp‡ in the
exterior lamp switch goes out.Rear fog lamp (driver’s side only)
�
Switch on the front fog lamps
(�page 142).
�
Pull out the exterior lamp switch to
second stop.
The rear fog lamp is switched on.
The yellow indicator lamp† in the
exterior lamp switch comes on
(�page 138).
�
Push in the exterior lamp switch to first
stop.
The rear fog lamp switches off.
The yellow indicator lamp† in the
exterior lamp switch goes out.
The front fog lamps remain lit.
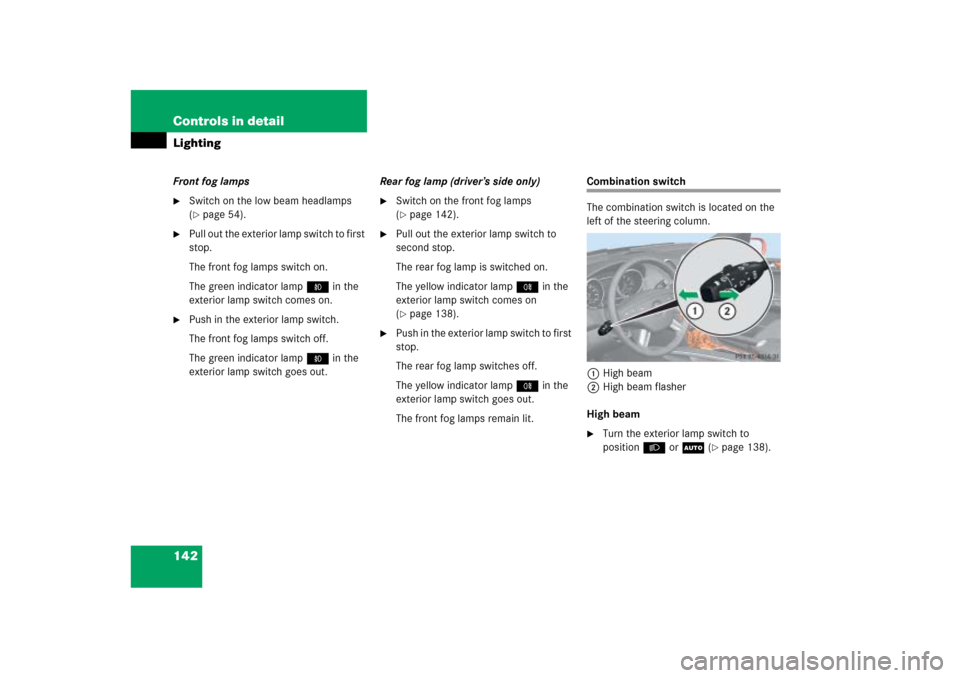
Combination switch
The combination switch is located on the
left of the steering column.
1High beam
2High beam flasher
High beam�
Turn the exterior lamp switch to
positionB orU (
�page 138).
Page 144 of 539

143 Controls in detail
Lighting
�
Push the combination switch in
direction of arrow1 to switch on the
high beam.
The high beam headlamp indicator
lampA in the instrument cluster
comes on (
�page 24).
�
Pull the combination switch in direction
of arrow2 to its original position to
switch off the high beam.
The high beam headlamp indicator
lampA in the instrument cluster
goes out.
High beam flasher
�
Pull the combination switch briefly in
direction of arrow2.
Corner-illuminating front fog lamps*
The corner-illuminating front fog lamps im-
prove illumination of the road onto which
you are turning.
The corner-illuminating front fog lamps will
operate with the engine running and with�
the exterior lamp switch in
positionB (
�page 138)
or
�
the exterior lamp switch in
positionU (
�page 138)
or
�
the daytime running lamp mode
activated (
�page 140)Driving forward
Switching on corner-illuminating front
fog lamps
�
Depending on whether you are turning
left or right, switch on the left or right
turn signal (
�page 54).
The respective front fog lamp comes on
and illuminates the area in the direc-
tion into which you are turning.
iCorner-illuminating front fog lamps will
only come on in low ambient lighting
conditions.
The corner-illuminating front fog lamps
function is not available at a vehicle
speed above 25 mph (40 km/h).
iThe corner-illuminating front fog lamps
will come on automatically depending
on the steering angle, even if you did
not switch on either turn signal. If the
corner-illuminating front fog lamps
came on automatically, they will also
go out automatically depending on the
steering angle.
Page 148 of 539

147 Controls in detail
Lighting
Switching right front reading lamp on
and off�
Press button5.
The right reading lamp comes on.
�
Press button5 again.
The right reading lamp goes out.
Switching rear interior reading lamps on
and off
The rear interior reading lamps are located
above the rear side windows next to the
grab handles.
1Rear interior reading lamp
�
Press reading lamp1 in direction of
arrow.
The reading lamp comes on.
�
Press reading lamp1 in direction of
arrow again.
The reading lamp goes out.
Cargo compartment lamp
The cargo compartment lamp switches on
if the tailgate is opened.
If you leave the tailgate open for an extend-
ed period of time, the cargo compartment
lamp will switch off automatically after ap-
proximately five minutes.Switching cargo compartment lamp on
and off manually
�
Press switch2 (
�page 145).
The cargo compartment lamp comes
on.
�
Press switch2 again.
The cargo compartment lamp goes out.
Door entry lamps
For better orientation in the dark, the
corresponding door entry lamps will switch
on in the darkness when you open a door
and the automatic control is activated.
The door entry lamps will switch off when
the corresponding door is closed.
iIf you turn the SmartKey in the starter
switch to position0 and switch off the
headlamps, the door entry lamps will
remain lit for approximately five
minutes.
Page 168 of 539

This function is not available if your vehicle
is equipped with the Modular COMAND
System and navigation module*.�
Move the selection marker to")
167 Controls in detail
Control system
Set date (year)
This function is not available if your vehicle
is equipped with the Modular COMAND
System and navigation module*.�
Move the selection marker to the Time/Date
submenu using theæ or
çbutton.
�
Press buttonj ork repeatedly
until you see this message in the dis-
play:
Date Set year
.
The selection marker is on the year set-
ting.
�
Press buttonæ orç to set the
year.Lighting submenu
Access the
Lighting
submenu via the
Settings...
menu. Use the
Lighting
submenu to change the lamp and lighting
settings on your vehicle. The following
functions are available:Setting daytime running lamp mode
(USA only)
�
Move the selection marker to the Lighting
submenu using theæ
orç button.
�
Press buttonj ork repeatedly
until you see this message in the dis-
play:
Light circuit headlamp mode
.
The selection marker is on the current
setting.
Function
Page
Set daytime running lamp mode
(USA only)
167
Set locator lighting
168
Exterior lamps delayed shut-off
169
Interior lighting delayed shut-off
170
iThis function is not available in coun-
tries where daytime running lamps are
mandatory.
��
Page 169 of 539

mode.
With daytime running lamp mode se-
lected and the exterior lamp switch at
positionM,")
168 Controls in detailControl system�
Pressæ orç to select
Manual
or
daytime running lamp (
Constant
)
mode.
With daytime running lamp mode se-
lected and the exterior lamp switch at
positionM, the following lamps will
come on automatically when the en-
gine is turned on:
�
Parking lamps and low beam
headlamps
�
License plate lamps (in low ambient
light conditions)Setting locator lighting
With the locator lighting feature activated
and the exterior lamp switch in
position
U
, the following lamps will
switch on during darkness when the vehi-
cle is unlocked with SmartKey:
�
Parking lamps
�
Tail lamps
�
License plate lamps
�
Side marker lamps
�
Front fog lamps
The locator lighting switches off when the
driver’s door is opened. It switches off au-
tomatically after a period of approximately
40 seconds.
iIf you turn the exterior lamp switch to
another position, the corresponding
lamp(s) will switch on.
For safety reasons, resetting the Lighting
submenu to factory settings
while driving will not reset the daytime
running lamp mode.
In the display you will then see the mes-
sage:
Lighting - Cannot be com-
pletely reset to factory settings
while driving.
��
Page 170 of 539

169 Controls in detail
Control system
�
Move the selection marker to the Lighting
submenu using theæ
orç button.
�
Press buttonj ork repeatedly
until you see this message in the dis-
play:
Function Surround lighting
.
The selection marker is on the current
setting.
�
Press buttonæ orç to select
the desired setting.
The locator lighting will be switched on
or off.
�
Turn the exterior lamp switch to
positionU when exiting the vehicle
(�page 138).Setting night security illumination
(Headlamps delayed shut-off)
Use this function to set whether and how
long you would like the exterior lamps to
illuminate during darkness after exiting the
vehicle and all doors closed.
With the delayed shut-off feature activated
and the exterior lamp switch in
position
U
before the engine is turned
off, the following lamps will switch on
when the engine is turned off:
�
Parking lamps
�
Tail lamps
�
License plate lamps
�
Side marker lamps
�
Front fog lamps
�
Move the selection marker to the Lighting
submenu using theæ
orç button.
�
Press buttonj ork repeatedly
until you see this message in the dis-
play:
Headlmp. delayed shut-off
.
The selection marker is on the current
setting.
iYou can reactivate this function within
ten minutes by opening a door.
If after turning off the engine you do not
open a door or do not close an opened
door, the lamps will automatically
switch off after 60 seconds.
��
Page 195 of 539
194 Controls in detailGood visibilityFor information on the windshield wipers,
see “Windshield wipers” (
�page 55).
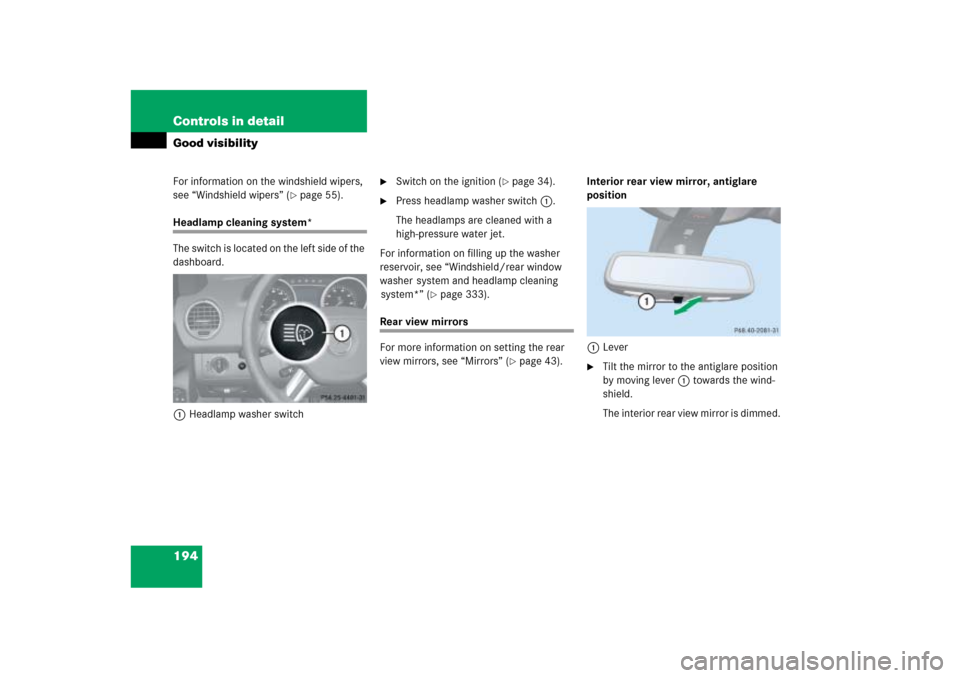
Headlamp cleaning system*
The switch is located on the left side of the
dashboard.
1Headlamp washer switch
�
Switch on the ignition (
�page 34).
�
Press headlamp washer switch1.
The headlamps are cleaned with a
high-pressure water jet.
For information on filling up the washer
reservoir, see “Windshield/rear window
washer system and headlamp cleaning
system*” (
�page 333).
Rear view mirrors
For more information on setting the rear
view mirrors, see “Mirrors” (
�page 43).Interior rear view mirror, antiglare
position
1Lever
�
Tilt the mirror to the antiglare position
by moving lever1 towards the wind-
shield.
The interior rear view mirror is dimmed.
Page 196 of 539

195 Controls in detail
Good visibility
Auto-dimming rear view mirror*
The reflection brightness of the exterior
rear view mirror on the driver’s side and
the interior rear view mirror will respond
automatically to glare when�
the ignition is switched on
�
incoming light from headlamps falls on
the sensor in the interior rear view
mirror
The rear view mirror will not react if
�
reverse gearR is engaged
�
the interior light is turned on
Warning!
G
The auto-dimming function does not react if
incoming light is not aimed directly at sen-
sors in the interior rear view mirror.
The interior rear view mirror and the exterior
rear view mirror on the driver’s side do not
react, for example, when transporting cargo
which covers the rear window.
Glare can endanger you and others.Warning!
G
In case of an accident, liquid electrolyte may
escape from the mirror housing if the mirror
glass breaks.
Electrolyte has an irritating effect. Do not
allow the liquid to come into contact with
eyes, skin, clothing, or respiratory system.
In case it does, immediately flush affected
area with water, and seek medical help if
necessary.
!Electrolyte drops coming into contact
with the vehicle paint finish can be
completely removed only while in the
liquid state and by applying plenty of
water.Warning!
G
Exercise care when using the passen-
ger-side exterior rear view mirror. The mirror
surface is convex (outwardly curved surface
for a wider field of view). Objects in mirror
are closer than they appear. Check your
interior rear view mirror or glance over your
shoulder before changing lanes.