Page 162 of 539

161 Controls in detail
Control system
Settings menu
In the
Settings...
menu there are two
functions:
�
The function
To reset: Press reset
button for 3 seconds
, with which you
can reset all the settings to the original
factory settings.
�
A collection of submenus with which
you can make individual settings for
your vehicle.
�
Press buttonè orÿ repeatedly
until the
Settings...
menu is seen in
the display.Resetting all settings
You can reset all the functions of all sub-
menus to the factory settings.
�
Press the reset button in the instru-
ment cluster (
�page 24) for approxi-
mately three seconds.
In the display you will see the request
to press the reset button again to con-
firm.
�
Press the reset button again.
The functions of all the submenus will
reset to factory settings.Submenus in the Settings menu
�
Press buttonj.
In the display you see the collection of
the submenus.
�
Press buttonç.
The selection marker moves to the next
submenu.
iThe settings you have changed will not
be reset unless you confirm the action
by pressing the reset button a second
time.
Page 163 of 539
162 Controls in detailControl systemThe submenus are arranged by hierarchy.
Scroll down with theç button, scroll up
with theæ button.
With the selection marker on the desired
submenu, use the jbutton to access
the individual functions within that sub-
menu. Once within the submenu, you can
use buttonj to move to the next func-
tion or buttonk to move to the previ-
ous function within that submenu.
The settings themselves are made with
buttonæ orç.Resetting the functions of a submenu
For each submenu you can reset all the
functions to the factory settings.
�
Move to a function in the submenu.
�
Press the reset button (
�page 24) in
the instrument cluster for approximate-
ly three seconds.
In the display you will see the request
to press the reset button again to con-
firm.
�
Press the reset button again.
All functions of the submenu will reset
to factory settings.
Page 165 of 539

164 Controls in detailControl systemInstrument cluster submenu
Access the
Instr. cluster
submenu us-
ing the jbutton via the Settings
menu. Use the
Instr. cluster
submenu
to change the instrument cluster display
settings. The following functions are avail-
able:Selecting speedometer display mode
�
Move the selection marker to the Instr. cluster
submenu using
theæ orç button.
�
Press buttonj ork repeatedly
until you see this message in the dis-
play:
Display unit
Speedometer/odometer
.
The selection marker is on the current
setting.
�
Press æ or ç to set speedome-
ter unit to
km or
miles
.
Selecting language
�
Move the selection marker to the Instr. cluster
submenu using
theæ orç button.
�
Press buttonj ork repeatedly
until you see this message in the dis-
play:
Language
.
The selection marker is on the current
setting.
�
Pressæ orç to select the lan-
guage to be used for the multifunction
display messages.
Available languages:�
German
�
English
�
French
�
Italian
�
Spanish
Function
Page
Select speedometer display
mode
164
Select language
164
Select display (speed display or
outside temperature) for status
display
165
Page 166 of 539
 for status display�
Move the selection marker with
theæ orç button to the
Instr.
cluster
submenu.")
165 Controls in detail
Control system
Selecting display (speed display or out-
side temperature) for status display�
Move the selection marker with
theæ orç button to the
Instr.
cluster
submenu.
�
Press buttonj ork repeatedly
until you see this message in the dis-
play:
Status line display
.
The selection marker is on the current
setting.
�
Press buttonæ orç to select
whether the speed or the outside tem-
perature appears in the multifunction
display.Time/Date submenu
Access the
Time/Date
submenu via the
Settings
menu. Use the
Time/Date
submenu to change the time and date dis-
play settings. The following functions are
available:Set time (hours)
This function is not available if your vehicle
is equipped with the Modular COMAND
System and navigation module*.
�
Move the selection marker to the Time/Date
submenu using theæ or
çbutton.
�
Press buttonj ork repeatedly
until you see this message in the dis-
play:
Clock, hours
.
The selection marker is on the hour set-
ting.
�
Press buttonæ orç to set the
hour.
Function
Page
Set time (hours)
165
Set time (minutes)
166
Set date (month)
166
Set date (day)
166
Set date (year)
167
iIf your vehicle is equipped with the
Modular COMAND System and naviga-
tion module, see separate COMAND
manual on how to set the date and
time.
Page 172 of 539

171 Controls in detail
Control system
Vehicle submenu
Access the
Vehicle
submenu via the
Settings...
menu. Use the
Vehicle
sub-
menu to make general vehicle settings.
The following functions are available:Adjusting compass zone
This function is not available if your vehicle
is equipped with the Modular COMAND
System and navigation module*.
Use this function to set the compass zone.
To set the compass zone:
�
Move the selection marker to the Vehicle
submenu using theæ
orç button.
�
Press buttonj ork repeatedly
until you see this message in the dis-
play:
Compass Adjustment Zone
.
The selection marker is on the current
setting.
�
Press buttonæ orç to set the
respective compass zone.For information on how to select the prop-
er geographic zone, see “Compass”
(
�page 295).
Calibrating compass
This function is not available if your vehicle
is equipped with the Modular COMAND
System and navigation module*.
Use this function to calibrate the compass
zone.
To calibrate the compass:
�
Move the selection marker to the Vehicle
submenu using theæ
orç button.
�
Press buttonj ork repeatedly
until you see this message in the dis-
play:
Compass Calibration
.
The selection marker is on the current
setting.
Function
Page
Adjusting compass zone
171
Calibrating compass
171
Display when ignition is
switched off
172
Set automatic locking
172
Limiting opening height of tail-
gate*
173
��
Page 173 of 539

172 Controls in detailControl system�
Press buttonæ to start calibrating
the compass.
Display when ignition is switched off
Use this function to select which message
will be shown in the multifunction display
when the ignition is being switched off.
�
Move the selection marker to the Vehicle
submenu using theæ
orç button.
�
Press buttonj ork repeatedly
until you see this message in the dis-
play:
Display when ignition is
turned off
.
The selection marker is on the current
setting.
�
Press buttonæ orç to select
the desired setting.Setting automatic locking
Use this function to activate or deactivate
the automatic central locking. With the au-
tomatic central locking system activated,
the vehicle is centrally locked at vehicle
speeds of approximately 9 mph
(15 km/h).
�
Move the selection marker to the Vehicle
submenu using theæ
orç button.
�
Press buttonj ork repeatedly
until you see this message in the dis-
play:
Automatic door lock
.
The selection marker is on the current
setting.
�
Press buttonæ orç to switch Automatic door lock
On or
Off
.
��
Page 175 of 539

174 Controls in detailControl system�
Move the selection marker with
theæ orç button to the
Convenience
submenu.
�
Press buttonj ork repeatedly
until you see this message in the multi-
function display:
Func. Easy-entry
feature
.
The selection marker is on the current
setting.
�
Press buttonæ orç to change
the easy-entry/exit setting.The following settings are available for the
easy-entry/exit feature:Setting parking position* for exterior
rear view mirror
Use the
Mirror adjustment parking aid
function to select whether the passen-
ger-side exterior rear view mirror should be
turned downward during parking maneu-
vers when reverse gearR is engaged. For
additional information, see “Activating ex-
terior rear view mirror parking position*”
(
�page 196).
�
Move the selection marker to the
Convenience
submenu using theæ
or çbutton.
�
Press buttonj ork repeatedly
until you see this message in the dis-
play:
Mirror adjustment parking
assist.
The selection marker is on the current
setting.
Off
The easy-entry/exit
feature is deactivat-
ed.
Steering col.
Only the steering col-
umn is moved.
Steer. col.+seat
Both the steering
column and the driv-
er’s seat are moved.
Page 176 of 539
175 Controls in detail
Control system
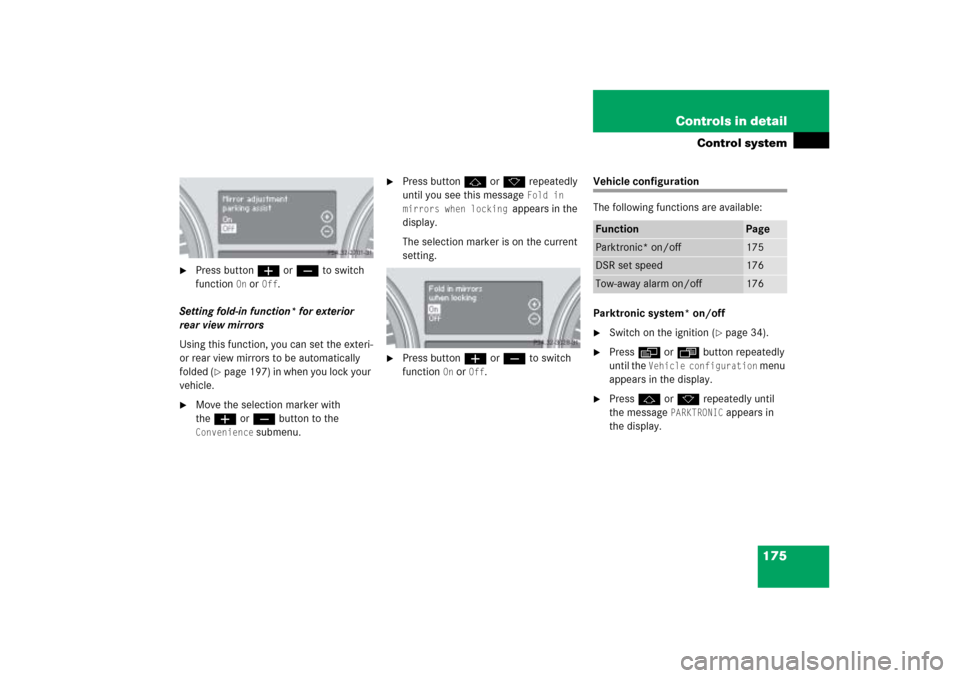
�
Press buttonæ orç to switch
function
On or
Off
.
Setting fold-in function* for exterior
rear view mirrors
Using this function, you can set the exteri-
or rear view mirrors to be automatically
folded (
�page 197) in when you lock your
vehicle.
�
Move the selection marker with
theæ orç button to the
Convenience
submenu.
�
Press buttonj ork repeatedly
until you see this message
Fold in
mirrors when locking
appears in the
display.
The selection marker is on the current
setting.
�
Press buttonæ orç to switch
function
On or
Off
.
Vehicle configuration
The following functions are available:
Parktronic system* on/off�
Switch on the ignition (
�page 34).
�
Pressè orÿ button repeatedly
until the
Vehicle configuration
menu
appears in the display.
�
Pressj ork repeatedly until
the message
PARKTRONIC
appears in
the display.
Function
Page
Parktronic* on/off
175
DSR set speed
176
Tow-away alarm on/off
176