Page 457 of 539

456 Practical hintsFlat tire
Preparing the vehicle�
Park the vehicle as far as possible from
moving traffic on a hard surface.
�
Turn on the hazard warning flashers.
�
Turn the steering wheel so that the
front wheels are in a straight ahead po-
sition.
�
Set the parking brake.
�
Shift automatic transmission to park
positionP.
Vehicles with Air suspension package*:
�
Do not open or close a door or tailgate
while mounting the spare wheel.
Vehicles with SmartKey:
�
Turn off the engine (
�page 34).
�
Remove the SmartKey from the starter
switch.Vehicles with KEYLESS-GO*:
�
Turn off the engine by pressing the
KEYLESS-GO* button once
(�page 63).
�
Open the driver’s door (this puts the
starter switch in position0, same as
with the SmartKey removed from the
starter switch). The driver’s door then
can be closed again.
�
Have any passenger exit the vehicle at
a safe distance from the roadway.
Warning!
G
The dimensions of the Minispare wheel are
different from those of the road wheels. As
a result, the vehicle handling characteristics
change when driving with a mounted
Minispare wheel. Adapt your driving style
accordingly.
The Minispare wheel is for temporary use
only. When driving with a Minispare wheel
mounted, ensure proper tire pressure and
do not exceed a vehicle speed of
50 mph (80 km/h).
Drive to the nearest Mercedes-Benz Light
Truck Center as soon as possible to have the
Minispare wheel replaced with a regular
road wheel.
Never operate the vehicle with more than
one spare wheel mounted.
Do not switch off the ESP
® when a
Minispare wheel is mounted.
iOpen doors only when conditions are
safe to do so.
Page 466 of 539

465 Practical hints
Battery
Step 1 (Disconnecting)
�
Turn off the engine and leave the igni-
tion switched on (
�page 34).
�
Depress parking brake firmly and set
automatic transmission to positionP.
�
Turn off all electrical consumers.
�
Read and observe safety instructions
and precautions (
�page 462).
�
Move the front passenger seat to the
most forward position (
�page 39).
Step 2 (Disconnecting)
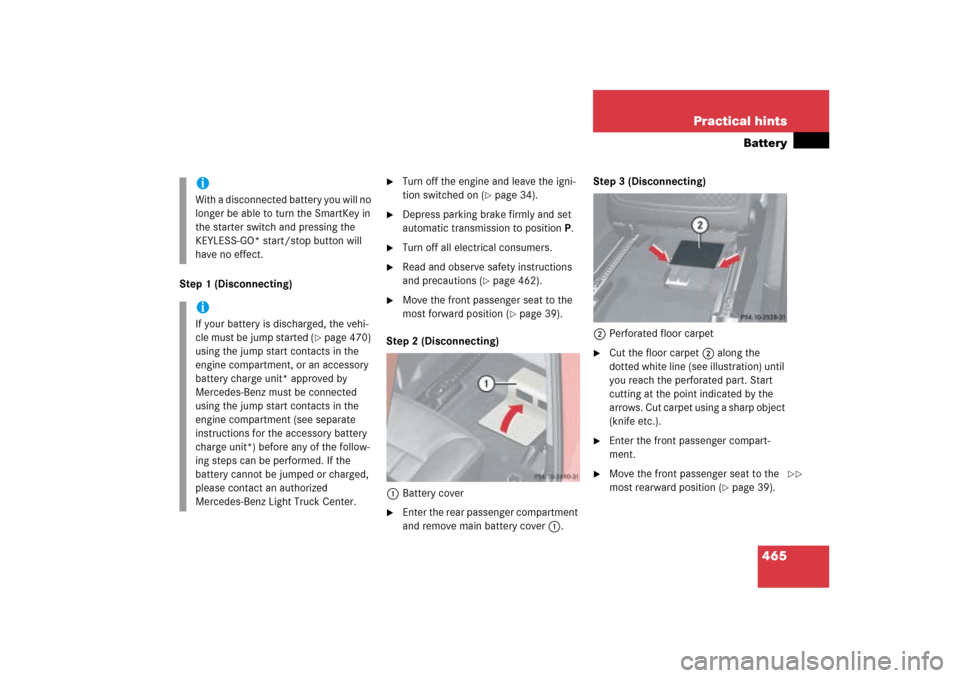
1Battery cover
�
Enter the rear passenger compartment
and remove main battery cover1.Step 3 (Disconnecting)
2Perforated floor carpet
�
Cut the floor carpet2 along the
dotted white line (see illustration) until
you reach the perforated part. Start
cutting at the point indicated by the
arrows. Cut carpet using a sharp object
(knife etc.).
�
Enter the front passenger compart-
ment.
�
Move the front passenger seat to the
most rearward position (
�page 39).
iWith a disconnected battery you will no
longer be able to turn the SmartKey in
the starter switch and pressing the
KEYLESS-GO* start/stop button will
have no effect.iIf your battery is discharged, the vehi-
cle must be jump started (
�page 470)
using the jump start contacts in the
engine compartment, or an accessory
battery charge unit* approved by
Mercedes-Benz must be connected
using the jump start contacts in the
engine compartment (see separate
instructions for the accessory battery
charge unit*) before any of the follow-
ing steps can be performed. If the
battery cannot be jumped or charged,
please contact an authorized
Mercedes-Benz Light Truck Center.
��
Page 472 of 539

471 Practical hints
Jump starting
The jump-start contacts are located in the
engine compartment.�
Make sure the two vehicles do not
touch.
�
Turn off all electrical consumers.
�
Apply parking brake.
�
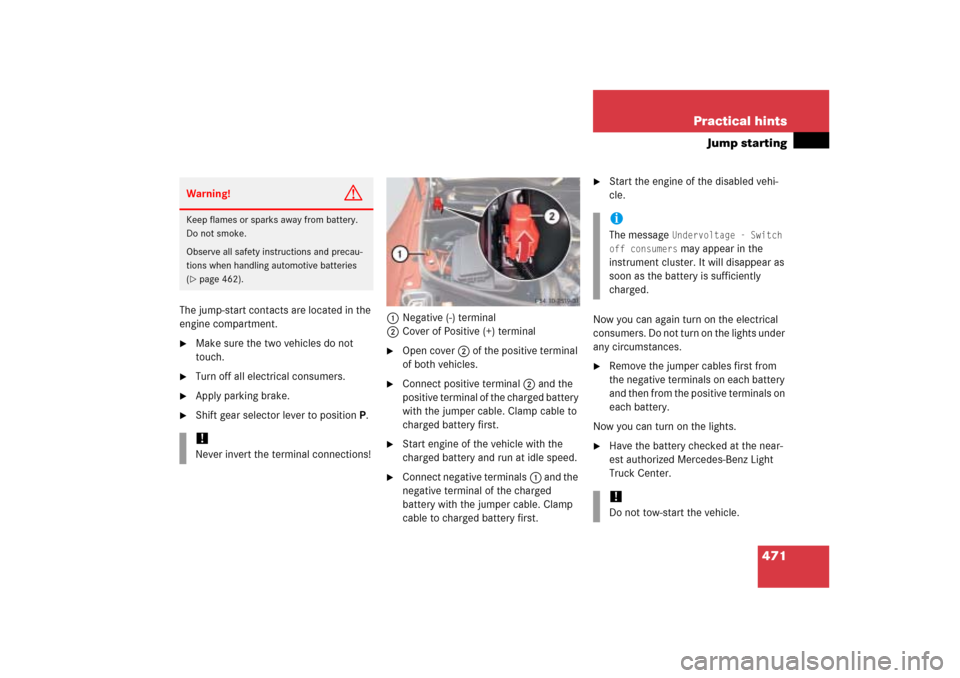
Shift gear selector lever to positionP.1Negative (-) terminal
2Cover of Positive (+) terminal
�
Open cover2 of the positive terminal
of both vehicles.
�
Connect positive terminal2 and the
positive terminal of the charged battery
with the jumper cable. Clamp cable to
charged battery first.
�
Start engine of the vehicle with the
charged battery and run at idle speed.
�
Connect negative terminals1 and the
negative terminal of the charged
battery with the jumper cable. Clamp
cable to charged battery first.
�
Start the engine of the disabled vehi-
cle.
Now you can again turn on the electrical
consumers. Do not turn on the lights under
any circumstances.
�
Remove the jumper cables first from
the negative terminals on each battery
and then from the positive terminals on
each battery.
Now you can turn on the lights.
�
Have the battery checked at the near-
est authorized Mercedes-Benz Light
Truck Center.
Warning!
G
Keep flames or sparks away from battery.
Do not smoke.
Observe all safety instructions and precau-
tions when handling automotive batteries
(�page 462).!Never invert the terminal connections!
iThe message
Undervoltage - Switch
off consumers may appear in the
instrument cluster. It will disappear as
soon as the battery is sufficiently
charged.
!Do not tow-start the vehicle.
Page 502 of 539

501 Technical terms
ABS
(A
ntilock B
rake S
ystem)
Prevents the wheels from locking up
during braking so that the vehicle can
continue to be steered.
Accessory weight
(
�page 365)
ADS*
(Adaptive D
amping S
ystem*)
Automatically adapts the optimum sus-
pension damping to prevailing driving
conditions.
Air suspension*
Automatically selects the optimum sus-
pension tuning and ride height for your
vehicle. Air suspension consists of two
components:
�
Adaptive Damping System
�
Vehicle level control
Air pressure
(
�page 365)Alignment bolt
Metal pin with thread. The centering
pin is an aid used when changing a tire
to align the wheel with the wheel hub.
Aspect ratio
(
�page 365)
Bar
(�page 365)
BAS
(Brake A
ssist S
ystem)
System for potentially reducing braking
distances in emergency braking situa-
tions. The system is activated when it
senses an emergency based on how
fast the brake is applied.
Bead
(
�page 365)
Bi-Xenon headlamps*
Headlamps which use an electric arc as
the light source and produce a more
intense light than filament headlamps.
Bi-Xenon headlamps produce low
beam and high beam.CAC
(C
ustomer A
ssistance C
enter)
Mercedes-Benz customer service
center, which can help you with any
questions about your vehicle and
provide assistance in the event of a
breakdown.
CAN system
(C
ontroller A
rea N
etwork)
Data bus network serving to control
vehicle functions such as door locking
or windshield wiping.
Cockpit
All instruments, switches, buttons and
indicator/warning lamps in the
passenger compartment needed for
vehicle operation and monitoring.
Cold tire inflation pressure
(
�page 365)
Page 511 of 539

510 IndexBrake pads
Message in display 408
Brakes 300
Warning lamp 383
Break-in period 298
Bulbs, replacing 443
Additional turn signals 443
Backup lamps 444
Brake lamps 444
Fog lamps 443
Front fog lamp 449
Front lamps 443
High beam 443
License plate lamps 444, 451
Low beam 443
Parking, standing lamp 443
Rear fog lamps 450
Rear side marker lamp bulbs 450
Side marker lamp 443
Side marker lamps 444
Turn signal lamps 443, 444C
CAC (Customer Assistance Center) 501
Calibrating
Compass 171
California
Important notice 11
Call priority
Tele Aid* 287
Calling up
Range (distance to empty) 178
Service indicator 372
CAN system 501
Capacities
Fuels, coolants, lubricants, etc. 493
Cargo compartment
Fuse box in 479
Interior lighting 145
Lamp 147
Tie-down rings 260
Cargo compartment cover* 265
Closing 265
Installing 265
Opening 265
Removing 265
Cargo tie-down rings 260Carpet
Cleaning 379
Catalytic converter 320
CD player
Operating 158
Center console 27
Lower part 28
PASS AIR BAG OFF indicator
lamp 393
Upper part 27
Central locking
Automatic 125
Switch 126
Switching on/off
(control system) 172
Unlocking from inside 126
Central locking switch 126
Certification label 484
Changing
SmartKey setting 173
Charging
Vehicle battery 469
CHECK ENGINE malfunction
indicator lamp 385, 386
Page 536 of 539

535 Index
Vehicle jack 431
Vehicle level control* 250, 506
Vehicle lighting
Checking 325
Vehicle loading terminology 365
Vehicle maximum load on the tire 368
Vehicle tool kit 430
Setting up the collapsible wheel
chock 432
Vehicle washing 376
VIN (Vehicle Identification Number) 506W
Warning indicators
Parktronic* 256
Warning sounds
Drivers seat belts 75
Parking brake 53
Warranty coverage 483
Washer fluid see Windshield washer fluid
Wear pattern (tires) 368
Weights 492
Wheel change
Tightening torque 461
Wheels
Rotating 368
Window curtain air bags 72
Windows see Side windows
Windshield
Defogging 208, 222
Refilling washer fluid 334
Replacing wiper blades 453
Washer fluid 333, 500
Washer system 500Windshield washer fluid 500
Message in display 427
Mixing ratio 500
Refilling 333
Wiping with 56
Windshield washer system 500
Windshield wipers 55
Fast wiper speed 55
Intermittent 55
Intermittent wiping 55
Interval wiping 56
Normal wiper speed 55
Rear window wiper/washer 57
Replacing wiper blades 453
Simultaneous wiping and washing 58
Single wipe 56
Switching on 55
Wiping with windshield washer
fluid 56
Page:
< prev 1-8 9-16 17-24