Page 386 of 539
385 Practical hints
What to do if …
Problem
Possible cause
Suggested solution
?
(USA only)
±
(Canada only)
The yellow engine malfunction
indicator lamp comes on while
driving.
There is a malfunction in:�
The fuel management
system
�
The ignition system
�
The emission control
system
�
Systems which affect
emissions
Such malfunctions may result
in excessive emissions values
and may switch the engine to
its limp-home (emergency op-
eration) mode (
�page 192).
�
Have the vehicle checked as soon as
possible by an authorized
Mercedes-Benz Light Truck Center.
An on-board diagnostic connector is
used by the service station to link the
vehicle to the shop diagnostics
system. It allows the accurate identifi-
cation of system malfunctions through
the readout of diagnostic trouble
codes. It is located in the front left area
of the footwell next to the parking
brake pedal.
Page 400 of 539

399 Practical hints
What to do if …
Display message
Possible cause
Possible solution
ESP
unavailable
See Operator’s Manual
In addition, the yellow ESP
® warning
lampv comes on.
The ESP
® is deactivated because of
a malfunction or interrupted power
supply.
�
Continue driving with added caution.
�
Visit an authorized Mercedes-Benz Light
Truck Center as soon as possible.
Failure to follow these instructions increases
the risk of accident.
If the yellow ESP
® warning
lampv flashes while driving and
this message appears, the electron-
ic traction system has switched off
to prevent overheating of the drive
wheel brakes.
As soon as the brakes have cooled off, the
electronic traction system switches on again.
The message in the multifunction display disap-
pears and the ESP
® warning lampv go out.
The self-diagnosis has not yet been
completed.
The display will clear after driving a short dis-
tance at a vehicle speed of above 12 mph
(20 km/h).
Malfunction
Visit workshop
In addition, the yellow ESP
® warning
lampv comes on.
The ESP
® has detected a malfunc-
tion and switched off.
The ABS may still be operational.
�
Continue driving with added caution.
�
Have the system checked at an authorized
Mercedes-Benz Light Truck Center as soon
as possible.
Failure to follow these instructions increases
the risk of an accident.
Page 445 of 539

444 Practical hintsReplacing bulbsRear lamps Notes on bulb replacement
�
Only use 12 volt bulbs of the same type
and with the specified watt rating.
�
Switch lights off before changing a bulb
to prevent short circuits.
�
Always use a clean lint-free cloth when
handling bulbs.
�
Your hands should be dry and free of oil
and grease.
�
If the newly installed bulb does not
come on, visit an authorized
Mercedes-Benz Light Truck Center.
Lamp
Type
8
High mounted brake
lamp
LED
9
Brake lamp
P21W
a
Backup lamp
P21W
b
Turn signal lamp
PY 21 W
c
Side marker lamp
P21/4W
d
Tail, parking, standing
lamp, rear fog lamp
(only driver’s side)
P21/4W
e
License plate lamps
C5W
Warning!
G
Bulbs and bulb sockets can be very hot.
Allow the lamp to cool down before chang-
ing a bulb.
Keep bulbs out of reach of children.
Halogen lamps contain pressurized gas.
A bulb can explode if you:�
touch or move it when hot
�
drop the bulb
�
scratch the bulb
Wear eye and hand protection.
Because of high voltage in Xenon lamps, it is
dangerous to replace the bulb or repair the
lamp and its components. We recommend
that you have such work done by a qualified
technician.
Page 446 of 539
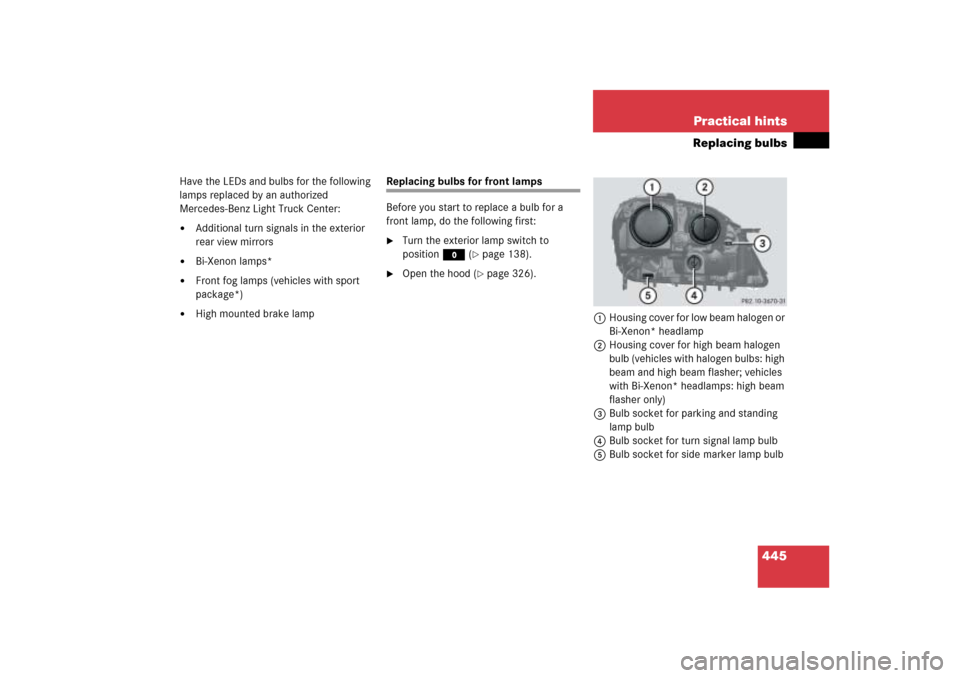
445 Practical hints
Replacing bulbs
Have the LEDs and bulbs for the following
lamps replaced by an authorized
Mercedes-Benz Light Truck Center:�
Additional turn signals in the exterior
rear view mirrors
�
Bi-Xenon lamps*
�
Front fog lamps (vehicles with sport
package*)
�
High mounted brake lamp
Replacing bulbs for front lamps
Before you start to replace a bulb for a
front lamp, do the following first:�
Turn the exterior lamp switch to
positionM (
�page 138).
�
Open the hood (
�page 326).
1Housing cover for low beam halogen or
Bi-Xenon* headlamp
2Housing cover for high beam halogen
bulb (vehicles with halogen bulbs: high
beam and high beam flasher; vehicles
with Bi-Xenon* headlamps: high beam
flasher only)
3Bulb socket for parking and standing
lamp bulb
4Bulb socket for turn signal lamp bulb
5Bulb socket for side marker lamp bulb
Page 472 of 539

471 Practical hints
Jump starting
The jump-start contacts are located in the
engine compartment.�
Make sure the two vehicles do not
touch.
�
Turn off all electrical consumers.
�
Apply parking brake.
�
Shift gear selector lever to positionP.1Negative (-) terminal
2Cover of Positive (+) terminal
�
Open cover2 of the positive terminal
of both vehicles.
�
Connect positive terminal2 and the
positive terminal of the charged battery
with the jumper cable. Clamp cable to
charged battery first.
�
Start engine of the vehicle with the
charged battery and run at idle speed.
�
Connect negative terminals1 and the
negative terminal of the charged
battery with the jumper cable. Clamp
cable to charged battery first.
�
Start the engine of the disabled vehi-
cle.
Now you can again turn on the electrical
consumers. Do not turn on the lights under
any circumstances.
�
Remove the jumper cables first from
the negative terminals on each battery
and then from the positive terminals on
each battery.
Now you can turn on the lights.
�
Have the battery checked at the near-
est authorized Mercedes-Benz Light
Truck Center.
Warning!
G
Keep flames or sparks away from battery.
Do not smoke.
Observe all safety instructions and precau-
tions when handling automotive batteries
(�page 462).!Never invert the terminal connections!
iThe message
Undervoltage - Switch
off consumers may appear in the
instrument cluster. It will disappear as
soon as the battery is sufficiently
charged.
!Do not tow-start the vehicle.
Page 502 of 539

Prevents the wheels from locking up
during braking so that the vehicle can
continue to be steered.
Accessory weight
(
�page 365)
ADS*
(Adaptive D
a")
501 Technical terms
ABS
(A
ntilock B
rake S
ystem)
Prevents the wheels from locking up
during braking so that the vehicle can
continue to be steered.
Accessory weight
(
�page 365)
ADS*
(Adaptive D
amping S
ystem*)
Automatically adapts the optimum sus-
pension damping to prevailing driving
conditions.
Air suspension*
Automatically selects the optimum sus-
pension tuning and ride height for your
vehicle. Air suspension consists of two
components:
�
Adaptive Damping System
�
Vehicle level control
Air pressure
(
�page 365)Alignment bolt
Metal pin with thread. The centering
pin is an aid used when changing a tire
to align the wheel with the wheel hub.
Aspect ratio
(
�page 365)
Bar
(�page 365)
BAS
(Brake A
ssist S
ystem)
System for potentially reducing braking
distances in emergency braking situa-
tions. The system is activated when it
senses an emergency based on how
fast the brake is applied.
Bead
(
�page 365)
Bi-Xenon headlamps*
Headlamps which use an electric arc as
the light source and produce a more
intense light than filament headlamps.
Bi-Xenon headlamps produce low
beam and high beam.CAC
(C
ustomer A
ssistance C
enter)
Mercedes-Benz customer service
center, which can help you with any
questions about your vehicle and
provide assistance in the event of a
breakdown.
CAN system
(C
ontroller A
rea N
etwork)
Data bus network serving to control
vehicle functions such as door locking
or windshield wiping.
Cockpit
All instruments, switches, buttons and
indicator/warning lamps in the
passenger compartment needed for
vehicle operation and monitoring.
Cold tire inflation pressure
(
�page 365)
Page 511 of 539

510 IndexBrake pads
Message in display 408
Brakes 300
Warning lamp 383
Break-in period 298
Bulbs, replacing 443
Additional turn signals 443
Backup lamps 444
Brake lamps 444
Fog lamps 443
Front fog lamp 449
Front lamps 443
High beam 443
License plate lamps 444, 451
Low beam 443
Parking, standing lamp 443
Rear fog lamps 450
Rear side marker lamp bulbs 450
Side marker lamp 443
Side marker lamps 444
Turn signal lamps 443, 444C
CAC (Customer Assistance Center) 501
Calibrating
Compass 171
California
Important notice 11
Call priority
Tele Aid* 287
Calling up
Range (distance to empty) 178
Service indicator 372
CAN system 501
Capacities
Fuels, coolants, lubricants, etc. 493
Cargo compartment
Fuse box in 479
Interior lighting 145
Lamp 147
Tie-down rings 260
Cargo compartment cover* 265
Closing 265
Installing 265
Opening 265
Removing 265
Cargo tie-down rings 260Carpet
Cleaning 379
Catalytic converter 320
CD player
Operating 158
Center console 27
Lower part 28
PASS AIR BAG OFF indicator
lamp 393
Upper part 27
Central locking
Automatic 125
Switch 126
Switching on/off
(control system) 172
Unlocking from inside 126
Central locking switch 126
Certification label 484
Changing
SmartKey setting 173
Charging
Vehicle battery 469
CHECK ENGINE malfunction
indicator lamp 385, 386
Page 524 of 539

523 Index
Operating
CD player 158
Garage door opener 294
Integrated remote control 294
Radio 157
Radio transmitters 320
Telephone* 178
Vehicle outside the USA or
Canada 13
Operating safety 17
Operator’s Manual 10
Ornamental moldings 377
Outside temperature indicator 149
Overhead control panel 29
Overspeed range 504P
Paintwork 375
Panic alarm 91
Panic button on SmartKey 91
Panic button on SmartKey with
KEYLESS-GO* 91
Parcel net in front passenger
footwell 270
Parking 301
Parking and locking 60
Parking brake 52, 61
Engaging 61
Message in display 409
Releasing 52
Parking position*
Exterior rear view mirrors 174
Parking, standing lamp
Replacing bulbs 443
Parking/standing lamp bulb
Replacing 448
Parktronic (Parking assist)* 504
Parktronic system*
Cleaning system sensor 377
Range of the sensors 255
Sensor cover 377Parktronic*
Warning indicators 256
Parktronic* system
Malfunction 258
Switching off 257
Switching on 257
Parktronic* system (Parking assist) 254
Partition net* 263
Engaging 263
Removing 264
Tightening 264
Parts see Parts service
Parts service 482
Passenger compartment 319
Passenger safety see Occupant safety
Pedals 299
Phone book*
Loading 180
Quick search 180
Phone number*
Dialing 180
Redialing 181
Plastic and rubber parts
Cleaning 380
Page:
< prev 1-8 9-16 17-24

±
(Canada only)
The yellow engine malfunction
indicator lamp comes on while
driving.
There is a malfunct")