Page 430 of 539
429 Practical hints
What to do if …
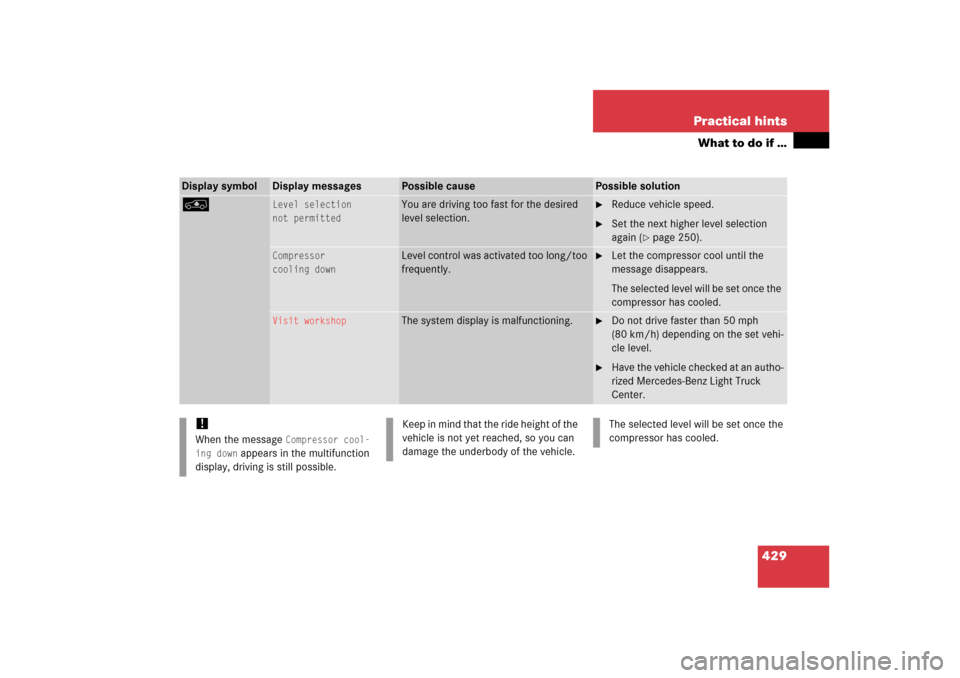
Display symbol
Display messages
Possible cause
Possible solution
>
Level selection
not permitted
You are driving too fast for the desired
level selection.
�
Reduce vehicle speed.
�
Set the next higher level selection
again (
�page 250).
Compressor
cooling down
Level control was activated too long/too
frequently.
�
Let the compressor cool until the
message disappears.
The selected level will be set once the
compressor has cooled.
Visit workshop
The system display is malfunctioning.
�
Do not drive faster than 50 mph
(80 km/h) depending on the set vehi-
cle level.
�
Have the vehicle checked at an autho-
rized Mercedes-Benz Light Truck
Center.
!When the message
Compressor cool-
ing down
appears in the multifunction
display, driving is still possible.
Keep in mind that the ride height of the
vehicle is not yet reached, so you can
damage the underbody of the vehicle.
The selected level will be set once the
compressor has cooled.
Page 432 of 539

431 Practical hints
Where will I find ...?
Trunk area shown with spare wheel
removed1Wheel bolt wrench with screwdriver
2Vehicle jack
3Collapsible wheel chock
4Spare fuses, fuse chart, fuse extractor
5Towing eye bolt
6Alignment bolt
7Wheel bolts for 17" light alloy rims or
Minispare wheel1Wheel bolt wrench
2Screwdriver
3Interchangeable slot
Screwdriver2 is placed inside the handle
of wheelbolt wrench1.Vehicle jack
iVehicles with scissors-type jack see
separate instructions.
!To prevent damage, always disengage
the elastic strap and lower the cargo
compartment floor (
�page 430) be-
fore closing the tailgate.
Warning!
G
The jack is designed exclusively for jacking
up the vehicle at the jack take-up brackets
built into both sides of the vehicle. To help
avoid personal injury, use the jack only to lift
the vehicle during a wheel change. Never
get beneath the vehicle while it is supported
by the jack. Keep hands and feet away from
the area under the lifted vehicle. Always
firmly set parking brake and block wheels
before raising vehicle with jack.
Do not disengage parking brake while the
vehicle is raised. Be certain that the jack is
always vertical (plumb line) when in use, es-
pecially on hills. Always try to use the jack
on level surface.
Make sure that the jack arm is fully seated
in the jack take-up bracket. Always lower
the vehicle onto sufficient capacity jack-
stands before working under the vehicle.
Page 441 of 539

440 Practical hintsReplacing SmartKey batteriesIf the batteries in the SmartKey or the
SmartKey with KEYLESS-GO* are dis-
charged, the vehicle can no longer be
locked or unlocked. It is recommended to
have the batteries replaced at an autho-
rized Mercedes-Benz Light Truck Center.
Batteries contain materials that can harm
the environment if disposed of improperly.
Recycling of batteries is the preferred
method of disposal. Many states require
sellers of batteries to accept old batteries
for recycling.
SmartKey
Replacement batteries: Lithium, type
CR 2025 or equivalent.�
Remove mechanical key1
(�page 435).1Mechanical key
2Slide
3Battery compartment
�
Insert the mechanical key1 in direc-
tion of arrow in side opening.
�
Using mechanical key1 push gray
slide2 to unlatch battery
compartment3.
�
Pull the battery compartment3 out of
the housing in direction of arrow.
Warning!
G
Keep the batteries out of reach of children.
If a battery is swallowed, seek medical help
immediately.
iWhen inserting the batteries, make
sure they are clean and free of lint.iWhen replacing batteries, always
replace both batteries.
The required replacement batteries are
available at any Mercedes-Benz Light
Truck Center.
Page 444 of 539

443 Practical hints
Replacing bulbs
�Replacing bulbs
Bulbs
Safe vehicle operation depends on proper
exterior lighting and signaling. It is there-
fore essential that all bulbs and lamp as-
semblies are in good working order at all
times.
Correct headlamp adjustment is extremely
important. Have headlamps checked and
readjusted at regular intervals. See an
authorized Mercedes-Benz Light Truck
Center for headlamp adjustment.Front lamps
iSubstitute bulbs will be brought into
use when the following lamps malfunc-
tion:�
Brake lamps
�
Parking lamps
�
Turn signal lamps
�
Tail lamps
Observe the messages in the multi-
function display (
�page 418).
iIf the headlamps or front fog lamps are
fogged up on the inside as a result of
high humidity, driving the vehicle a dis-
tance with the lights on should clear up
the fogging.
Lamp
Type
1
Parking and standing
lamp
W5W
2
High beam/high
beam flasher lamp
H7 (55 W)
3
Low beam
1
1Vehicles with Bi-Xenon headlamps*: Do not re-
place the Bi-Xenon bulbs yourself. See your autho-
rized Mercedes-Benz Light Truck Center.
H7 (55 W)
Bi-Xenon*:
D2S-35 W
4
Additional turn signal
lamp
LED
5
Side marker lamp
WY 5 W
6
Turn signal lamp
3457 AK S-8
(30/2.2 cp
bulb)
7
Front fog lamp
H11 (55 W)
Page 445 of 539

444 Practical hintsReplacing bulbsRear lamps Notes on bulb replacement
�
Only use 12 volt bulbs of the same type
and with the specified watt rating.
�
Switch lights off before changing a bulb
to prevent short circuits.
�
Always use a clean lint-free cloth when
handling bulbs.
�
Your hands should be dry and free of oil
and grease.
�
If the newly installed bulb does not
come on, visit an authorized
Mercedes-Benz Light Truck Center.
Lamp
Type
8
High mounted brake
lamp
LED
9
Brake lamp
P21W
a
Backup lamp
P21W
b
Turn signal lamp
PY 21 W
c
Side marker lamp
P21/4W
d
Tail, parking, standing
lamp, rear fog lamp
(only driver’s side)
P21/4W
e
License plate lamps
C5W
Warning!
G
Bulbs and bulb sockets can be very hot.
Allow the lamp to cool down before chang-
ing a bulb.
Keep bulbs out of reach of children.
Halogen lamps contain pressurized gas.
A bulb can explode if you:�
touch or move it when hot
�
drop the bulb
�
scratch the bulb
Wear eye and hand protection.
Because of high voltage in Xenon lamps, it is
dangerous to replace the bulb or repair the
lamp and its components. We recommend
that you have such work done by a qualified
technician.
Page 446 of 539
445 Practical hints
Replacing bulbs
Have the LEDs and bulbs for the following
lamps replaced by an authorized
Mercedes-Benz Light Truck Center:�
Additional turn signals in the exterior
rear view mirrors
�
Bi-Xenon lamps*
�
Front fog lamps (vehicles with sport
package*)
�
High mounted brake lamp
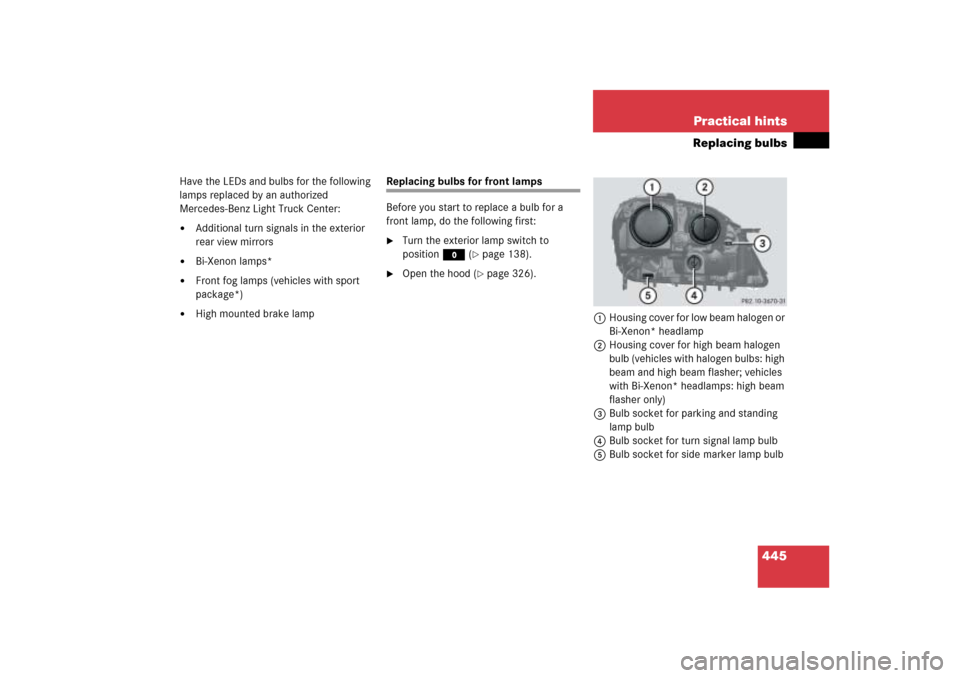
Replacing bulbs for front lamps
Before you start to replace a bulb for a
front lamp, do the following first:�
Turn the exterior lamp switch to
positionM (
�page 138).
�
Open the hood (
�page 326).
1Housing cover for low beam halogen or
Bi-Xenon* headlamp
2Housing cover for high beam halogen
bulb (vehicles with halogen bulbs: high
beam and high beam flasher; vehicles
with Bi-Xenon* headlamps: high beam
flasher only)
3Bulb socket for parking and standing
lamp bulb
4Bulb socket for turn signal lamp bulb
5Bulb socket for side marker lamp bulb
Page 450 of 539
449 Practical hints
Replacing bulbs
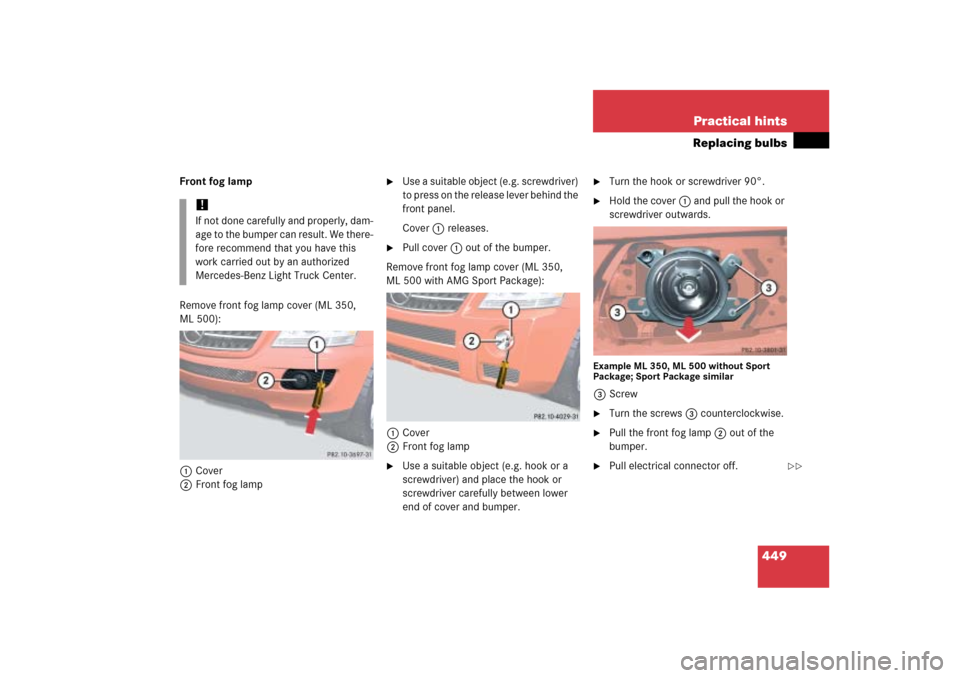
Front fog lamp
Remove front fog lamp cover (ML 350,
ML 500):
1Cover
2Front fog lamp
�
Use a suitable object (e.g. screwdriver)
to press on the release lever behind the
front panel.
Cover1 releases.
�
Pull cover1 out of the bumper.
Remove front fog lamp cover (ML 350,
ML 500 with AMG Sport Package):
1Cover
2Front fog lamp
�
Use a suitable object (e.g. hook or a
screwdriver) and place the hook or
screwdriver carefully between lower
end of cover and bumper.
�
Turn the hook or screwdriver 90°.
�
Hold the cover1 and pull the hook or
screwdriver outwards.
Example ML 350, ML 500 without Sport
Package; Sport Package similar3Screw�
Turn the screws3 counterclockwise.
�
Pull the front fog lamp2 out of the
bumper.
�
Pull electrical connector off.
!If not done carefully and properly, dam-
age to the bumper can result. We there-
fore recommend that you have this
work carried out by an authorized
Mercedes-Benz Light Truck Center.
��
Page 453 of 539
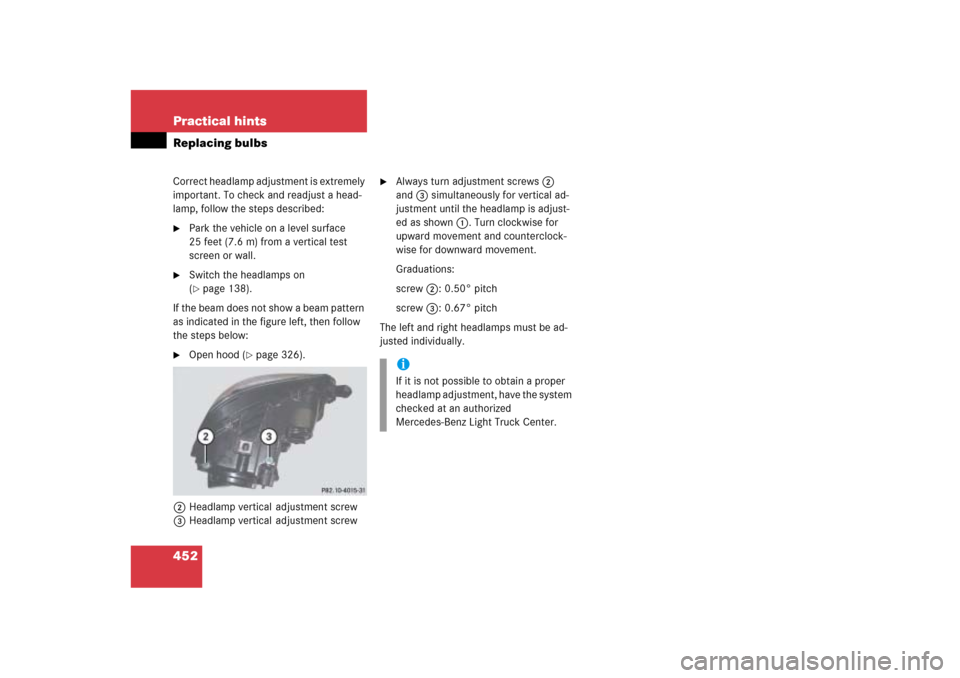
452 Practical hintsReplacing bulbsCorrect headlamp adjustment is extremely
important. To check and readjust a head-
lamp, follow the steps described:�
Park the vehicle on a level surface
25 feet (7.6 m) from a vertical test
screen or wall.
�
Switch the headlamps on
(�page 138).
If the beam does not show a beam pattern
as indicated in the figure left, then follow
the steps below:
�
Open hood (
�page 326).
2Headlamp vertical adjustment screw
3Headlamp vertical adjustment screw
�
Always turn adjustment screws2
and3 simultaneously for vertical ad-
justment until the headlamp is adjust-
ed as shown1. Turn clockwise for
upward movement and counterclock-
wise for downward movement.
Graduations:
screw2:0.50° pitch
screw3:0.67° pitch
The left and right headlamps must be ad-
justed individually.iIf it is not possible to obtain a proper
headlamp adjustment, have the system
checked at an authorized
Mercedes-Benz Light Truck Center.