Page 27 of 539
26 At a glanceMultifunction steering wheel
Item
Page
1
Multifunction display
150
Operating control system
151
2
Telephone*:
Press buttonsto take a call, or
to dial a calltto end a call, or
to reject an incoming
call
3
Selecting the submenu or
setting the volume:
Press buttonæup/to increaseçdown/to decrease
Item
Page
4
Moving within a menu:
Press buttonjfor next displaykfor previous display
5
Menu systems:
Press buttonèfor next menuÿfor previous menu
Page 39 of 539

38 Getting startedAdjustingSeatsWarning!
G
All seat, head restraint, steering wheel, and
rear view mirror adjustments, as well as fas-
tening of seat belts, must be done before
the vehicle is put into motion.Warning!
G
Do not adjust the driver’s seat while driving.
Adjusting the seat while driving could cause
the driver to lose control of the vehicle.
Never ride in a moving vehicle with the seat
back in an excessively reclined position as
this can be dangerous. You could slide un-
der the seat belt in a collision. If you slide
under it, the belt would apply force at the ab-
domen or neck. That could cause serious or
fatal injuries. The seat backrest and seat
belts provide the best restraint when the
wearer is in a nearly upright position and
belts are properly positioned on the body.
Your seat must be adjusted so that you can
correctly fasten your seat belt (
�page 39).
Never place hands under the seat or near
any moving parts while a seat is being
adjusted.
Warning!
G
When leaving the vehicle, always remove the
SmartKey or SmartKey with KEYLESS-GO*
from the starter switch, take it with you, and
lock the vehicle.
Even with the SmartKey or the SmartKey
with KEYLESS-GO* removed from the
starter switch or the SmartKey with
KEYLESS-GO* removed from the vehicle,
the power seats can be operated when the
respective door is open.
Therefore, do not leave children unattended
in the vehicle, or with access to an unlocked
vehicle. Unsupervised use of vehicle equip-
ment may cause an accident and/or serious
personal injury.
Warning!
G
According to accident statistics, children
are safer when properly restrained in the
rear seating positions than in the front seat-
ing position. Thus, we strongly recommend
that children be placed in the rear seats
whenever possible. Regardless of seating
position, children 12 years old and under
must be seated and properly secured in an
appropriate infant, or toddler restraint, or
booster seat recommended for the size and
weight of the child. For additional
information, see “Children in the vehicle”
(�page 78).
A child’s risk of serious or fatal injuries is
significantly increased if the child restraints
are not properly secured in the vehicle
and/or the child is not properly secured in
the child restraint.
Page 40 of 539

39 Getting started
Adjusting
Seat adjustment
The seat adjustment switch is located on
the entry side of each front seat base.
1 Head restraint height*
2Seat cushion tilt
3Seat height
4Backrest tilt
5Seat fore and aft adjustment�
Switch on the ignition (
�page 34).
or
�
Open the respective door.Seat fore and aft adjustment
�
Press the switch forward or backward
in the direction of arrow5.
Adjust seat to a comfortable seating
position that still allows you to reach
the accelerator/brake pedal safely.
The position should be as far to the rear
as possible, consistent with ability to
properly operate controls.
Seat height
�
Press the switch up or down in the
direction of arrow3.
!When moving the seat, make sure
there are no items in the footwell or
behind the seat. Otherwise you could
damage the seat.
When the rear bench seat is folded for-
ward, the front seats cannot be moved
to the rearmost position. Otherwise
you could damage the front seats and
the rear bench seat.!When adjusting the backrest tilt and
head restraint height, make sure that
the sun visor is folded up. If the head
restraint is in the uppermost position, it
could hit and damage the sun visor.
iThe memory function* (
�page 135)
lets you store the setting for the seat
positions together with the setting for
the steering wheel and the exterior rear
view mirrors.
Page 41 of 539

40 Getting startedAdjustingSeat cushion tilt�
Press the switch up or down in the
direction of arrow2 until your upper
legs are lightly supported.
Seat backrest tilt
�
Press the switch forward or backward
in the direction of arrow4 until your
arms are slightly angled when holding
the steering wheel.Head restraint heightVehicles with memory function*:
�
Press switch1 (
�page 39) up or
down in the direction of arrow.
Vehicles without memory function*:
1Release button
Raising:
�
Manually adjust the height of the head
restraint by pulling it upward.
If the head restraint is fully retracted,
push release button1 in direction of
arrow and pull the head restraint up.
Warning!
G
For your protection, drive only with properly
positioned head restraints.
Adjust head restraint so that the center of
the head restraint supports the back of the
head at eye level. This will reduce the poten-
tial for injury to the head and neck in the
event of an accident or similar situation.
Do not drive the vehicle without the seat
head restraints. Head restraints are intend-
ed to help reduce injuries during an acci-
dent.iAdjust the head restraint in such a way
that it is as close to the head as possi-
ble.
Page 42 of 539
41 Getting started
Adjusting
Lowering:�
To lower the head restraint, push
release button1 in direction of arrow
and press down on the head restraint.
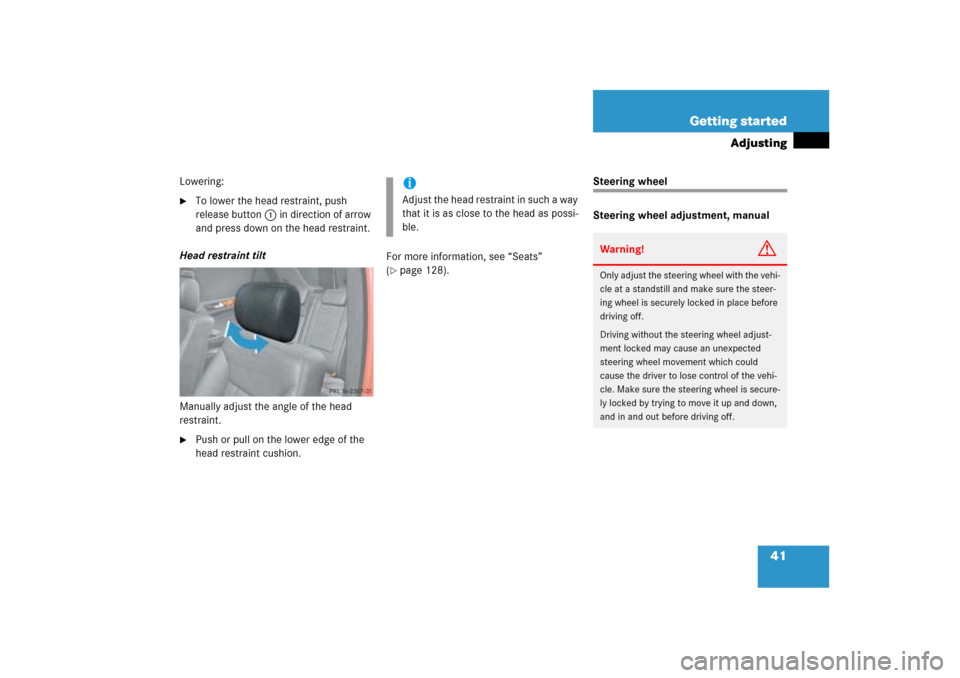
Head restraint tilt
Manually adjust the angle of the head
restraint.
�
Push or pull on the lower edge of the
head restraint cushion.For more information, see “Seats”
(
�page 128).
Steering wheel
Steering wheel adjustment, manual
iAdjust the head restraint in such a way
that it is as close to the head as possi-
ble.
Warning!
G
Only adjust the steering wheel with the vehi-
cle at a standstill and make sure the steer-
ing wheel is securely locked in place before
driving off.
Driving without the steering wheel adjust-
ment locked may cause an unexpected
steering wheel movement which could
cause the driver to lose control of the vehi-
cle. Make sure the steering wheel is secure-
ly locked by trying to move it up and down,
and in and out before driving off.
Page 43 of 539

42 Getting startedAdjustingThe adjustment handle for manual steering
wheel adjustment is located under the
steering column.�
To unlock the steering column, pull
handle out to its stop limit.
�
Move steering wheel to the desired
position.
Make sure your legs can move freely
and that all the displays (including
malfunction and indicator lamps) on
the instrument cluster are clearly
visible.
�
Push handle back to its original posi-
tion to relock the steering column.
The steering column is once again
locked into position.
�
Make sure the steering column is se-
curely locked by trying to move the
steering wheel up and down, in and out
before driving off.Steering wheel adjustment, electrical*!Do not drive the vehicle until you have
properly locked the steering column.
Warning!
G
Do not adjust the steering wheel while driv-
ing. Adjusting the steering wheel while driv-
ing could cause the driver to lose control of
the vehicle.
When leaving the vehicle, always remove the
SmartKey or SmartKey with KEYLESS-GO*
from the starter switch, take it with you, and
lock the vehicle.
Even with the SmartKey or SmartKey with
KEYLESS-GO* removed from the starter
switch or the SmartKey with KEYLESS-GO*
removed from the vehicle, the steering
wheel adjustment feature can be operated
when the driver’s door is open. Therefore,
do not leave children unattended in the ve-
hicle, or with access to an unlocked vehicle.
Unsupervised use of vehicle equipment may
cause an accident and/or serious personal
injury.
Page 44 of 539
.
1Adjusting steering column, in or out
2Adjusting steering column, up or down�
Swit")
43 Getting started
Adjusting
The stalk for steering wheel adjustment is
located on the steering column (lower left).
1Adjusting steering column, in or out
2Adjusting steering column, up or down�
Switch on the ignition (
�page 34).
or
�
Open the driver’s door.Adjusting steering column in or out
�
Move stalk forward or back in the direc-
tion of arrow1 until a comfortable
steering wheel position is reached with
your arms slightly bent at the elbow.
Adjusting steering column up or down
�
Move stalk up or down in the direction
of arrow2.
Make sure your legs can move freely
and that all the displays (including
malfunction and indicator lamps) on
the instrument cluster are clearly
visible.
Mirrors
Adjust the interior and exterior rear view
mirrors before driving so that you have a
good view of the road and traffic condi-
tions.
iThe memory function* (
�page 135)
lets you store the setting for the seat
position together with the setting for
the steering wheel and the exterior rear
view mirrors.
Warning!
G
In case of an accident, liquid electrolyte may
escape the mirror housing if the mirror glass
breaks.
Electrolyte has an irritating effect. Do not al-
low the liquid to come into contact with
eyes, skin, clothing, or respiratory system.
In case it does, immediately flush affected
area with water, and seek medical help if
necessary.!Electrolyte drops coming into contact
with the vehicle paint finish can only be
completely removed while in their
liquid state and by applying plenty of
water.
Page 45 of 539
.
Exterior rear view mirrorsThe bu")
44 Getting startedAdjustingInterior rear view mirror�
Manually adjust the interior rear view
mirror.
For more information, see “Rear view mir-
rors” (
�page 194).
Exterior rear view mirrorsThe buttons are located on the driver’s
door.
1Driver’s side exterior rear view mirror
button
2Adjustment button
3Passenger-side exterior rear view mir-
ror button
�
Switch on the ignition (
�page 34).
�
Press button1 for the driver’s side ex-
terior rear view mirror or button3 for
the passenger-side exterior rear view
mirror.
The indicator lamp on the respective
button comes on for
approximately 15 seconds.
�
Push adjustment button2 up, down,
left, or right according to the desired
setting.
Warning!
G
Exercise care when using the
passenger-side exterior rear view mirror.
The mirror surface is convex (outwardly
curved surface for a wider field of view). Ob-
jects in mirror are closer than they appear.
Check your interior rear view mirror or
glance over your shoulder before changing
lanes.
iIf you do not make adjustments to the
selected exterior rear view mirror
within 15 seconds, the indicator lamp
goes out. You then will have to select
the desired exterior rear view mirror
again before any adjustments can be
made. Adjustments can only be made
with the indicator lamp for the respec-
tive exterior rear view mirror button
illuminated.iThe memory function* (
�page 135)
lets you store the setting for the seat
position together with the setting for
the steering wheel and the exterior rear
view mirrors.
At low ambient temperatures, the
mirrors will be heated automatically.