Page 19 of 539
18 IntroductionProblems with your vehicleIf you should experience a problem with your vehicle, particularly one that you believe may affect its safe operation, we urge you to
immediately contact an authorized Mercedes-Benz Light Truck Center to have the problem diagnosed and corrected if required. If the
matter is not handled to your satisfaction, please discuss the problem with the Mercedes-Benz Light Truck Center management, or if
necessary contact us at one of the following addresses:
In the USA:
Customer Assistance Center
Mercedes-Benz USA, LLC
One Mercedes Drive
Montvale, NJ 07645-0350
In Canada:
Customer Relations Department
Mercedes-Benz Canada, Inc.
98 Vanderhoof Avenue
Toronto, Ontario, M4G 4C9
Page 29 of 539
28 At a glanceCenter consoleLower part
Item
Page
1
Ashtray with cigarette light-
er*
Vehicles without ashtray*:
Storage compartment with
electrical outlet
275
271
2
Cup holder
274
3
Button for storage tray
272
4
Button for storage compart-
ment (incl. coin holder)
272
5
Card, ticket holder
Page 30 of 539
29 At a glance
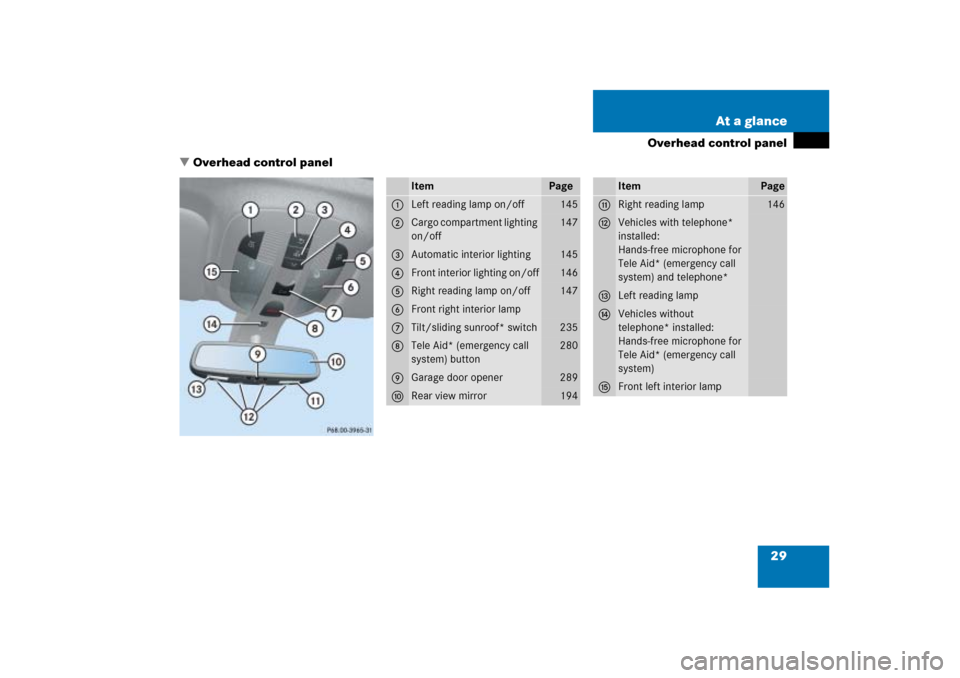
Overhead control panel
�Overhead control panel
Item
Page
1
Left reading lamp on/off
145
2
Cargo compartment lighting
on/off
147
3
Automatic interior lighting
145
4
Front interior lighting on/off
146
5
Right reading lamp on/off
147
6
Front right interior lamp
7
Tilt/sliding sunroof* switch
235
8
Tele Aid* (emergency call
system) button
280
9
Garage door opener
289
a
Rear view mirror
194
Item
Page
b
Right reading lamp
146
c
Vehicles with telephone*
installed:
Hands-free microphone for
Tele Aid* (emergency call
system) and telephone*
d
Left reading lamp
e
Vehicles without
telephone* installed:
Hands-free microphone for
Tele Aid* (emergency call
system)
f
Front left interior lamp
Page 41 of 539

40 Getting startedAdjustingSeat cushion tilt�
Press the switch up or down in the
direction of arrow2 until your upper
legs are lightly supported.
Seat backrest tilt
�
Press the switch forward or backward
in the direction of arrow4 until your
arms are slightly angled when holding
the steering wheel.Head restraint heightVehicles with memory function*:
�
Press switch1 (
�page 39) up or
down in the direction of arrow.
Vehicles without memory function*:
1Release button
Raising:
�
Manually adjust the height of the head
restraint by pulling it upward.
If the head restraint is fully retracted,
push release button1 in direction of
arrow and pull the head restraint up.
Warning!
G
For your protection, drive only with properly
positioned head restraints.
Adjust head restraint so that the center of
the head restraint supports the back of the
head at eye level. This will reduce the poten-
tial for injury to the head and neck in the
event of an accident or similar situation.
Do not drive the vehicle without the seat
head restraints. Head restraints are intend-
ed to help reduce injuries during an acci-
dent.iAdjust the head restraint in such a way
that it is as close to the head as possi-
ble.
Page 44 of 539
.
1Adjusting steering column, in or out
2Adjusting steering column, up or down�
Swit")
43 Getting started
Adjusting
The stalk for steering wheel adjustment is
located on the steering column (lower left).
1Adjusting steering column, in or out
2Adjusting steering column, up or down�
Switch on the ignition (
�page 34).
or
�
Open the driver’s door.Adjusting steering column in or out
�
Move stalk forward or back in the direc-
tion of arrow1 until a comfortable
steering wheel position is reached with
your arms slightly bent at the elbow.
Adjusting steering column up or down
�
Move stalk up or down in the direction
of arrow2.
Make sure your legs can move freely
and that all the displays (including
malfunction and indicator lamps) on
the instrument cluster are clearly
visible.
Mirrors
Adjust the interior and exterior rear view
mirrors before driving so that you have a
good view of the road and traffic condi-
tions.
iThe memory function* (
�page 135)
lets you store the setting for the seat
position together with the setting for
the steering wheel and the exterior rear
view mirrors.
Warning!
G
In case of an accident, liquid electrolyte may
escape the mirror housing if the mirror glass
breaks.
Electrolyte has an irritating effect. Do not al-
low the liquid to come into contact with
eyes, skin, clothing, or respiratory system.
In case it does, immediately flush affected
area with water, and seek medical help if
necessary.!Electrolyte drops coming into contact
with the vehicle paint finish can only be
completely removed while in their
liquid state and by applying plenty of
water.
Page 50 of 539

49 Getting started
Driving
Starting the engine Automatic transmission
Gearshift pattern for automatic
transmissionPPark position
RReverse gear
NNeutral
DDrive position
For more information on how to operate
the gear selector lever, see “Automatic
transmission” (
�page 182).
Warning!
G
Do not pass belts over sharp edges. They
could tear.
Do not allow the belt to get caught in the
door or in the seat adjustment mechanism.
This could damage the belt.
Never attempt to make modifications to
seat belts. This could impair the effective-
ness of the belts.
Do not bleach or dye seat belts as this may
severely weaken them. In a crash, they may
not be able to provide adequate protection.
Damaged seat belts or belts that were highly
stressed in an accident must be replaced.
Contact an authorized Mercedes-Benz Light
Truck Center.
Warning!
G
Inhalation of exhaust gas is hazardous to
your health. All exhaust gas contains carbon
monoxide, and inhaling it can cause uncon-
sciousness and lead to death.
Do not run the engine in confined areas
(such as a garage) which are not properly
ventilated. If you think that exhaust gas
fumes are entering the vehicle while driving,
have the cause determined and corrected
immediately. If you must drive under these
conditions, drive only with at least one win-
dow fully open.
Page 52 of 539

51 Getting started
Driving
�
Press KEYLESS-GO start/stop
button1 once.
The engine starts if the SmartKey with
KEYLESS-GO is in the vehicle.
For information on turning off the engine
with KEYLESS-GO, see “Turning off with
KEYLESS-GO*” (
�page 63).Starting difficulties
If the engine does not start as described,
carry out the following steps:
�
If you are starting the engine with the
SmartKey, turn SmartKey in starter
switch to position0 and repeat starting
procedure.
�
If you are starting the engine with
KEYLESS-GO*: Close any doors that
may be open to allow for better
detection of the SmartKey with
KEYLESS-GO*.
Or:
�
Remove KEYLESS-GO* start/stop but-
ton from starter switch.
�
Start the engine with the SmartKey as
radio signals from another source may
be interfering with the SmartKey with
KEYLESS-GO*.
�
Repeat the starting procedure
(�page 49). Remember that extended
starting attempts can drain the battery.
�
Get a jump start (
�page 470).
If the engine does not start after several
starting attempts, there could be a mal-
function in the engine electronics or in the
fuel supply system.
�
Notify an authorized Mercedes-Benz
Light Truck Center.
iIf you wish to start the engine using the
SmartKey instead of the KEYLESS-GO
feature, remove the KEYLESS-GO*
start/stop button from starter switch
(�page 35).
Page 55 of 539
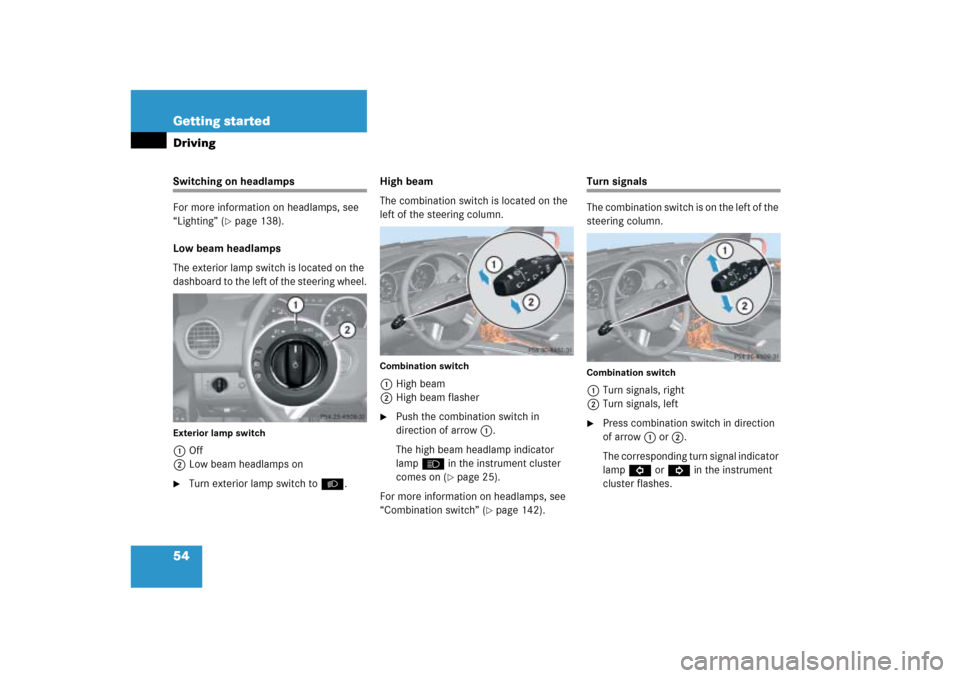
54 Getting startedDrivingSwitching on headlamps
For more information on headlamps, see
“Lighting” (
�page 138).
Low beam headlamps
The exterior lamp switch is located on the
dashboard to the left of the steering wheel.
Exterior lamp switch1Off
2Low beam headlamps on�
Turn exterior lamp switch toB.High beam
The combination switch is located on the
left of the steering column.
Combination switch1High beam
2High beam flasher�
Push the combination switch in
direction of arrow1.
The high beam headlamp indicator
lampA in the instrument cluster
comes on (
�page 25).
For more information on headlamps, see
“Combination switch” (
�page 142).
Turn signals
The combination switch is on the left of the
steering column.Combination switch1Turn signals, right
2Turn signals, left�
Press combination switch in direction
of arrow1 or2.
The corresponding turn signal indicator
lampL orK in the instrument
cluster flashes.