Page 446 of 539
445 Practical hints
Replacing bulbs
Have the LEDs and bulbs for the following
lamps replaced by an authorized
Mercedes-Benz Light Truck Center:�
Additional turn signals in the exterior
rear view mirrors
�
Bi-Xenon lamps*
�
Front fog lamps (vehicles with sport
package*)
�
High mounted brake lamp
Replacing bulbs for front lamps
Before you start to replace a bulb for a
front lamp, do the following first:�
Turn the exterior lamp switch to
positionM (
�page 138).
�
Open the hood (
�page 326).
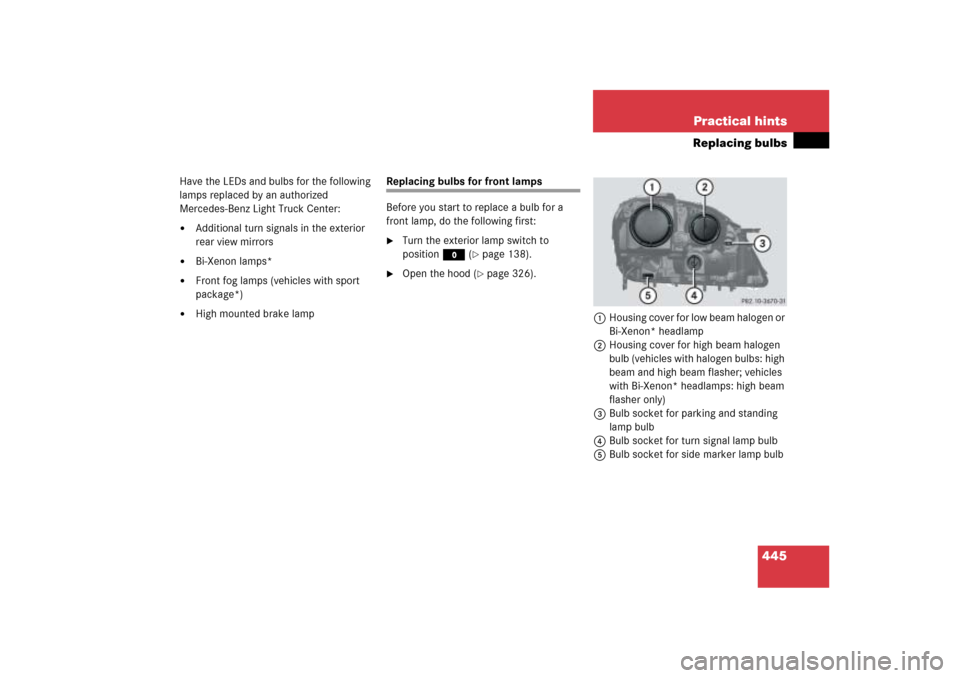
1Housing cover for low beam halogen or
Bi-Xenon* headlamp
2Housing cover for high beam halogen
bulb (vehicles with halogen bulbs: high
beam and high beam flasher; vehicles
with Bi-Xenon* headlamps: high beam
flasher only)
3Bulb socket for parking and standing
lamp bulb
4Bulb socket for turn signal lamp bulb
5Bulb socket for side marker lamp bulb
Page 453 of 539
452 Practical hintsReplacing bulbsCorrect headlamp adjustment is extremely
important. To check and readjust a head-
lamp, follow the steps described:�
Park the vehicle on a level surface
25 feet (7.6 m) from a vertical test
screen or wall.
�
Switch the headlamps on
(�page 138).
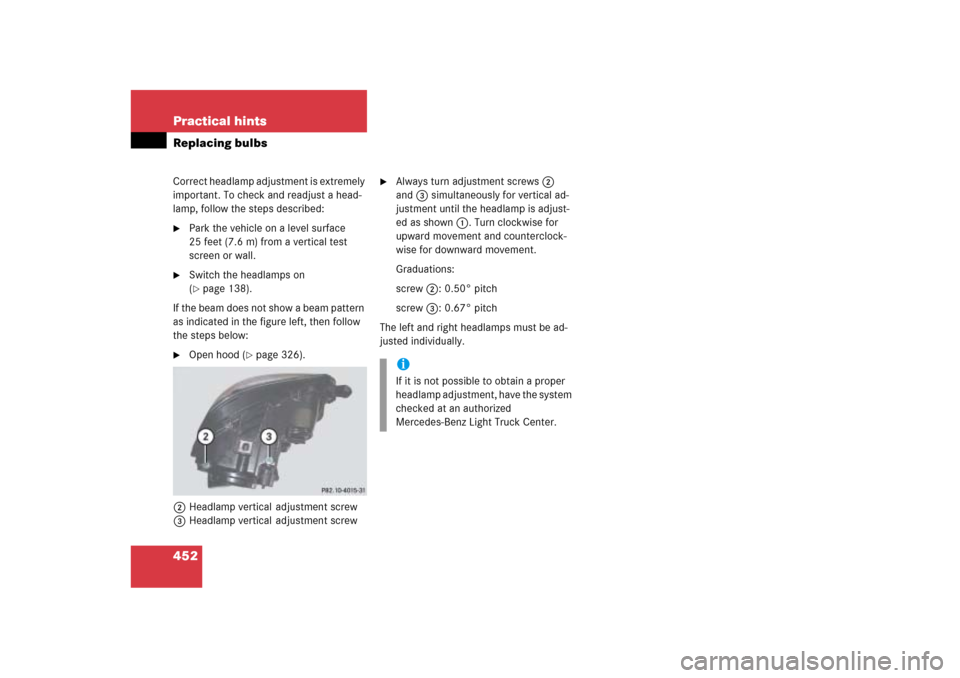
If the beam does not show a beam pattern
as indicated in the figure left, then follow
the steps below:
�
Open hood (
�page 326).
2Headlamp vertical adjustment screw
3Headlamp vertical adjustment screw
�
Always turn adjustment screws2
and3 simultaneously for vertical ad-
justment until the headlamp is adjust-
ed as shown1. Turn clockwise for
upward movement and counterclock-
wise for downward movement.
Graduations:
screw2:0.50° pitch
screw3:0.67° pitch
The left and right headlamps must be ad-
justed individually.iIf it is not possible to obtain a proper
headlamp adjustment, have the system
checked at an authorized
Mercedes-Benz Light Truck Center.
Page 455 of 539

454 Practical hintsReplacing wiper blades�
Let tab2 latch into both recesses of
attachment3.
�
Check if the wiper blade is securely
fastened.
�
Fold the wiper arm backward to rest on
the windshield.
Make sure you hold on to the wiper arm
when folding it back.
Removing rear wiper blade�
Fold wiper arm1 (
�page 455) for-
ward until it engages.
!Never open the hood when the wiper
arms are folded forward.
Hold on to the wiper when folding the
wiper arm back. If released, the force
of the impact from the tensioning
spring could crack the windshield.
Do not allow the wiper arms to contact
the windshield glass without a wiper
blade inserted.
Make certain that the wiper blades are
properly installed. Improperly installed
wiper blades may cause windshield
damage.
For your convenience, we recommend
that you have this work carried out by
an authorized Mercedes-Benz Light
Truck Center.
Warning!
G
For safety reasons, switch off wipers and
remove SmartKey from starter switch (vehi-
cles with KEYLESS-GO*: Make sure the
vehicle’s on-board electronics have
status
0) before replacing a wiper blade.
Otherwise the motor could suddenly turn on
and cause injury.
��
Page 512 of 539
 328
Engine oil with the
oil dipstick (ML 350 only) 330
Oil level 327
Tire inflate pressure 325
Vehicle lighting 32")
511 Index
Checking
Coolant level 332
Engine oil with the
control system (ML 500 only) 328
Engine oil with the
oil dipstick (ML 350 only) 330
Oil level 327
Tire inflate pressure 325
Vehicle lighting 325
Checking tire pressure
electronically with the
Advanced Tire Pressure Monitoring
System* (Advanced TPMS*) 351
Checking weights
Trailer and vehicle 315
Checklist
Off-road driving 307
Returning from off-road driving 313
Child safety 78
Air bags 68
Infant and child
restraint systems 73, 78
LATCH type child seat mounts 88Child safety switch see Blocking of rear
door window operation
Cigarette lighter*
Front center console 275
Cleaning
Carpet 379
Cup holder 379
Gear selector lever 379
Hard plastic trim items 379
Headlamps 194
Headliner 379
Instrument cluster 379
Leather upholstery* 380
Light alloy wheels 379
MB Tex upholstery 380
Plastic and rubber parts 380
Seat belts 379
Steering wheel 379
Windows 378
Windshield 56
Wiper blades 378
Cleaning and care of the vehicle 374
Cleaning tires 337Climate control 202
Adjusting 207
Adjusting air volume 208
deactivating 206
Defrosting 208
Rear passenger compartment 213
Rear window defroster 200
Setting the temperature 207
Clock 165
Closing
Glove box 270
Hood 327
Power tilt/sliding sunroof* 439
Side windows 231
Side windows with
KEYLESS-GO* 234
Tailgate 120
Vehicle with KEYLESS-GO* 123,
124
Tilt/sliding sunroof* 235
Tilt/sliding sunroof* with
KEYLESS-GO* 234
Windows 230