Page 57 of 242

55 Audio
CD operation
1Ejecting audio CD
2Opening/closing the display unit
3Warning message
Press EJECT to
close
�With the COMAND switched on, press
l.
The display unit moves forward and
then tilts down. The CD AUDIO slot is
visible.
�Press the l button left of the
CD AUDIO slot to eject a CD already
loaded.
�Remove the CD from the slot.
�Insert a CD into the slot. The CD should
be inserted with the label side up.
The COMAND pulls the CD in.
�Press l on the display unit to return
the display unit to its closed position.
The display unit tilts up and then moves
to the rear.
Playback begins with track number
one.
The message
CD error will appear if
there is a media error.
�Remove the CD or switch to
another operation.
WarningG
The display unit can cause injury if
contacted when open. Please close after
inserting an audio CD.
!
Do not place anything on the lowered
display panel (i.e. do not attempt to use
as a shelf). Placing objects on the
lowered display panel may result in
damage to the display or COMAND
unit which is not covered by the
Mercedes-Benz Limited Warranty.
!
Inserting a second CD with another CD
still loaded will cause damage to the
CD drive which is not covered by the
Mercedes-Benz Limited Warranty.
i
The message Press EJECT to
close
will appear. If l on the
display unit is not pressed within 20
seconds, eight successive series of two
beep tones will sound to remind you to
return the display to its closed position
by pressing l on the display unit.
The active audio source will be muted
until the display has been returned to
its closed position. If you do not do so,
the COMAND returns the display unit
to its closed position.
Page 61 of 242
59 Audio
CD changer* operation
The following options are available:
�Ejecting one CD
�Ejecting all CDs (�page 60)
Ejecting one CD
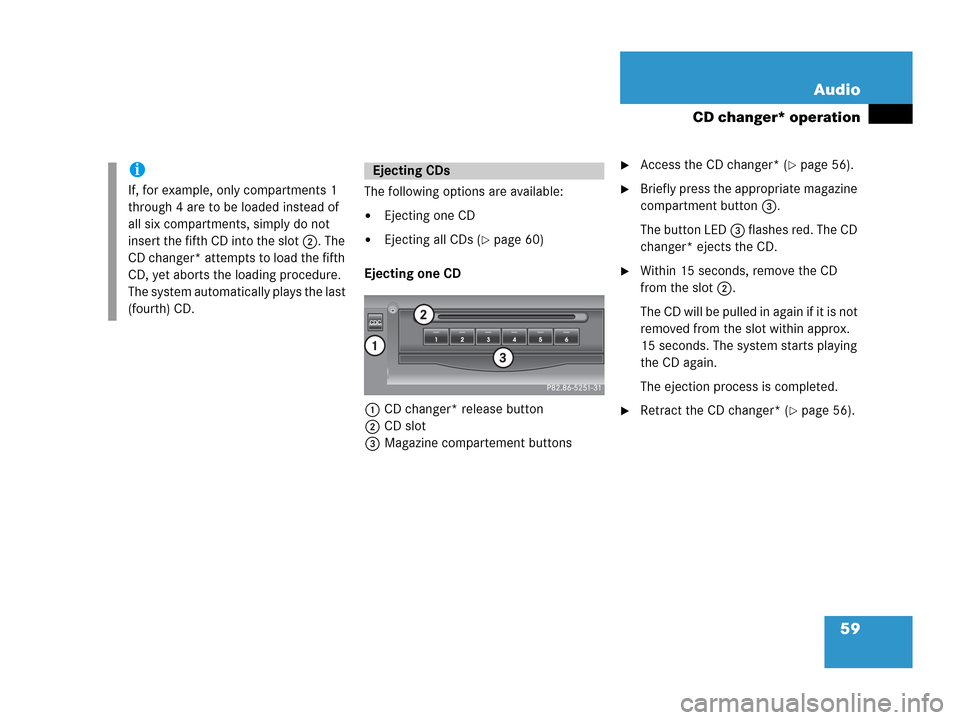
1CD changer* release button
2CD slot
3Magazine compartement buttons
�Access the CD changer* (�page 56).
�Briefly press the appropriate magazine
compartment button 3.
The button LED 3 flashes red. The CD
changer* ejects the CD.
�Within 15 seconds, remove the CD
from the slot 2.
The CD will be pulled in again if it is not
removed from the slot within approx.
15 seconds. The system starts playing
the CD again.
The ejection process is completed.
�Retract the CD changer* (�page 56).
i
If, for example, only compartments 1
through 4 are to be loaded instead of
all six compartments, simply do not
insert the fifth CD into the slot 2. The
CD changer* attempts to load the fifth
CD, yet aborts the loading procedure.
The system automatically plays the last
(fourth) CD.
Ejecting CDs
Page 62 of 242
.
�Press and hold the button of a loaded
magazine")
60 Audio
CD changer* operation
Ejecting all CDs
1CD changer* release button
2CD slot
3Magazine compartement buttons
�Access the CD changer* (�page 56).
�Press and hold the button of a loaded
magazine compartment 3 for more
than 2 seconds.
The button LEDs of all loaded magazine
compartments will briefly flash red,
several times.
The CD changer* ejects the CDs one
after another.
�Within 15 seconds, remove each CD
from the slot 2.
The CD will be pulled in again if it is not
removed from the slot within
approx.15 seconds. The system starts
playing the CD again.
The ejection procedure is completed
when all CDs are removed, or when the
procedure is aborted by the CD
changer*.
�Retract the CD changer* (�page 56).
i
If you are listening to a CD in the CD
changer* and you eject another CD
from the changer:
�While ejecting the CD, the system
interrupts CD playback.
�The CD you were last listening to
starts from the beginning once the
ejection procedure is completed.
If you eject the CD you are currently
listening to:
�The next available audio CD is
played.
�If there are no other CDs available,
the system switches to the audio
source listened to before CD
changer* mode.
Page 76 of 242
74 Audio
MP3 CD operation
�Activate the MP3 CD main menu
(
�page 75).
or
�Load a MP3 CD into the CD drive
(
�page 53).Loading a MP3 CD into the CD drive is the
same as described for audio CDs.
�Load a MP3 CD (�page 53).
After inserting a MP3 CD into the CD drive
the COMAND loads the data. It may take a
while to load the data, depending on the
number of folders and tracks.
After loading, COMAND plays the MP3 CD.Ejecting a MP3 CD out of the CD drive is
the same as described for audio CDs.�Eject a MP3 CD (�page 53).
Switching to MP3 CD mode
i
A MP3 CD is played in the same drive
as a audio CD. The CD drive is located
behind of the display unit (
�page 54).
Loading a MP3 CDEjecting a MP3 CD
Page 96 of 242
 operation*
In all cases, one of the following
messages will appear on the monitor
Please wait, loading disc...
The RSE CD/DVD player will load the")
94 Rear Audio/Video*
Rear Seat Entertainment (RSE) operation*
In all cases, one of the following
messages will appear on the monitor
Please wait, loading disc...
The RSE CD/DVD player will load the
CD which was in the drive when the
system was switched off. The
corresponding menu will appear on the
rear monitors and playback will begin.
Drive empty
�Load a CD into the RSE CD/DVD
player.Switching off
�Press on the rear monitor or press
on the remote control again.
or
�Turn the key in the starter switch to
position 0 and pull the key out.
The message
Vehicle key remo-
ved. Please confirm by pres-
sing OK so that the device
continues operating.
will appear
for approx. 10 seconds. If no action is
taken the system will turn off. If
OK is
selected via the remote the system will
continue to operate for approx. 30 mi-
nutes.M class
The RSE CD/DVD player is located under
the right rear seat.
R class
The RSE CD/DVD player is located at the
front of the middle row console.
R class illustrated
1RSE CD/DVD player
i
If the system is being used while the
key is out or inserted in position 0, the
system will switch off after approx. 30
minutes.
Loading/ejecting CDs
Page 97 of 242
 operation*
1CD/DVD slot
The system is already switched on
(
�page 93).
�Slide the protective cover on the center
console open.
�Insert a CD into th")
95 Rear Audio/Video*
Rear Seat Entertainment (RSE) operation*
1CD/DVD slot
The system is already switched on
(
�page 93).
�Slide the protective cover on the center
console open.
�Insert a CD into the slot 1. The CD
should be inserted with the label side
up.
The RSE CD/DVD player pulls the
medium in.The message
Please wait,
loading disc...
will appear on the
rear monitor. It may take a while to
load the data.
After loading, the player plays the
loaded medium and the corresponding
menu will appear on the rear monitor.
Ejecting a CD from the RSE CD/DVD
player
1CD/DVD slot
2 Eject button
�Slide the protective cover on the center
console open.
�Press .
The message
Press any key to
continue...
will appear.
�Within 10 seconds, remove the
medium from the slot 1.
The medium will be pulled in again if it
is not removed from the slot within
approx.10 seconds. The RSE CD/DVD
player starts playing the medium again.
After removing the medium, the
message
Drive empty will appear.
!
Inserting a second CD with another CD
still loaded will cause damage to the
RSE CD/DVD player which is not
covered by the Mercedes-Benz Limited
Warranty.
Page 138 of 242
136 Telephone*
Telephone operation
The system detects an incoming call, the
phone rings.
Incoming calls are indicated in a window in
any system (e.g. radio).
The window shows:
�the caller’s number if it is transmitted
or
�the caller’s name if her or his name and
number are saved in the phone book or
�Unknown.Accepting a call
�Press k.
or
�Press E to confirm accept.
The display will change to the
call menu (
�page 141). In the status
bar, the off-hook symbol will appear.
An active audio source will be muted.
You talk over the hands-free set.
Rejecting a call
�Press K.
or
�Push the joystick to H to highlight
reject and than press E.Setting the volume for hands-free ope-
ration
Raising the volume
�Turn the rotary control on the e but-
ton to the right.
Lowering the volume
�Turn the rotary control on the e but-
ton to the left.
Ending a call
�Press K.
or
�Press the End soft key.
Incoming call
Page 151 of 242

149 Navigation*
Important notes
COMAND calculates the route with the
help of data that is stored on the navigati-
on DVD.
Only use Mercedes-Benz navigation DVDs.
Using other navigation DVDs or CDs will
cause malfunctions and/or damage.
Because of changes in local traffic patterns
(e.g. road works) and/or incomplete data,
errors in calculation may occur.
As a result, the recommended route may
deviate from the ideal route. The data
stored on the DVD only reflects local con-
ditions at the time of DVD production. DVD
maps do not cover all areas nor all routes
within an area. Loading/ejecting a DVD
DVDs are loaded and ejected at the DVD
Navigation slot. The DVD Navigation slot is
located behind the display unit.
�Open the display unit to get access to
the DVD Navigation slot as described in
“Starting an update” (
�page 206).
Navigation DVD!
GPS (Global Positioning System) sig-
nals received make it possible to deter-
mine the current vehicle position.
Deviations from the actual position
may occur
�if the reception of GPS signals is
disturbed e.g. in parking garages
and tunnels
�if road conditions are bad
�depending on the vehicle’s conditi-
on
i
There are two l buttons. One is on
the display unit. The other is located
left of the DVD NAVIGATION slot
behind the display (
�page 205).