Page 286 of 417

285 Operation
Vehicle care
Engine cleaning
Prior to cleaning the engine compartment,
make sure to protect electrical compo-
nents and connectors from the intrusion of
water and cleaning agents.
Corrosion protection, such as
MB Anticorrosion Wax should be applied to
the engine compartment after every en-
gine cleaning. Before applying, all control
linkage bushings and joints should be lu-
bricated. The poly-V-belt and all pulleys
should be protected from any wax.Vehicle washing
Do not use hot water or wash your vehicle
in direct sunlight. Use only a mild car wash
detergent, such as Mercedes-Benz ap-
proved Car Shampoo.
Thoroughly spray the vehicle with a dif-
fused jet of water. Direct only a very weak
spray towards the ventilation intake. Use
plenty of water and rinse the sponge and
chamois frequently.
Rinse with clear water and thoroughly dry
with a chamois. Do not allow cleaning
agents to dry on the finish.
Due to the width of the vehicle, fold in ex-
terior rear view mirrors prior to running the
vehicle through an automatic car wash to
prevent damage to the mirrors.
In the winter, thoroughly remove all traces
of road salt as soon as possible.
When washing the underbody, do not for-
get to clean the inner sides of the wheels.Ornamental moldings
For regular cleaning and care of very dirty
chrome-plated parts, use a chrome
cleaner.
Headlamps, tail lamps, side marker,
turn signal lenses
�Use a mild car wash detergent, such as
Mercedes-Benz approved Car
Shampoo, with plenty of water.
To prevent scratches, never apply strong
force and use only a soft, non-scratchy
cloth when cleaning the lenses. Do not at-
tempt to wipe dirty lenses with a dry cloth
or sponge.
Page 290 of 417
289 Practical hints
What to do if …
Where will I find...?
Unlocking/locking in an emergency
Opening/closing in an emergency
Brush guard*
Replacing SmartKey batteries
Replacing bulbs
Replacing wiper blades
Flat tire
Battery
Jump starting
Towing the vehicle
Fuses
Page 326 of 417
325 Practical hints
Where will I find...?
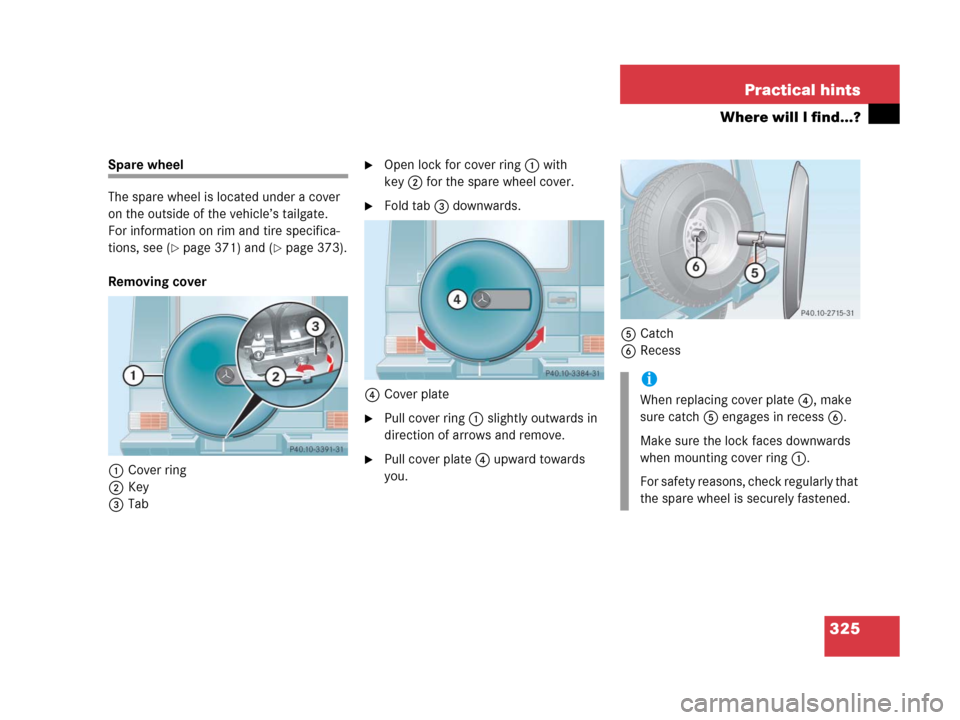
Spare wheel
The spare wheel is located under a cover
on the outside of the vehicle’s tailgate.
For information on rim and tire specifica-
tions, see (
�page 371) and (�page 373).
Removing cover
1Cover ring
2Key
3Tab
�Open lock for cover ring1 with
key2 for the spare wheel cover.
�Fold tab3 downwards.
4Cover plate
�Pull cover ring1 slightly outwards in
direction of arrows and remove.
�Pull cover plate4 upward towards
you.5Catch
6Recess
i
When replacing cover plate4, make
sure catch5 engages in recess6.
Make sure the lock faces downwards
when mounting cover ring1.
For safety reasons, check regularly that
the spare wheel is securely fastened.
Page 330 of 417
329 Practical hints
Unlocking/locking in an emergency
3Release strap
�Pull strap 3 upwards.
The fuel filler flap is unlocked and can
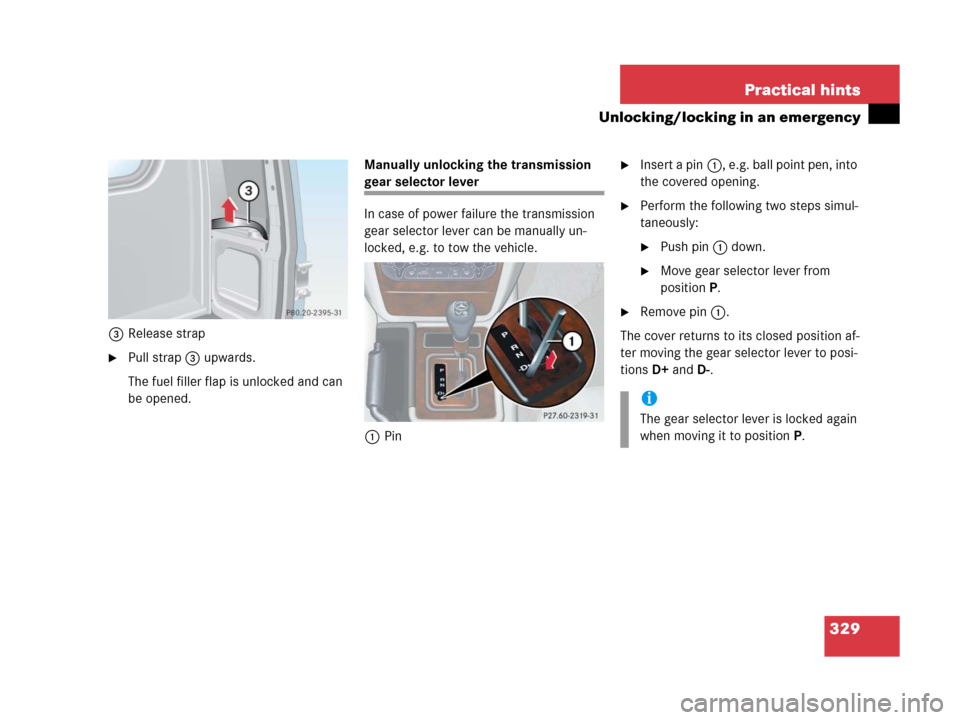
be opened. Manually unlocking the transmission
gear selector lever
In case of power failure the transmission
gear selector lever can be manually un-
locked, e.g. to tow the vehicle.
1Pin
�Insert a pin1, e.g. ball point pen, into
the covered opening.
�Perform the following two steps simul-
taneously:
�Push pin1 down.
�Move gear selector lever from
positionP.
�Remove pin1.
The cover returns to its closed position af-
ter moving the gear selector lever to posi-
tions D+ and D-.
i
The gear selector lever is locked again
when moving it to positionP.
Page 357 of 417

356 Practical hints
Jump starting
If the battery is discharged, the engine can
be started with jumper cables and the bat-
tery of another vehicle. Observe the
following:
�Jump starting should only be performed
when the engine and catalytic convert-
er are cold.
�Do not start the engine if the battery is
frozen. Let the battery thaw out first.
�Only use 12 volt battery to jump start
your vehicle. Jump starting with a more
powerful battery could damage the ve-
hicle’s electrical system, which will not
be covered by the Mercedes-Benz
Limited Warranty.
�Use only jumper cables with sufficient
cross-section and insulated terminal
clamps.
�Always make sure the jumper cables
are not on or near pulleys, fans, or
other parts that move when an engine
is started or running.
Warning!G
Failure to follow these directions will cause
damage to the electronic components, and
can lead to a battery explosion and severe
injury or death.
Never lean over batteries while connecting
or jump starting, you might get injured.
Battery fluid contains sulfuric acid. Do not
allow this fluid to come in contact with eyes,
skin or clothing. In case it does, immediately
flush affected area with water, and seek
medical help if necessary.
A battery will also produce hydrogen gas,
which is flammable and very explosive. Keep
flames or sparks away from battery, avoid
improper connection of jumper cables,
smoking, etc.
Attempting to jump start a frozen battery
can result in it exploding, causing personal
injury.
Read all instructions before proceeding.
!
Avoid repeated and lengthy starting at-
tempts.
Do not attempt to start the engine us-
ing a battery quick charge unit.
If engine does not run after several un-
successful starting attempts, have it
checked at the nearest authorized
Mercedes-Benz Light Truck Center.
Excessive unburned fuel generated by
repeated failed starting attempts may
damage the catalytic converter and
may present a fire risk.
Make sure the jumper cables do not
have loose or missing insulation.
Make sure the cable clamps do not
touch any other metal part while the
other end is still attached to a battery.
!
Do not tow-start the vehicle.
Page 359 of 417

358 Practical hints
Towing the vehicle
Mercedes-Benz recommends that the vehi-
cle be transported with all wheels off the
ground using flatbed or appropriate wheel
lift/dolly equipment. This method is pref-
erable to other types of towing.
When circumstances do not permit the
recommended towing methods, the vehi-
cle may be towed with all wheels on the ground only so far as necessary to have the
vehicle moved to a safe location where the
recommended towing methods can be em-
ployed.
!
Use flatbed or wheel lift/dolly equip-
ment, with SmartKey in starter switch
turned to position0.
Do not tow with sling-type equipment.
Towing with sling-type equipment over
bumpy roads will damage radiator and
supports.
To prevent damage during transport,
do not tie down vehicle by its chassis or
suspension parts. Use the towing eyes.
Switch off the ESP (
�page 86),
tow-away alarm (
�page 89) and the
automatic central locking
(
�page 142).
!
When towing the vehicle with all wheels
on the ground, the gear selector lever
must be in position N and the
SmartKey must be in starter switch
position2.
When towing the vehicle with all wheels
on the ground, the vehicle may be
towed only for distances up to 30 miles
(50 km) and at a speed not to exceed
30 mph (50 km/h).
If the vehicle is towed with one axle
raised (observe instructions regarding
flexible drive shaft and propeller
shafts), the engine must be shut off
(SmartKey in starter switch position1).
Otherwise, the 4-ETS may become en-
gaged which may cause loss of towing
control.
!
Do not tow-start the vehicle.
Warning!G
Prior to towing the vehicle with all wheels on
the ground, make sure the SmartKey is in
starter switch position2.
If the SmartKey is left in the starter switch
position0 for an extended period of time, it
can no longer be turned in the switch. In this
case, the steering is locked. To unlock, re-
move SmartKey from starter switch and re-
insert.
Always tow with a tow bar if:
�the engine will not run
�there is a malfunction in the power sup-
ply or in the vehicle’s electrical system
as that will be necessary to adequately con-
trol the towed vehicle.
Page 360 of 417

359 Practical hints
Towing the vehicle
Warning!G
With the engine not running, there is no
power assistance for the brake and steering
systems. In this case, it is important to keep
in mind that a considerably higher degree of
effort is necessary to brake and steer the ve-
hicle. Adapt your driving accordingly.
i
The gear selector lever will remain
locked in positionP and the SmartKey
will not turn in the starter switch if the
battery is disconnected or discharged.
For more information, see “Battery”
(
�page 353) and “Jump starting”
(
�page 356).
For information on manually unlocking
transmission gear selector lever, see
(
�page 329).
i
To signal turns while being towed with
hazard warning flasher in use, turn
SmartKey in starter switch to
position2 and activate combination
switch for left or right turn signal in
usual manner – only the selected turn
signal will operate.
Upon canceling the turn signal, the
hazard warning flasher will operate
again.
!
When towing the vehicle with all wheels
on the ground, note the following:
With the automatic central locking acti-
vated and the SmartKey in starter
switch position2, the vehicle doors
lock if the wheels are turning at vehicle
speeds of approx. 9 mph (15 km/h) or
more.
To prevent the vehicle doors from lock-
ing, deactivate the automatic central
locking (
�page 142).
Towing of the vehicle should only be
done using the towing eye. Never at-
tach tow cable, tow rope or tow rod to
vehicle chassis, frame or suspension
parts.
Page 361 of 417

360 Practical hints
Towing the vehicle
Transporting the vehicle
When transporting the vehicle, you can use
the towing eyes for pulling the vehicle onto
a trailer or transporter.
�Move the gear selector lever to posi-
tion N.
�Shift the transfer case to neutral posi-
tion N.
�To avoid damaging the vehicle, it
should only be tied down on the
wheels / wheel rims, not on chassis
components such as the transverse
link or trailing arm.Towing the vehicle - various problem
scenarios
�Comply with all towing information
(
�page 358).
In case of engine damage, transmission
damage or malfunctions in electrical
equipment
�Move the gear selector lever to posi-
tion N.
�Shift the transfer case to neutral posi-
tion N.In case of transfer case damage or for
towing vehicle distances exceeding
30 miles (50 km)
The propeller shafts to the drive axles must
be removed.
In case of front axle damage
Raise the front axle when towing. The pro-
peller shaft between the rear axle and the
transfer case must be removed.
In case of rear axle damage
When the rear axle is raised, the vehicle
can only be towed with a wheel lift or a dol-
ly placed under its front wheels.
!
When removing drive shaft, place M10
nuts on bolts as distance sleeves and
tighten using M8 nuts.
Always install new self-locking nuts
when reinstalling the drive shaft.