Page 39 of 417

38 Getting started
Adjusting
Seat adjustment
The seat adjustment switches are located
in each front door.
1Head restraint height
2Seat backrest tilt
3Seat fore and aft adjustment
4Seat cushion tilt
5Seat height
�Switch on the ignition (�page 35).
or
�Open the respective front door.
Seat fore and aft adjustment
�Press the switch forward or back in the
direction of arrow3.
Adjust to a comfortable seating posi-
tion that still allows you to reach the
accelerator/brake pedal safely. The
position should be as far to the rear as
possible, consistent with ability to
properly operate controls.
A child’s risk of serious or fatal injuries is
significantly increased if the child restraints
are not properly secured in the vehicle and
the child is not properly secured in the child
restraint.i
When moving the seat, be sure that
�there are no items in the footwell or
behind the seats
�the cup holder next to the armrest
is removed (
�page 196)
�the cup holder in the front passen-
ger footwell is folded closed
(
�page 196)
Otherwise you could damage the seats
and/or cup holders.
The memory function (
�page 107) lets
you store the setting for the seat posi-
tion together with the setting for the
steering wheel and the exterior rear
view mirrors.
��
Page 42 of 417

41 Getting started
Adjusting
Mirrors
Adjust the interior and exterior rear view
mirrors before driving so that you have a
good view of the road and traffic condi-
tions.
Interior rear view mirror
�Adjust the interior rear view mirror
manually.Exterior rear view mirrors
Warning!G
In case of an accident, liquid electrolyte may
escape the mirror housing if the mirror glass
breaks.
Electrolyte has an irritating effect. Do not al-
low the liquid to come into contact with
eyes, skin, clothing, or the respiratory sys-
tem. In case it does, immediately flush af-
fected area with water, and seek medical
help if necessary.
!
Electrolyte drops coming into contact
with the vehicle paint finish can only be
completely removed while in their
liquid state and by applying plenty of
water.
Warning!G
Exercise care when using the passen-
ger-side exterior rear view mirror. The mirror
surface is convex (outwardly curved surface
for a wider field of view). Objects in mirror
are closer than they appear. Check your in-
terior rear view mirror or glance over your
shoulder before changing lanes.
Page 43 of 417

42 Getting started
Adjusting
The buttons are located above the exterior
lamp switch.
1Adjustment button
2Driver’s side exterior rear view mirror
3Passenger-side exterior rear view
mirror�Switch on the ignition (�page 35).
�Press switch2 or3 to select the
respective exterior rear view mirror.
�Push adjustment button1 up, down,
left, or right according to the desired
setting.
For more information, see “Storing exterior
rear view mirror parking position”
(
�page 109).
!
If an exterior rear view mirror housing
is forcibly pushed forward (hit from the
rear) or rearward (hit from the front),
reposition it by applying firm pressure
until it snaps into place. The exterior
rear view mirror housing is now proper-
ly positioned and you can adjust the
mirror normally.
i
At low ambient temperatures, the exte-
rior rear view mirrors will be heated au-
tomatically.
i
The memory function (�page 107) lets
you store the setting for the exterior
rear view mirrors together with the set-
tings for the steering wheel and the
seat position.
Page 53 of 417
52 Getting started
Driving
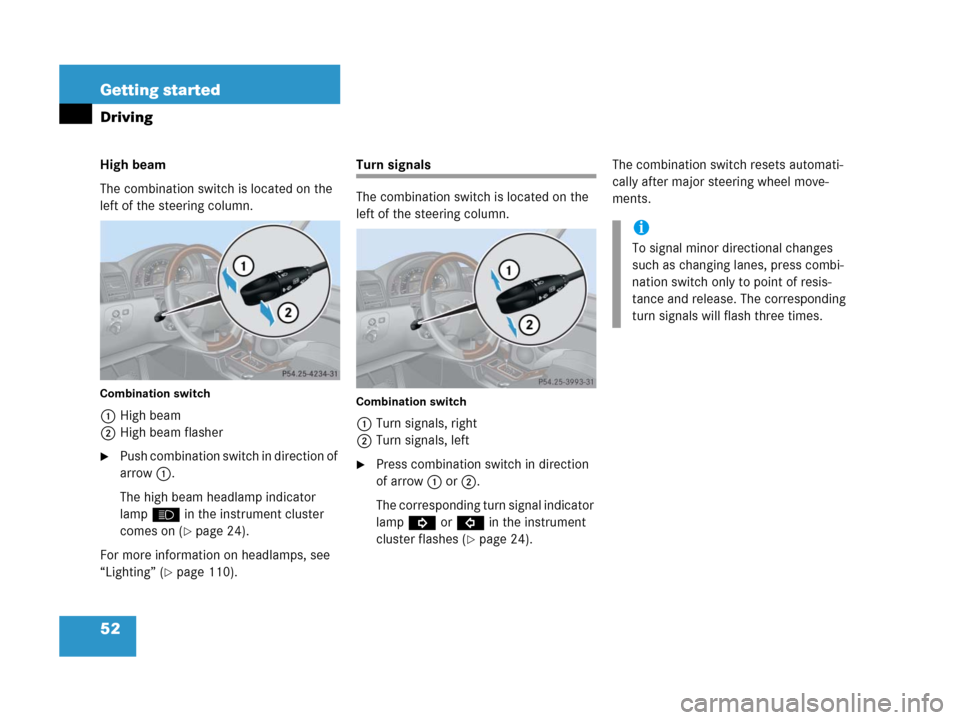
High beam
The combination switch is located on the
left of the steering column.
Combination switch
1High beam
2High beam flasher
�Push combination switch in direction of
arrow1.
The high beam headlamp indicator
lampA in the instrument cluster
comes on (
�page 24).
For more information on headlamps, see
“Lighting” (
�page 110).
Turn signals
The combination switch is located on the
left of the steering column.
Combination switch
1Turn signals, right
2Turn signals, left
�Press combination switch in direction
of arrow1 or2.
The corresponding turn signal indicator
lampK orL in the instrument
cluster flashes (
�page 24).The combination switch resets automati-
cally after major steering wheel move-
ments.
i
To signal minor directional changes
such as changing lanes, press combi-
nation switch only to point of resis-
tance and release. The corresponding
turn signals will flash three times.
Page 60 of 417
.
Allow the retractor to completely re-
wind the seat belt by guiding the latch
plate.
�After exiting the vehic")
59 Getting started
Parking and locking
�Press the seat belt release button3
(
�page 45).
Allow the retractor to completely re-
wind the seat belt by guiding the latch
plate.
�After exiting the vehicle, press the lock
button‹ on the SmartKey
(
�page 34).
With the hood, tailgate and all doors
closed, all turn signal lamps flash three
times. The locking knobs on the doors
move down.
The anti-theft alarm system is armed.For more information, see “Locking and
unlocking” (
�page 92).
i
The SmartKey can only be pulled out
when:
�it has been turned to position0 in
the starter switch
�the gear selector lever for the auto-
matic transmission is in positionP
i
With the SmartKey removed and the
driver’s door open, a warning sounds if
the vehicle’s exterior lamps are not
switched off.
Warning!G
To prevent possible personal injury, always
keep hands and fingers away from the door
openings when closing the doors. Be espe-
cially careful when small children are
around.
Before closing doors, make sure there is no
possibility of someone getting caught in a
door during closing.
Warning!G
When leaving the vehicle, always remove the
SmartKey from the starter switch, take it
with you, and lock the vehicle. Do not leave
children unattended in the vehicle, or with
access to an unlocked vehicle. Unsuper-
vised use of vehicle equipment may cause
an accident and/or serious personal injury.
Page 72 of 417
,
seat belt force limiter
The seat belts for the front and rear outer
seats are equipped with emergency ten-
sioning devices a")
71 Safety and Security
Occupant safety
Emergency tensioning device (ETD),
seat belt force limiter
The seat belts for the front and rear outer
seats are equipped with emergency ten-
sioning devices and belt force limiters.
The ETD is designed to activate in the
following cases:
�in frontal or rear-end impacts exceed-
ing a preset severity level
�if the restraint systems are operational
and functioning correctly, see
1indicator lamp (
�page 62)In an impact, emergency tensioning
devices remove slack from the belts in
such a way that the seat belts fit more
snugly against the body.
�Belts should not be worn twisted. In a
crash, you wouldn’t have the full width
of the belt to manage impact forces. The
twisted belt against your body could
cause injuries.
�Pregnant women should also use a
lap-shoulder belt. The lap belt portion
should be positioned as low as possible
on the hips to avoid any possible pres-
sure on the abdomen.
�Never place your feet on the instrument
panel, dashboard or on the seat. Always
keep both feet on the floor in front of the
seat.
i
The ETDs for the front seats will only
activate if the respective front seat belt
is fastened (latch plate properly
inserted into buckle).
The ETDs for the rear outer seats will
activate with or without the respective
seat belt fastened.
Warning!G
An emergency tensioning device (ETD) that
was activated must be replaced.
When disposing of the emergency tension-
ing device, our safety instructions must be
followed. These are available at your autho-
rized Mercedes-Benz Light Truck Center.
!
Do not place objects heavier than
20 lbs (9 kg) on the front passenger
seat. This could cause the passenger
front airbag and, with the seat belt
fastened to secure the object, the ETD
on the front passenger side to deploy in
a crash which exceeds the system’s
deployment threshold.
Page 77 of 417

76 Safety and Security
Occupant safety
Installation of infant and child restraint
system
1Anchorage ring for rear left side seat
2Anchorage ring for rear center seat
3Anchorage ring for rear right side seat
�Remove the cargo compartment cover
blind (
�page 187).
�Remove the partition net*
(
�page 189).
�Guide top tether strap between head
restraint and top of seat back. Head
restraint must be installed and posi-
tioned such that the top tether strap
can pass freely between the head re-
straint and top of seat back.4Hook
�Securely fasten hook4 to anchorage
ring.
Once the top tether anchorage hook is at-
tached, the child restraint itself can be se-
cured. Secure child restraint and tighten
the top tether strap according to the child
restraint manufacturer’s instructions.
i
For safety, make sure the hook is at-
tached to the ring beyond the safety
catch, as illustrated.
Warning!G
Use only the described anchorage rings for
the respective child seat. Other lashing eye-
lets could tear in case of an accident. Make
sure
�the fastening straps are not crossed or
twisted.
�the hook is properly attached and is
closed.
Page 81 of 417

�BAS (Brake Assist System)
�4-ETS (El")
80 Safety and Security
Driving and safety systems
In this section you will find information on
the following driving safety systems:
�ABS (Antilock Brake System)
�BAS (Brake Assist System)
�4-ETS (Electronic Traction System)
�EBB (Electronic Brake Booster)
�ESP (Electronic Stability Program)
ABS
The ABS regulates the brake pressure so
t h a t t h e w h e e l s d o n o t l o c k d u r i n g b r a k i n g .
This allows you to maintain the ability to
steer your vehicle.
The ABS is functional above a speed of ap-
proximately 5 mph (8 km/h) independent
of road surface conditions (as long as the
differential locks are not engaged).
At the instant one of the wheels is about to
lock up, a slight pulsation can be felt in the
brake pedal, indicating that the ABS is in
the regulating mode. Keep firm and steady
pressure on the brake pedal while experi-
encing the pulsation.
i
In winter operation, the maximum ef-
fectiveness of the ABS, ESP, EBB, and
4-ETS is only achieved with winter tires
or snow chains as required.
Warning!G
The following factors increase the risk of ac-
cidents:
�Excessive speed, especially in turns
�Wet and slippery road surfaces
�Following another vehicle too closely
The ABS, BAS, ESP, and 4-ETS cannot
reduce this risk.
Always adjust your driving style to the pre-
vailing road and weather conditions.
Warning!G
Do not pump the brake pedal. Use firm,
steady brake pedal pressure instead. Pump-
ing the brake pedal defeats the purpose of
ABS and significantly reduces braking effec-
tiveness.