Page 8 of 417

Contents
Practical hints................................. 289
What to do if … .................................. 290
Lamps in instrument cluster ........ 290
Lamp in center console................ 297
Vehicle status messages in the
multifunction display .................... 298
Where will I find...? ............................ 323
First aid kit ................................... 323
Vehicle tool kit ............................. 323
Vehicle jack.................................. 324
CD changer .................................. 324
Spare wheel ................................. 325
Unlocking/locking in an emergency .. 327
Unlocking the vehicle ................... 327
Locking the vehicle ...................... 328
Fuel filler flap ............................... 328
Manually unlocking the
transmission gear selector lever .. 329Opening/closing in an emergency ..... 330
Tilt/sliding sunroof ....................... 330
Brush guard* ...................................... 331
Lowering and raising brush guard . 332
Replacing SmartKey batteries ............ 333
SmartKey ...................................... 334
Replacing bulbs .................................. 335
Bulbs ............................................. 336
Replacing bulbs for front lamps .... 338
Replacing bulbs for rear lamps ..... 343
Replacing wiper blades....................... 346
Removing wiper blades ................. 346
Installing wiper blades .................. 347
Flat tire ............................................... 348
Preparing the vehicle .................... 348
Mounting the spare wheel ............ 349
Battery................................................ 353
Charging the battery ..................... 353
Disconnecting the battery............. 354
Reconnecting the battery.............. 355Jump starting...................................... 356
Towing the vehicle.............................. 358
Transporting the vehicle ............... 360
Towing the vehicle - various
problem scenarios ........................ 360
Front towing eye ........................... 361
Rear towing eye ............................ 361
Freeing a stranded vehicle ............ 361
Fuses.................................................. 362
Fuse box in passenger
compartment ................................ 362
Fuse box in battery box ................ 362
Fuse box in front passenger
footwell ......................................... 363
Fuse box in middle tunnel ............. 364
Page 54 of 417
53 Getting started
Driving
Windshield wipers
The combination switch is located on the
left of the steering column.
Combination switch
1Single wipe
Wiping with windshield washer fluid
2Switching on windshield wipers
�Switch on the ignition (�page 35).Switching on windshield wipers
�Turn the combination switch to the de-
sired position depending on the inten-
sity of the rain.
0Windshield wipers off
IIntermittent wiping
IINormal wiper speed
IIIFast wiper speed
i
Intermittent wiping interval is depen-
dent on wetness of windshield. Pauses
between wipes are automatically con-
trolled by the rain sensor.
!
Do not operate the wipers when the
windshield is dry. Dust that accumu-
lates on a windshield might scratch the
glass and/or damage the wiper blades
when wiping occurs on a dry wind-
shield. If it is necessary to operate the
wipers in dry weather conditions, al-
ways operate the wipers with wind-
shield washer fluid (
�page 54).
Page 243 of 417

242 Operation
Engine compartment
Hood
Opening
The pull release lever is under the driver’s
side of the instrument panel.
1Release lever�Pull release lever1 upward.
The hood is unlocked.
2Safety hook
�Lift hood up slightly.
�Pull safety hook2 in direction of ar-
row and open hood.
Warning!G
Do not pull the release lever while the vehi-
cle is in motion. Otherwise the hood could
be forced open by passing air flow.
!
To avoid damage to the windshield wip-
ers or hood, open the hood only with
wipers in parked position.
Warning!G
To help prevent personal injury, stay clear of
moving parts when the hood is open and the
engine is running. Make sure the hood is
properly closed before driving. When closing
the hood, use extreme caution not to catch
hands or fingers.
The radiator fan may continue to run for ap-
proximately 30 seconds or even restart af-
ter the engine has been turned off. Stay
clear of fan blades.
Warning!G
If you see flames or smoke coming from the
engine compartment, or if the coolant tem-
perature display indicates that the engine is
overheated, do not open the hood. Move
away from vehicle and do not open the hood
until the engine has cooled down. If neces-
sary, call the fire department.
Page 287 of 417

286 Operation
Vehicle care
Cleaning the Rear Parking Assist
sensors*
1Sensor
�Use a mild car wash detergent, such as
Mercedes-Benz approved Car
Shampoo, with plenty of water to
clean sensors1.
To prevent scratches, never apply strong
force and use only a soft, non-scratchy
cloth when cleaning the sensors. Do not
attempt to wipe dirty sensors with a dry
cloth or sponge.Wiper blades
�Fold wiper arms forward.
�Clean the wiper blade inserts with a
clean cloth and detergent solution.Window cleaning
�Fold wiper arms forward.
�Use a window cleaning solution on all
glass surfaces.
An automotive glass cleaner is recom-
mended.
Warning!G
For safety reasons, switch off wipers and re-
move SmartKey from starter switch before
cleaning the wiper blades. Otherwise, the
wiper motor can suddenly turn on and cause
injury.
!
Fold the windshield wiper arms back
onto the windshield before turning the
SmartKey in the starter switch.
Hold on to the wiper when folding the
wiper arm back. If released, the force
of the impact from the tensioning
spring could crack the windshield.
Warning!G
For safety reasons, switch off wipers and re-
move SmartKey from starter switch before
cleaning the windshield. Otherwise, the wip-
er motor can suddenly turn on and cause in-
jury.
!
Fold the windshield wiper arms back
onto the windshield before turning the
SmartKey in the starter switch.
Hold on to the wiper when folding the
wiper arm back. If released, the force
of the impact from the tensioning
spring could crack the windshield.
Page 290 of 417
289 Practical hints
What to do if …
Where will I find...?
Unlocking/locking in an emergency
Opening/closing in an emergency
Brush guard*
Replacing SmartKey batteries
Replacing bulbs
Replacing wiper blades
Flat tire
Battery
Jump starting
Towing the vehicle
Fuses
Page 347 of 417
346 Practical hints
Replacing wiper blades
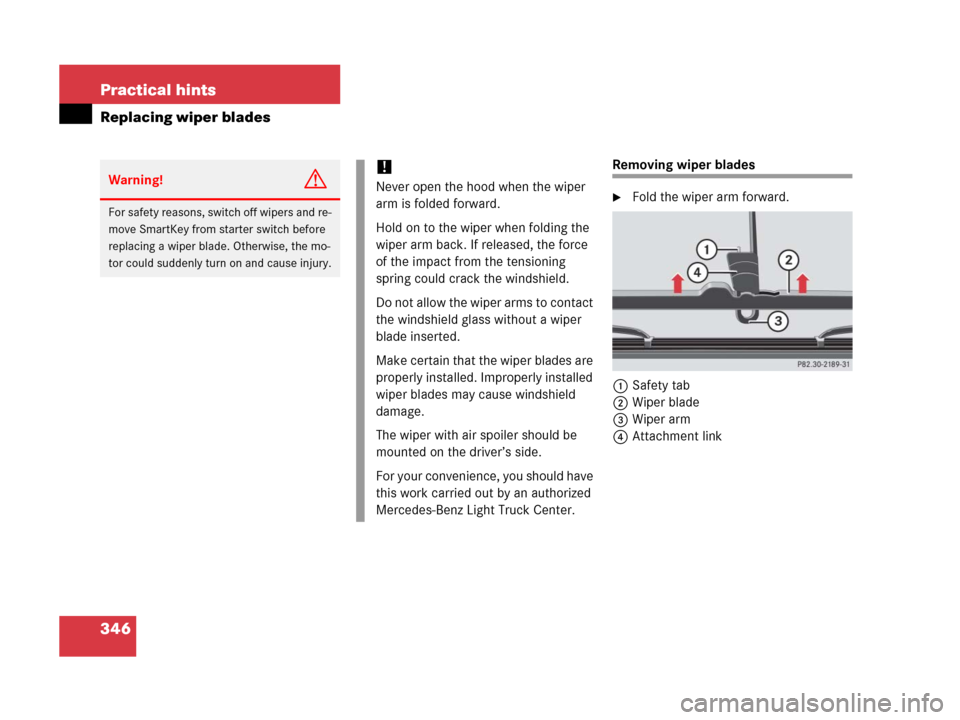
Removing wiper blades
�Fold the wiper arm forward.
1Safety tab
2Wiper blade
3Wiper arm
4Attachment link
Warning!G
For safety reasons, switch off wipers and re-
move SmartKey from starter switch before
replacing a wiper blade. Otherwise, the mo-
tor could suddenly turn on and cause injury.
!
Never open the hood when the wiper
arm is folded forward.
Hold on to the wiper when folding the
wiper arm back. If released, the force
of the impact from the tensioning
spring could crack the windshield.
Do not allow the wiper arms to contact
the windshield glass without a wiper
blade inserted.
Make certain that the wiper blades are
properly installed. Improperly installed
wiper blades may cause windshield
damage.
The wiper with air spoiler should be
mounted on the driver’s side.
For your convenience, you should have
this work carried out by an authorized
Mercedes-Benz Light Truck Center.
Page 348 of 417
347 Practical hints
Replacing wiper blades
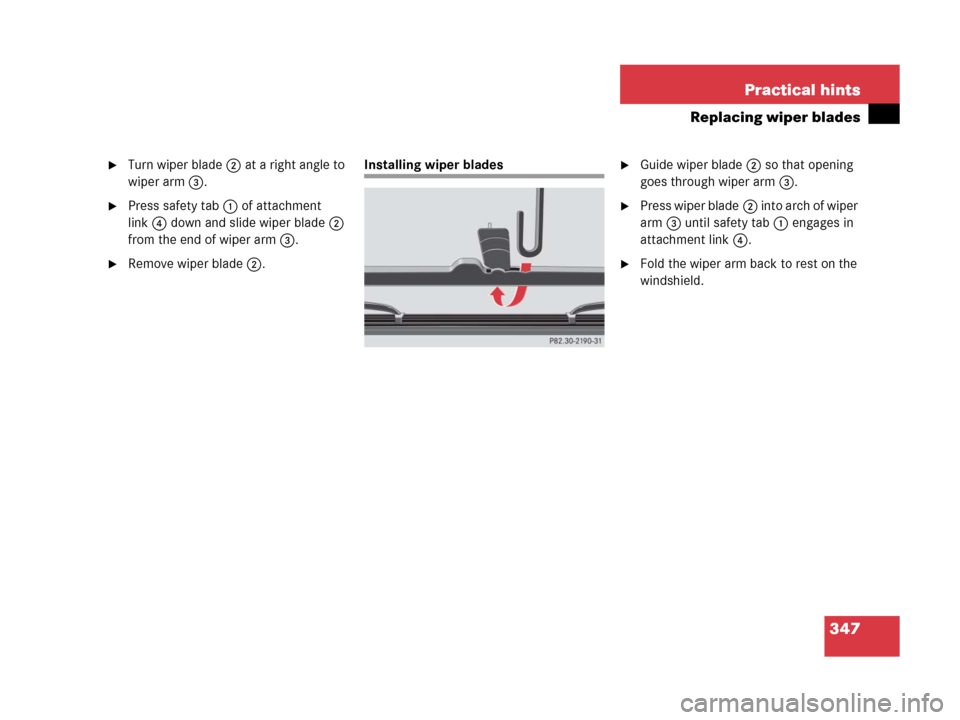
�Turn wiper blade2 at a right angle to
wiper arm3.
�Press safety tab1 of attachment
link4 down and slide wiper blade2
from the end of wiper arm3.
�Remove wiper blade2.
Installing wiper blades�Guide wiper blade2 so that opening
goes through wiper arm3.
�Press wiper blade2 i n t o a r c h o f w i p e r
arm3 until safety tab1 engages in
attachment link4.
�Fold the wiper arm back to rest on the
windshield.
Page 393 of 417

392 Index
Center console 28
AIRBAG OFF indicator lamp 297
Lower part 29
Upper part 28
Centigrade
Setting temperature units 136
Central locking
From inside 99
Switch 99
Switching on/off (control
system) 142
Unlocking from inside 99
Certification label 368
Changing
Key setting 143
Charging
Vehicle battery 353
Checking
Coolant level 241, 248
Oil level 241, 243
Checklist
Off-road driving 229Child safety 72
Infant and child restraint systems 62,
72
LATCH child seat anchors 77
Child safety switch see Blocking of rear
door window operation
Cigarette lighter 199
Cleaning
Cup holders 287
Gear selector lever 287
Hard plastic trim items 287
Headlamps 165
Headliner 287
Illuminated door sill panels 288
Instrument cluster 287
Leather upholstery 288
Light alloy wheels 287
MB Tex upholstery 288
Plastic and rubber parts 288
Rear Parking Assist sensors* 286
Seat belts 287
Steering wheel 287
Windows 286
Windshield 54
Wiper blades 286
Wood trims 288Cleaning tires 254
Climate control 168
Adjusting 171
Defogging windshield 171
Defrosting 172
Rear window defroster 166
Setting the temperature 170
Clock 25
Closing
Glove box 194
Hood 243
Side windows 175
Tailgate 98
Tilt/sliding sunroof 178, 330
Tilt/sliding sunroof with
SmartKey 179
Windows 175
Windows with SmartKey 176
Closing tilt/sliding sunroof
In an emergency 330
Cockpit 22, 383
Cockpit management and data system
(COMAND) 384
Cold tire inflation pressure 273
COMAND 384