Page 133 of 417

132 Controls in detail
Control system
Settings menu
In the
SETTINGS... menu there are two
functions:
�The function TO RESET: R BUTTON FOR
3SEC.
, with which you can reset all the
settings to those set at the factory.
�A collection of submenus with which
you can make individual settings for
your vehicle.
�Press buttonè orÿ repeatedly
until the
SETTINGS... menu is seen in
the display.Resetting all settings
You can reset all the functions of all sub-
menus to the factory settings.
�Press the reset button in the instru-
ment cluster (
�page 120) for approxi-
mately three seconds.
In the display you will see the request
to press the reset button again to con-
firm.
�Press the reset button again.
The functions of all the submenus will
reset to factory settings.
i
The settings you have changed will not
be reset unless you confirm the action
by pressing the reset button a second
time. Approximately five seconds after
pressing the reset button for the sec-
ond time, the
SETTINGS... menu reap-
pears in the display.
For safety reasons, the following func-
tions are not reset while driving:
�the LIGHT CIRCUIT HEADLIGHT MODE
function in the
LIGHTING submenu
�the SETTINGS KEY- DEPENDENT func-
tion in the
CONVENIENCE submenu
Page 139 of 417

�Move the selection marker with
theæ orç button to the
INSTRUMENT CLUSTER submenu.
�Press buttonj o")
138 Controls in detail
Control system
Selecting display (speed display or out-
side temperature)
�Move the selection marker with
theæ orç button to the
INSTRUMENT CLUSTER submenu.
�Press buttonj ork repeatedly
until you see this message in the dis-
play:
SELECT DISPLAY.
The selection marker is on the current
setting.
�Pressæ orç to select the dis-
play permanently shown in the multi-
function display.Lighting submenu
Access the
LIGHTING submenu via the
SETTINGS menu. Use the LIGHTING sub-
menu to change the lamp and lighting set-
tings on your vehicle. The following
functions are available:Setting daytime running lamp mode
(USA only)
�Move the selection marker with
theæ orç button to the
LIGHTING submenu.
�Press buttonj ork repeatedly
until you see this message in the dis-
play:
LIGHT CIRCUIT HEADLIGHT MODE.
FunctionPage
Setting daytime running lamp
mode (USA only)138
Setting locator lighting139
Setting night security
illumination140
Setting interior lighting delayed
shut-off141
i
This function is not available in coun-
tries where the daytime running lamp
mode is mandatory and therefore in a
constant mode.
Page 141 of 417

140 Controls in detail
Control system
�Move the selection marker with
theæ orç button to the
LIGHTING submenu.
�Press buttonj ork repeatedly
until you see this message in the dis-
play:
LOCATOR LIGHTING.
The selection marker is on the current
setting.
�Pressæ orç to switch the loca-
tor lighting function
ON or OFF.
�Turn the exterior lamp switch to
positionU when exiting the vehicle
(
�page 110).
The locator lighting feature is
activated.Setting night security illumination
(Headlamps delayed shut-off)
Use this function to set whether and how
long you would like the exterior lamps to
illuminate during darkness after exiting the
vehicle and all doors closed.
With the delayed shut-off feature activated
and the exterior lamp switch in
positionU before the engine is turned
off, the following lamps will switch on
when the engine is turned off:
�Parking lamps
�Tail lamps
�License plate lamps
�Side marker lamps
�Front fog lamps
If after turning off the engine you do not
open a door or do not close an opened
door, the lamps will switch off automatical-
ly after approximately 60 seconds.
�Move the selection marker with
theæ orç button to the
LIGHTING submenu.
�Press buttonj ork repeatedly
until you see this message in the dis-
play:
HEADLIGHTS DELAYED SHUT-OFF.
The selection marker is on the current
setting.
�Pressæ orç to select the
desired lamp-on period.
i
You can reactivate this function within
ten minutes by opening a door.
Page 332 of 417
331 Practical hints
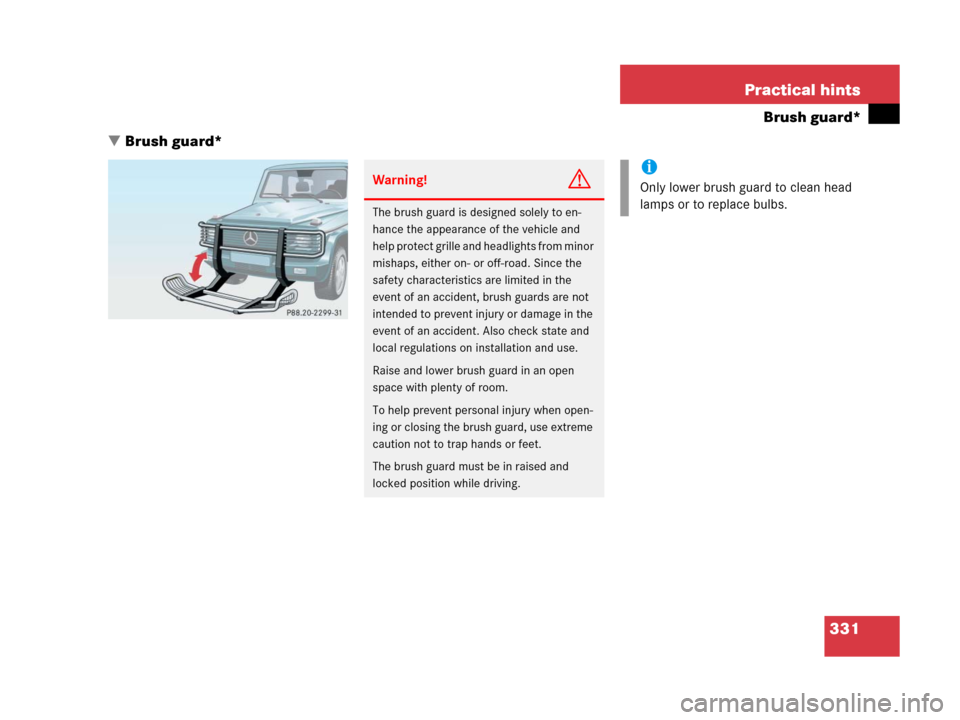
Brush guard*
�Brush guard*
Warning!G
The brush guard is designed solely to en-
hance the appearance of the vehicle and
help protect grille and headlights from minor
mishaps, either on- or off-road. Since the
safety characteristics are limited in the
event of an accident, brush guards are not
intended to prevent injury or damage in the
event of an accident. Also check state and
local regulations on installation and use.
Raise and lower brush guard in an open
space with plenty of room.
To help prevent personal injury when open-
ing or closing the brush guard, use extreme
caution not to trap hands or feet.
The brush guard must be in raised and
locked position while driving.
i
Only lower brush guard to clean head
lamps or to replace bulbs.
Page 398 of 417
 125, 127
Resetting 133
Fuse box 362, 363, 364
Fuses 362
Fuse box in battery box 362
Fuse box in front passenger
f")
397 Index
Fuels, coolants, lubricants, etc.
Capacities 376
Functions (control system) 125, 127
Resetting 133
Fuse box 362, 363, 364
Fuses 362
Fuse box in battery box 362
Fuse box in front passenger
footwell 363
Fuse box in middle tunnel 364
Fuse box in passenger
compartment 362
G
Garage door opener 30, 210
Gasoline see Fuel
Gasoline additives 379
GAWR 274
Gear range 385
Automatic transmission 154
Limiting 154
Shifting into optimal 155
Transfer case 157
Gear range limit
Canceling 155Gear selector lever
Cleaning 287
Position 151
Position (automatic
transmission) 149
Global
Locking 94
Unlocking 94
Global Positioning System (GPS) 385
Glove box 23, 194
Closing 194
Opening 194
Good visibility 163
GPS 385
Gross Axle Weight Rating see GAWR
Gross Trailer Weight see GTW
Gross Vehicle Weight Rating see GVWR
Gross Vehicle Weight see GVW
GTW 274
GVW 274
GVWR 274H
Hard plastic trim items
Cleaning 287
Hazard warning flasher 115
Head restraints 101
Power seats 39
Synchronizing 102
Headlamp cleaning system 249
Headlamps
Automatic control 111
Cleaning 285
Cleaning system 165, 249
Switching off 58
Switching on 51
Washer fluid 382
Washer system 382
Headlight switch-off delay see Delayed
switch-off, exterior lamps
Headliner
Cleaning 287
Heated seats 104
Heated steering wheel 215
Height adjustment
Head restraints 39
Seat belts 48
Steering wheel 40