Page 345 of 417
344 Practical hints
Replacing bulbs
1Securing screw
2Tail lamp lens
3Turn signal lamp bulb
4Tail lamp bulb
5Brake lamp bulb
�Loosen and remove securing
screws1.
�Remove tail lamp lens2.
�Press gently onto respective bulb3,
4, or5 and turn counterclockwise
out of its bulb socket.
�Press the new bulb gently into its bulb
socket and turn clockwise until it
engages.
�Reinstall tail lamp lens2.
�Install and tighten securing screws1.Rear fog lamp/Backup lamp
1Securing screw
2Lamp lens
3Bulb
i
Do not overtighten securing screws1.
Otherwise tail lamp lens2 could be
damaged.
Page 349 of 417
348 Practical hints
Flat tire
Preparing the vehicle
�Park the vehicle as far as possible from
moving traffic on a hard surface.
�Turn on the hazard warning flashers.
�Turn the steering wheel so that the
front wheels are in a straight ahead
position.
�Set the parking brake (�page 57).
�Move the gear selector lever toP.
�Turn off the engine (�page 58).
�Have any passenger exit the vehicle at
a safe distance from the roadway.
�Remove the vehicle tool kit
(
�page 323) and the jack
(
�page 324).
�Remove the spare wheel from the
spare wheel mounting bracket
(
�page 325).Information on spare wheel
When you replace the vehicle’s tires, you
can use the spare wheel as a regular wheel
if:
�it is not more than six years old
�rim and tire are the same model as the
regular wheels
Warning!G
For your safety, remove spare wheel from
the spare wheel mounting bracket before
undertaking any further steps.
Warning!G
If the spare tire is more than six years old or
is not the same model as the regular tires,
have the spare tire replaced with a new tire
at the nearest Mercedes-Benz Light Truck
Center.
Never operate the vehicle with more than
one spare tire.
Warning!G
G55AMG:
Vehicles with different tire dimensions on
the front and rear axle: rim and tire size of
spare wheel and normal wheel differ.
Handling will be adversely affected when the
spare wheel is used.
Do not exceed the maximum speed of
50 mph (80 km/h).
Page 350 of 417
349 Practical hints
Flat tire
Mounting the spare wheel
�Prepare the vehicle (�page 348).
Lifting the vehicle
�Prevent the vehicle from rolling away
by blocking wheels with wheel chocks
(not included) or other sizable objects.
When changing wheel on a level surface:
�Place one chock in front of and one be-
hind the wheel that is diagonally oppo-
site to the wheel being changed.
Always try lifting the vehicle using the jack
on a level surface. However, should cir-
cumstances require you to do so on a hill,
place the wheel chocks as follows:
�Place chocks on the downhill side
blocking both wheels of the axle not
being worked on.
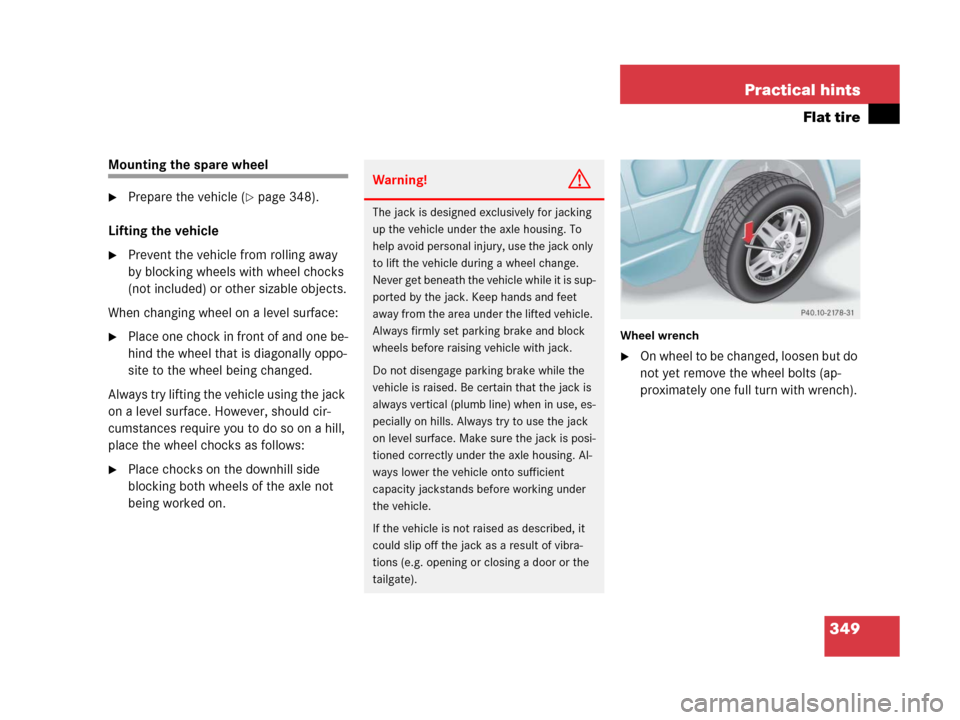
Wheel wrench
�On wheel to be changed, loosen but do
not yet remove the wheel bolts (ap-
proximately one full turn with wrench).
Warning!G
The jack is designed exclusively for jacking
up the vehicle under the axle housing. To
help avoid personal injury, use the jack only
to lift the vehicle during a wheel change.
Never get beneath the vehicle while it is sup-
ported by the jack. Keep hands and feet
away from the area under the lifted vehicle.
Always firmly set parking brake and block
wheels before raising vehicle with jack.
Do not disengage parking brake while the
vehicle is raised. Be certain that the jack is
always vertical (plumb line) when in use, es-
pecially on hills. Always try to use the jack
on level surface. Make sure the jack is posi-
tioned correctly under the axle housing. Al-
ways lower the vehicle onto sufficient
capacity jackstands before working under
the vehicle.
If the vehicle is not raised as described, it
could slip off the jack as a result of vibra-
tions (e.g. opening or closing a door or the
tailgate).
Page 358 of 417
357 Practical hints
Jump starting
The jump-start contacts are located in the
engine compartment.
�Make sure the two vehicles do not
touch.
�Turn off all electrical consumers.
�Apply parking brake.
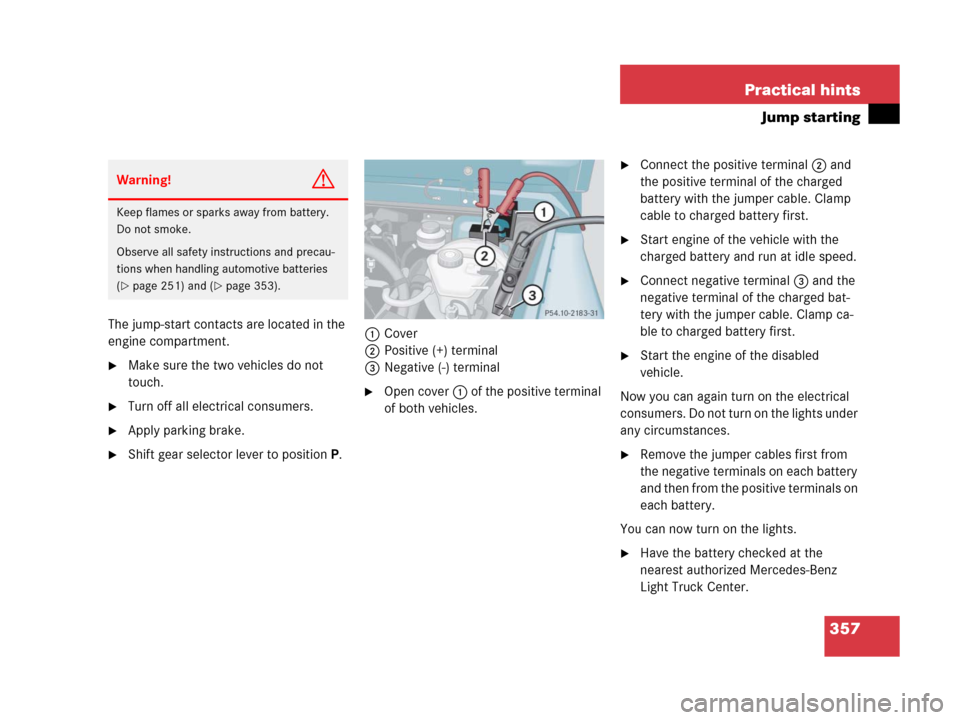
�Shift gear selector lever to positionP.1Cover
2Positive (+) terminal
3Negative (-) terminal
�Open cover1 of the positive terminal
of both vehicles.
�Connect the positive terminal2 and
the positive terminal of the charged
battery with the jumper cable. Clamp
cable to charged battery first.
�Start engine of the vehicle with the
charged battery and run at idle speed.
�Connect negative terminal3 and the
negative terminal of the charged bat-
tery with the jumper cable. Clamp ca-
ble to charged battery first.
�Start the engine of the disabled
vehicle.
Now you can again turn on the electrical
consumers. Do not turn on the lights under
any circumstances.
�Remove the jumper cables first from
the negative terminals on each battery
and then from the positive terminals on
each battery.
You can now turn on the lights.
�Have the battery checked at the
nearest authorized Mercedes-Benz
Light Truck Center.
Warning!G
Keep flames or sparks away from battery.
Do not smoke.
Observe all safety instructions and precau-
tions when handling automotive batteries
(
�page 251) and (�page 353).
Page 360 of 417
359 Practical hints
Towing the vehicle
Warning!G
With the engine not running, there is no
power assistance for the brake and steering
systems. In this case, it is important to keep
in mind that a considerably higher degree of
effort is necessary to brake and steer the ve-
hicle. Adapt your driving accordingly.
i
The gear selector lever will remain
locked in positionP and the SmartKey
will not turn in the starter switch if the
battery is disconnected or discharged.
For more information, see “Battery”
(
�page 353) and “Jump starting”
(
�page 356).
For information on manually unlocking
transmission gear selector lever, see
(
�page 329).
i
To signal turns while being towed with
hazard warning flasher in use, turn
SmartKey in starter switch to
position2 and activate combination
switch for left or right turn signal in
usual manner – only the selected turn
signal will operate.
Upon canceling the turn signal, the
hazard warning flasher will operate
again.
!
When towing the vehicle with all wheels
on the ground, note the following:
With the automatic central locking acti-
vated and the SmartKey in starter
switch position2, the vehicle doors
lock if the wheels are turning at vehicle
speeds of approx. 9 mph (15 km/h) or
more.
To prevent the vehicle doors from lock-
ing, deactivate the automatic central
locking (
�page 142).
Towing of the vehicle should only be
done using the towing eye. Never at-
tach tow cable, tow rope or tow rod to
vehicle chassis, frame or suspension
parts.
Page 377 of 417
376 Technical data
Fuels, coolants, lubricants, etc.
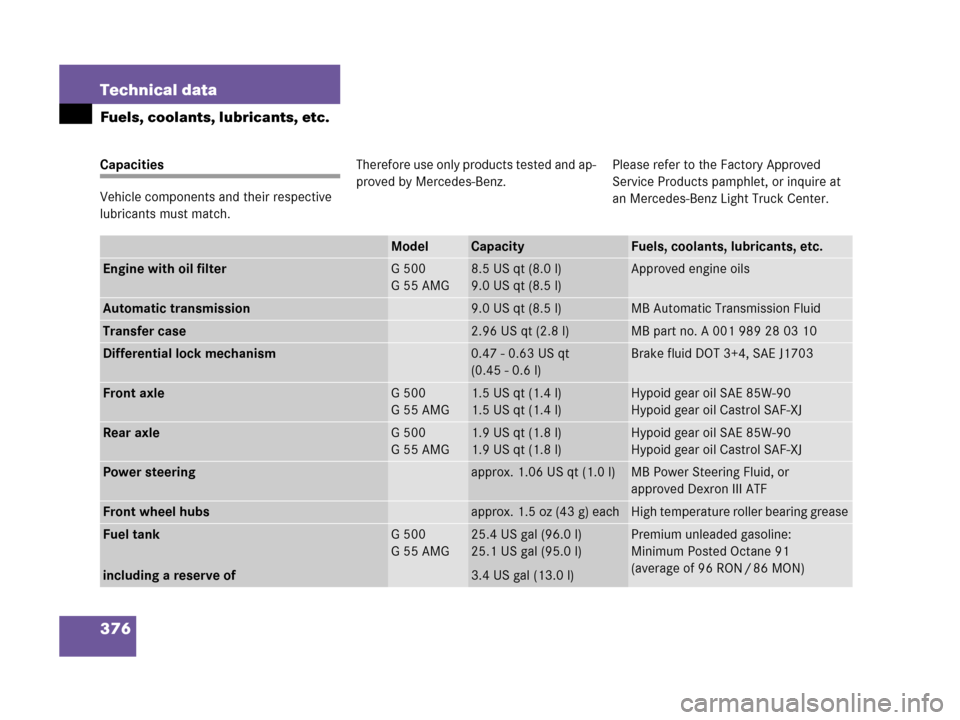
Capacities
Vehicle components and their respective
lubricants must match.Therefore use only products tested and ap-
proved by Mercedes-Benz.Please refer to the Factory Approved
Service Products pamphlet, or inquire at
an Mercedes-Benz Light Truck Center.
ModelCapacityFuels, coolants, lubricants, etc.
Engine with oil filterG500
G55AMG8.5 US qt (8.0 l)
9.0 US qt (8.5 l)Approved engine oils
Automatic transmission9.0 US qt (8.5 l)MB Automatic Transmission Fluid
Transfer case2.96 US qt (2.8 l)MB part no. A 001 989 28 03 10
Differential lock mechanism0.47 - 0.63 US qt
(0.45 - 0.6 l)Brake fluid DOT 3+4, SAE J1703
Front axleG500
G55AMG1.5 US qt (1.4 l)
1.5 US qt (1.4 l)Hypoid gear oil SAE 85W-90
Hypoid gear oil Castrol SAF-XJ
Rear axleG500
G55AMG1.9 US qt (1.8 l)
1.9 US qt (1.8 l)Hypoid gear oil SAE 85W-90
Hypoid gear oil Castrol SAF-XJ
Power steeringapprox. 1.06 US qt (1.0 l)MB Power Steering Fluid, or
approved Dexron III ATF
Front wheel hubsapprox. 1.5 oz (43 g) eachHigh temperature roller bearing grease
Fuel tank
including a reserve ofG500
G55AMG25.4 US gal (96.0 l)
25.1 US gal (95.0 l)
3.4 US gal (13.0 l)Premium unleaded gasoline:
Minimum Posted Octane 91
(average of 96 RON / 86 MON)
Page 379 of 417
378 Technical data
Fuels, coolants, lubricants, etc.
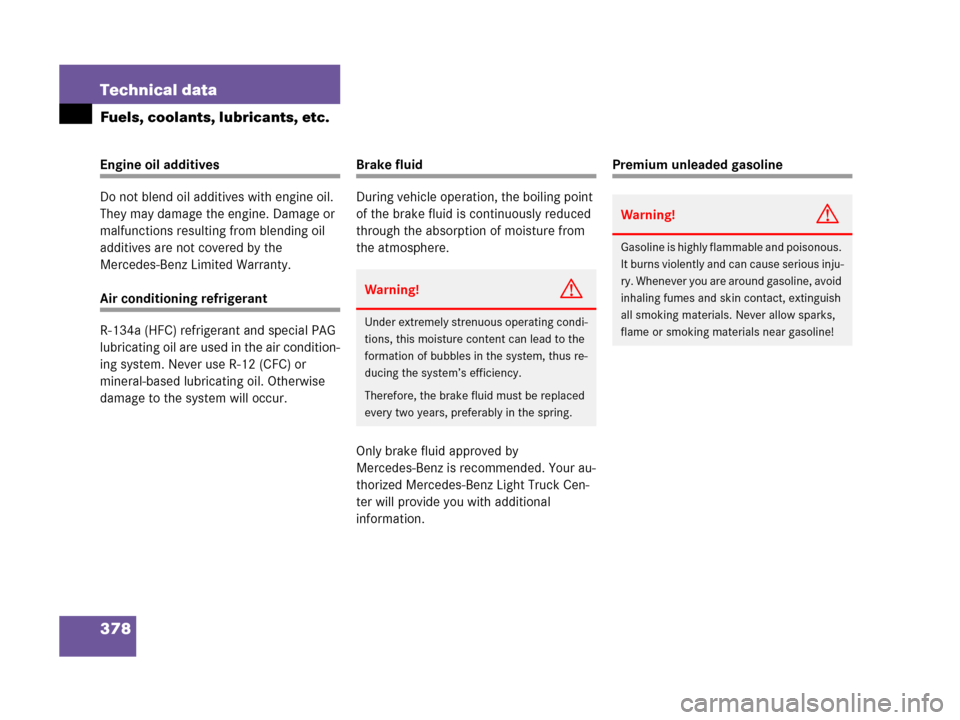
Engine oil additives
Do not blend oil additives with engine oil.
They may damage the engine. Damage or
malfunctions resulting from blending oil
additives are not covered by the
Mercedes-Benz Limited Warranty.
Air conditioning refrigerant
R-134a (HFC) refrigerant and special PAG
lubricating oil are used in the air condition-
ing system. Never use R-12 (CFC) or
mineral-based lubricating oil. Otherwise
damage to the system will occur.
Brake fluid
During vehicle operation, the boiling point
of the brake fluid is continuously reduced
through the absorption of moisture from
the atmosphere.
Only brake fluid approved by
Mercedes-Benz is recommended. Your au-
thorized Mercedes-Benz Light Truck Cen-
ter will provide you with additional
information.Premium unleaded gasoline
Warning!G
Under extremely strenuous operating condi-
tions, this moisture content can lead to the
formation of bubbles in the system, thus re-
ducing the system’s efficiency.
Therefore, the brake fluid must be replaced
every two years, preferably in the spring.
Warning!G
Gasoline is highly flammable and poisonous.
It burns violently and can cause serious inju-
ry. Whenever you are around gasoline, avoid
inhaling fumes and skin contact, extinguish
all smoking materials. Never allow sparks,
flame or smoking materials near gasoline!
Page 384 of 417
383 Technical terms
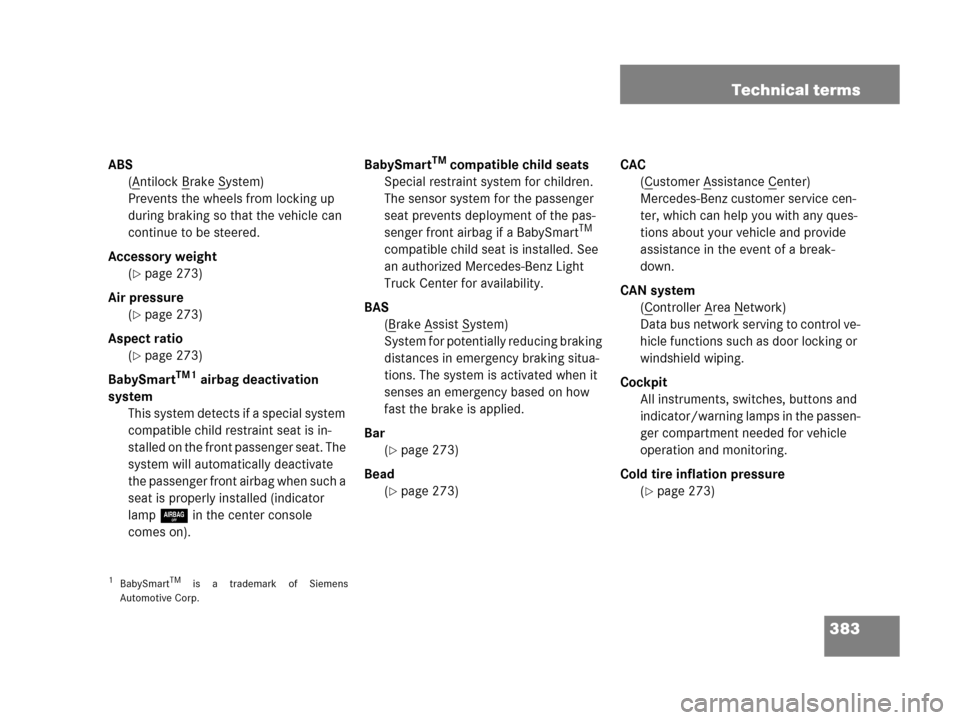
ABS
(A
ntilock Brake System)
Prevents the wheels from locking up
during braking so that the vehicle can
continue to be steered.
Accessory weight
(
�page 273)
Air pressure
(
�page 273)
Aspect ratio
(
�page 273)
BabySmart
TM1 airbag deactivation
system
This system detects if a special system
compatible child restraint seat is in-
stalled on the front passenger seat. The
system will automatically deactivate
the passenger front airbag when such a
seat is properly installed (indicator
lamp7 in the center console
comes on).BabySmart
TM compatible child seats
Special restraint system for children.
The sensor system for the passenger
seat prevents deployment of the pas-
senger front airbag if a BabySmart
TM
compatible child seat is installed. See
an authorized Mercedes-Benz Light
Truck Center for availability.
BAS
(B
rake Assist System)
System for potentially reducing braking
distances in emergency braking situa-
tions. The system is activated when it
senses an emergency based on how
fast the brake is applied.
Bar
(
�page 273)
Bead
(
�page 273)CAC
(C
ustomer Assistance Center)
Mercedes-Benz customer service cen-
ter, which can help you with any ques-
tions about your vehicle and provide
assistance in the event of a break-
down.
CAN system
(C
ontroller Area Network)
Data bus network serving to control ve-
hicle functions such as door locking or
windshield wiping.
Cockpit
All instruments, switches, buttons and
indicator/warning lamps in the passen-
ger compartment needed for vehicle
operation and monitoring.
Cold tire inflation pressure
(
�page 273)
1BabySmartTM is a trademark of Siemens
Automotive Corp.