Page 229 of 521

With the engine switched off, it is possible
to continue to heat or ventilate the interior
for up t")
228 Controls in detail4-zone automatic climate control*Residual heat and ventilation (Canada only)
With the engine switched off, it is possible
to continue to heat or ventilate the interior
for up to 30 minutes. This feature makes
use of the residual heat produced by the
engine.
Activating
�
Switch off the ignition.
�
Press buttonT (
�page 217).
REST in the display4 (�page 217)
comes on.Deactivating
�
Press buttonT (
�page 217) again.
REST in the display4 (�page 217)
goes out.
iIf you switch on the residual heat
function when temperatures are high,
only the ventilation will be switched on.iRegardless of the selected air volume,
the blower operates at low speed.
iHow long the system will provide heat-
ing depends on�
the coolant temperature
�
the temperature set by the operator
The blower will run at speed setting1
regardless of the air distribution
control setting.
iThe residual heat is automatically
turned off:�
when the ignition is switched on
�
after about 30 minutes
�
if the battery voltage drops
�
if the coolant temperature is too
low
Page 246 of 521

245 Controls in detail
Driving systems
Canceling cruise control
There are several ways to cancel the cruise
control:�
Step on the brake pedal.
The cruise control is canceled. The last
speed set is stored for later use.
or
�
Briefly push the cruise control lever in
direction of arrow3 (
�page 244).
The cruise control is canceled. The last
speed set is stored for later use.
iThe last stored speed is canceled when
you turn off the engine.
iThe cruise control switches off auto-
matically if�
you step on the brake pedal.
�
you depress the parking brake
pedal.
In this case the segments in the
multifunction display (
�page 249)
go out and no warning sounds.
�
the vehicle speed is below 20 mph
(30 km/h).
�
the ESP
® is in operation or
switched off with the ESP
® switch
(
�page 96).
�
you move the gear selector lever to
position N while driving.
The segments in the multifunction dis-
play (�page 249) go out, and an
acoustic warning sounds.
!Moving gear selector lever to
positionN while driving also cancels
the cruise control. However, the gear
selector lever should not be moved to
positionN while driving except to coast
when the vehicle is in danger of skid-
ding (e.g. on icy roads).iDepressing the accelerator pedal does
not deactivate the cruise control. After
brief acceleration (e.g. for passing), the
cruise control will resume the last
speed set.
Page 255 of 521
 increments
Faster�
Briefly tip the cruise control lever in di-
rection of arrow4 (
�page 252).Setting to last stored spe")
254 Controls in detailDriving systemsFine adjustment in 1 mph
(Canada: 1 km/h) increments
Faster�
Briefly tip the cruise control lever in di-
rection of arrow4 (
�page 252).Setting to last stored speed
(“Resume” function)
�
Briefly tip the cruise control lever in di-
rection of arrow4 (
�page 252).
Distronic is activated and set to the last
stored speed.
�
Remove your foot from the accelerator
pedal.Deactivating Distronic
There are several ways to deactivate the
Distronic system:
�
Briefly tip the cruise control lever in di-
rection of arrow3 (
�page 252).
or
�
Step on the brake pedal.
Distronic will be deactivated. The last
speed set will be stored into memory.
Warning!
G
The speed stored in memory should only be
set again if prevailing road conditions per-
mit. Possible acceleration or deceleration
differences arising from returning to the pre-
set speed could cause an accident and/or
serious injury to you and others.
iThe following message will appear in
the multifunction display for approxi-
mately 5 seconds:Distronic offThe last stored speed is deleted when
you turn off the engine.
Page 261 of 521

260 Controls in detailDriving systems1Damping button
2Indicator lamps�
Start the engine.
�
Press the damping button1 until the
desired suspension style is set.Vehicle level control
Your vehicle automatically adjusts its ride
height to
�
increase vehicle safety
�
reduce fuel consumption
The following vehicle chassis ride heights
can be selected:
�
Normal
�
Raised
The vehicle chassis ride height is raised or
lowered according to the selected level
setting and to the vehicle speed:
�
At a speed exceeding approximately
68 mph (110 km/h) with normal level
set or exceeding 75 mph (120 km/h)
with raised level set, the ride height is
reduced automatically. The table on
the next page provides an overview of
the vehicle levels.
�
With decreasing speed, the ride height
is again raised to the normal level.
!If you have selected the Comfort sus-
pension tuning, the vehicle lowers
slightly when you lock it within approx-
imately 60 seconds after switching off
the engine. When parking, make sure
that your vehicle cannot come into con-
tact with other objects, such as a curb,
while lowering. Your vehicle could oth-
erwise be damaged.iThe selected suspension style is stored
in memory, even after the SmartKey is
removed from the starter switch.
Page 263 of 521
262 Controls in detailDriving systemsThe following vehicle level settings can be
selected when the vehicle is stationary and
the engine is running:Vehicle level
when stationary
Indicator lamp
Suspension
tuning
Use for
Ride height increase
over normal
Automatic lowering
Normal
Lamp off
Comfort
For driving on normal
roads
None
Max. approx. 0.4 in (10 mm)
Normal
Lamp off
Sport 1 or 2
For driving on normal
roads
None
Max. approx. 0.6 in (15 mm)
Raised
Lamp on
Comfort
For driving on rough
roads or with snow
chains
Approx. 0.8 in (20 mm)
Max. approx. 1.2 in (30 mm)
Raised
Lamp on
Sport 1 or 2
For driving on rough
roads or with snow
chains
Approx. 0.8 in (20 mm)
Max. approx. 1.4 in (35 mm)
Page 264 of 521
.
�
Briefly press")
263 Controls in detail
Driving systems
The button is located in the lower section
of the center console.
1Vehicle level control button
2Indicator lamp �
Start the engine (
�page 36).
�
Briefly press button1 to change from
normal level to raised level. When vehi-
cle is at raised level, pressing the but-
ton will return the vehicle to normal
level.
When raised level is set, indicator
lamp2 in the button comes on.
When normal level is set, indicator
lamp2 in the button goes out.
Parktronic system (Parking assist)*
iAt a speed of approximately above
75 mph (120 km / h) or if the speed
amounts to between 50 mph
(80 km / h) and 75 mph (120 km / h)
for approximately five minutes, the set-
ting raised is canceled. The indicator
lamp 2 in the button goes out.
If you do not drive in this speed range,
the raised level remains stored even if
the SmartKey is removed from the
starter switch.
Warning!
G
Parktronic is a supplemental system. It is
not intended to, nor does it replace, the
need for extreme care. The responsibility
during parking and other critical maneuvers
always rests with the driver.
Special attention must be paid to objects
with smooth surfaces or low silhouettes
(e.g. trailer couplings, painted posts, or road
curbs). Such objects may not be detected by
the system and can damage the vehicle.
The operational function of the Parktronic
system can be affected by dirty sensors, es-
pecially at times of snow and ice, see
“Cleaning the Parktronic system* sensors”
(�page 368).
Interference caused by other ultrasonic sig-
nals (e.g. working jackhammers, car wash or
the air brakes of trucks) can cause the sys-
tem to send erratic indications, and should
be taken into consideration.
Page 282 of 521
281 Controls in detail
Useful features
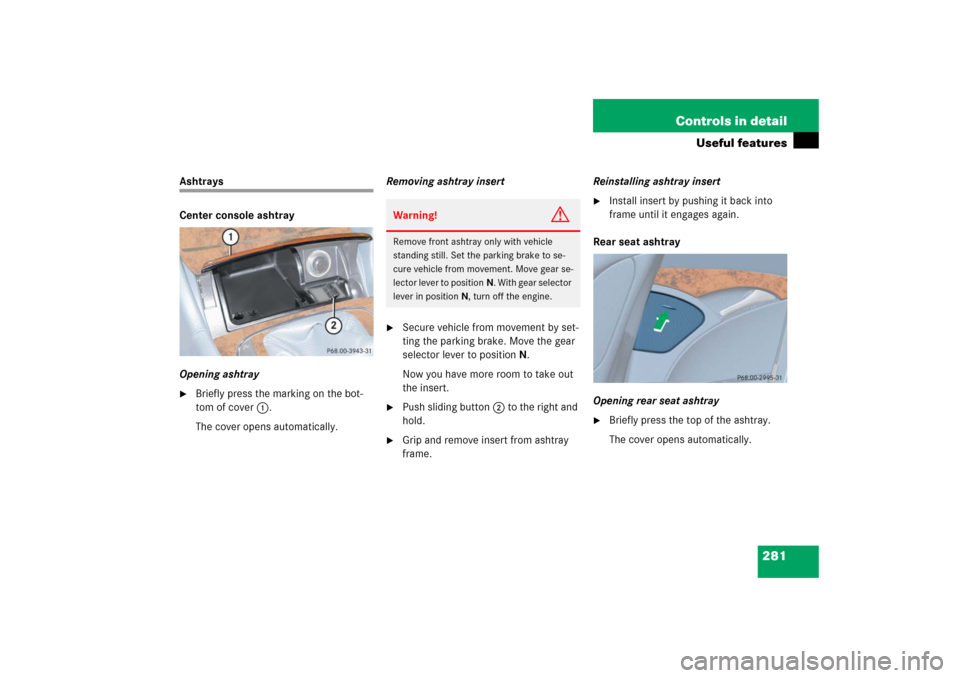
Ashtrays
Center console ashtray
Opening ashtray�
Briefly press the marking on the bot-
tom of cover1.
The cover opens automatically.Removing ashtray insert
�
Secure vehicle from movement by set-
ting the parking brake. Move the gear
selector lever to positionN.
Now you have more room to take out
the insert.
�
Push sliding button2 to the right and
hold.
�
Grip and remove insert from ashtray
frame.Reinstalling ashtray insert
�
Install insert by pushing it back into
frame until it engages again.
Rear seat ashtray
Opening rear seat ashtray
�
Briefly press the top of the ashtray.
The cover opens automatically.
Warning!
G
Remove front ashtray only with vehicle
standing still. Set the parking brake to se-
cure vehicle from movement. Move gear se-
lector lever to positionN. With gear selector
lever in positionN, turn off the engine.
Page 286 of 521

285 Controls in detail
Useful features
Telephone*
Radio transmitters, such as a portable tele-
phone or a citizens band unit, should only
be used inside the vehicle if they are con-
nected to an antenna that is installed on
the outside of the vehicle.
The external antenna must be approved by
Mercedes-Benz. Please contact an autho-
rized Mercedes-Benz Center for informa-
tion on the installation of an approved
external antenna. Refer to the radio trans-
mitter operation instructions regarding use
of an external antenna.You can take and place telephone calls us-
ing buttonss andt on the steering
wheel. To carry out other telephone func-
tions, use the control system
(
�page 180).
See separate operating manual for instruc-
tions on how to use the telephone.
Warning!
G
Never operate radio transmitters equipped
with a built-in or attached antenna (i.e. with-
out being connected to an external antenna)
from inside the vehicle while the engine is
running. Doing so could lead to a malfunc-
tion of the vehicle’s electronic system, pos-
sibly resulting in an accident and/or serious
personal injury.
Warning!
G
Please do not forget that your primary re-
sponsibility is to drive the vehicle. A driver’s
attention to the road must always be
his/her primary focus when driving. For
your safety and the safety of others, we rec-
ommend that you pull over to a safe location
and stop before placing or taking a tele-
phone call.
If you choose to use the telephone
1 while
driving, please use the hands-free device
and only use the telephone when road,
weather and traffic conditions permit. Some
jurisdictions prohibit the driver from using a
cellular telephone while driving a vehicle.
Only operate the COMAND (Cockpit Man-
agement and Data System) if road, weather
and traffic conditions permit.
1Observe all legal requirements.
Bear in mind that at a speed of just 30 mph
(approximately 50 km /h), your vehicle is
covering a distance of 44 feet (approximate-
ly 14 m) every second.