Page 282 of 521
281 Controls in detail
Useful features
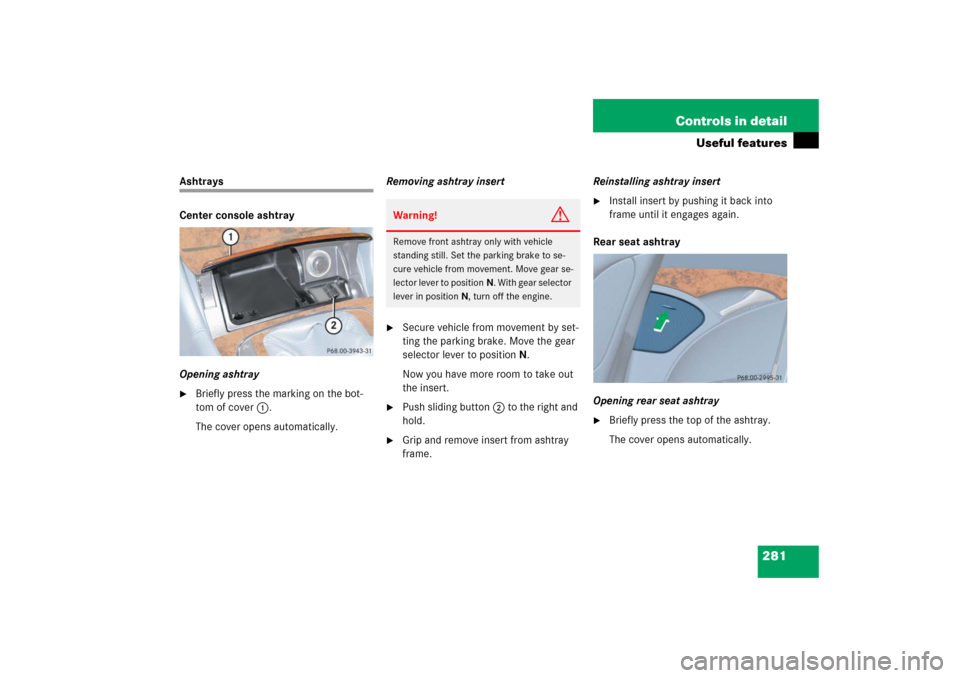
Ashtrays
Center console ashtray
Opening ashtray�
Briefly press the marking on the bot-
tom of cover1.
The cover opens automatically.Removing ashtray insert
�
Secure vehicle from movement by set-
ting the parking brake. Move the gear
selector lever to positionN.
Now you have more room to take out
the insert.
�
Push sliding button2 to the right and
hold.
�
Grip and remove insert from ashtray
frame.Reinstalling ashtray insert
�
Install insert by pushing it back into
frame until it engages again.
Rear seat ashtray
Opening rear seat ashtray
�
Briefly press the top of the ashtray.
The cover opens automatically.
Warning!
G
Remove front ashtray only with vehicle
standing still. Set the parking brake to se-
cure vehicle from movement. Move gear se-
lector lever to positionN. With gear selector
lever in positionN, turn off the engine.
Page 285 of 521

284 Controls in detailUseful featuresSwitching off�
Turn switch at the tip of stalk in direc-
tion of arrow2.
The heated steering wheel is switched
off. Indicator lamp1 goes out.
For information on steering wheel, see
“Multifunction steering wheel”
(
�page 154).
Floormats
1Retainer pin
2Eyelet
Removing
�
Pull floormat off of retainer pins1.
�
Remove the floormat.
Installing
�
Lay down the floormat.
�
Press the floormat eyelets2 onto re-
tainer pins1.
iIndicator lamp1 flashes or goes out�
in case of power surge or undervolt-
age
�
in case of a steering wheel heating
malfunction
iThe steering wheel heating switches off
automatically when you remove the
SmartKey from the starter switch or, on
vehicles with KEYLESS-GO*, when you
switch off the ignition (
�page 62) and
open the driver’s door.
iTo install or remove the floormat more
easily, move the driver’s seat or front
passenger seat as far to the rear as
possible (
�page 41).
Warning!
G
Whenever you are using floormats, make
sure there is enough clearance and that the
floormats are securely fastened.
Floormats should always be securely fas-
tened using eyelets 2 and retainer pins1.
Before driving off, check that the floormats
are securely in place and adjust them if nec-
essary. A loose floormat could slip and
hinder proper functioning of the pedals.
Page 312 of 521

311 Operation
Driving instructions
Passenger compartmentDriving abroad
Abroad, there is an extensive
Mercedes-Benz service network at your
disposal. If you plan to drive into areas
which are not listed in the index of your
Mercedes-Benz Center directory, you
should request pertinent information from
your authorized Mercedes-Benz Center.Control and operation of radio trans-
mitter
COMAND, radio and telephone*Telephones and two-way radios
Radio transmitters, such as a portable tele-
phone or a citizens band unit should only
be used inside the vehicle if they are con-
nected to an antenna that is installed on
the outside of the vehicle.
Refer to the radio transmitter operation in-
structions regarding use of an external an-
tenna.
Warning!
G
Always fasten items being carried as secure-
ly as possible.
In an accident, during hard braking or sud-
den maneuvers, loose items will be thrown
around inside the vehicle, and cause injury
to vehicle occupants unless the items are
securely fastened in the vehicle.
The trunk is the preferred place to carry ob-
jects.
Warning!
G
Please do not forget that your primary re-
sponsibility is to drive the vehicle safely.
Only operate the COMAND (Cockpit Man-
agement and Data System), radio or tele-
phone
1 if road, weather and traffic
conditions permit.
Bear in mind that at a speed of just 30 mph
(approximately 50 km/h), your vehicle is
covering a distance of 44 feet (approximate-
ly 14 m) every second.
1Observe all legal requirements.
Warning!
G
Never operate radio transmitters equipped
with a built-in or attached antenna (i.e. with-
out being connected to an external antenna)
from inside the vehicle while the engine is
running. Doing so could lead to a malfunc-
tion of the vehicle’s electronic system, pos-
sibly resulting in an accident and/or
personal injury.
Page 394 of 521

393 Practical hints
What to do if …
Display messages
Possible cause/conse-
quence
Possible solution
Front passenger
airbag
activated
See Operator’s Manual
Front passenger front air bag is
activated while driving even
though a child, small individual,
or object below the system’s
weight threshold is on the front
passenger seat, or the front
passenger seat is empty. Ob-
jects on the seat or forces act-
ing on the seat may make the
system sense supplemental
weight.
Stop the vehicle in a safe location as soon as possible and check the
front passenger seat for the following:�
Switch off the ignition (
�page 36).
�
Open the front passenger door.
�
Remove child and child restraint from front passenger seat and
properly secure the child in rear seat employing the child restraint
if necessary.
�
Remove any other items from on and around the front passenger
seat and make sure the storage pocket on the back of the front pas-
senger seat is empty.
�
Make sure that no objects which apply forces to the seat are
present (e.g. objects such as books, briefcases etc. lodged behind
or around the seat, head restraints pushing against roof etc.). The
system may recognize such forces as supplemental weight and
sense that an occupant on the front passenger seat is of a greater
weight than actually present.
�
Keep the seat unoccupied, close the front passenger door and turn
on the ignition (
�page 36).
(Continued on next page)
Page 423 of 521
422 Practical hintsWhere will I find ...?First aid kit
The first aid kit is in the storage compart-
ment at the front edge of the front passen-
ger seat.
1Tab�
Pull tab1 upward.
�
Fold the covering forward.
�
Remove the first aid kit.
Spare wheel
The spare wheel is located under the trunk
floor.�
Lift the trunk floor and engage the han-
dle in the upper edge of trunk.
�
Remove the luggage box (
�page 423).
1Vehicle tool kit
Wheel bolt wrench and jack
2Spare wheel
3Luggage bowlRemoving the spare wheel
�
Turn luggage bowl3 counterclock-
wise.
�
Remove spare wheel2.
Storing the spare wheel
�
Place spare wheel2 in wheel well.
�
Turn luggage bowl3 clockwise to its
stop to secure the spare wheel.
iCheck expiration dates and contents
for completeness at least once a year
and replace missing/expired items.
!Always lower trunk floor before closing
trunk.
Page 425 of 521
.
The vehicle tool kit includes:
�
One pair of univ")
424 Practical hintsWhere will I find ...?Vehicle tool kit
The vehicle tool kit is stored in the com-
partment underneath the trunk floor
(�page 422).
The vehicle tool kit includes:
�
One pair of universal pliers
�
One towing eye bolt
�
One wheel wrench
�
One alignment bolt
�
One fuse extractor
�
Spare fuses
�
Collapsible wheel chock
�
A pair of gloves
Setting up the collapsible wheel chock
The collapsible wheel chock serves to
additionally secure the vehicle, e.g. while
changing the wheel.1Tilt the plates upward
2Fold the lower plate outward
3Insert the plate
�
Tilt both plates upward1.
�
Fold the lower plate outward2.
�
Guide the tabs of the lower plate all the
way into the openings of the base
plate3.
Vehicle jackWarning!
G
The jack is designed exclusively for jacking
up the vehicle at the jack take-up brackets
built into both sides of the vehicle. To help
avoid personal injury, use the jack only to lift
the vehicle during a wheel change. Never
get beneath the vehicle while it is supported
by the jack. Keep hands and feet away from
the area under the lifted vehicle. Always
firmly set parking brake and block wheels
before raising vehicle with jack.
Do not disengage parking brake while the
vehicle is raised. Be certain that the jack is
always vertical (plumb line) when in use,
especially on hills. Always try to use the jack
on level surface. Make sure the jack arm is
fully seated in the jack take-up bracket.
Always lower the vehicle onto sufficient
capacity jackstands before working under
the vehicle.
Page 453 of 521
 and
(
�page 450).
�
Remove the luggage box (
�page 423).
�
Disconnect battery negative lead1.
�
Remove")
452 Practical hintsBatteries�
Read and observe safety instructions
and precautions (
�page 326) and
(
�page 450).
�
Remove the luggage box (
�page 423).
�
Disconnect battery negative lead1.
�
Remove cover2 from the positive ter-
minal.
�
Disconnect the battery positive lead.
Removing the battery�
Remove the screw-nuts securing the
battery.
�
Remove the battery bracket.
�
Pull out the battery ventilation tube
from the battery (depending on battery
arrangement in your vehicle model, the
ventilation tube is located either on the
left or right side of the battery).
�
Take out the battery.
Charging and reinstalling the battery
�
Charge battery in accordance with the
instructions of the battery charger
manufacturer.
�
Reinstall the charged battery. Follow
the previously described steps in re-
verse order.
Warning!
G
Never charge a battery while still installed in
the vehicle unless the accessory battery
charge unit* approved by Mercedes-Benz is
being used. Gases may escape during charg-
ing and cause explosions that may result in
paint damage, corrosion or personal injury.
An accessory battery charge unit* specially
adapted for Mercedes-Benz vehicles and
tested and approved by Mercedes-Benz is
available, permitting the charging of the bat-
tery in its installed position. Contact an au-
thorized Mercedes-Benz Center for
information and availability. Charge battery
in accordance with the separate instruc-
tions for the accessory battery charger*.
!The battery, its filler caps and the bat-
tery ventilation tube must always be se-
curely installed when the vehicle is in
operation.
��
Page 462 of 521

and systems secured by that fuse w")
461 Practical hintsFuses
�Fuses
Fuses are designed to protect the electri-
cal circuits in your vehicle from a short cir-
cuit. If a fuse is blown, the component(s)
and systems secured by that fuse will stop
operating.
The following aids are available to help you
replace fuses (
�page 461):
�
Fuse chart
�
Spare fuses
�
Fuse extractor
The electrical fuses are located in different
fuse boxes:
�
Main fuse box in passenger
compartment (
�page 462)
�
Fuse box in trunk (
�page 462)
Aids for replacing fuses
Fuse chart
The fuse chart is located in the fuse box in
the passenger compartment (
�page 462).
The amperages of the fuses are also given
there.
Spare fuses
Spare fuses are located in the vehicle tool
kit in the trunk (
�page 424).
Fuse extractor
The fuse extractor is located in the vehicle
tool kit in the trunk (�page 424).
Warning!
G
Only use fuses approved by Mercedes-Benz
with the specified amperage for the system
in question. Using other fuses may cause an
overload leading to a fire, and/or cause
damage to electrical components and/or
systems.
!Never attempt to repair or bridge a
blown fuse. Have the cause determined
and remedied by an authorized
Mercedes-Benz Center.!Keep the fuse boxes free by contamina-
tion and wetness. Otherwise, electrical
parts or systems could be damaged.