Page 425 of 521
.
The vehicle tool kit includes:
�
One pair of univ")
424 Practical hintsWhere will I find ...?Vehicle tool kit
The vehicle tool kit is stored in the com-
partment underneath the trunk floor
(�page 422).
The vehicle tool kit includes:
�
One pair of universal pliers
�
One towing eye bolt
�
One wheel wrench
�
One alignment bolt
�
One fuse extractor
�
Spare fuses
�
Collapsible wheel chock
�
A pair of gloves
Setting up the collapsible wheel chock
The collapsible wheel chock serves to
additionally secure the vehicle, e.g. while
changing the wheel.1Tilt the plates upward
2Fold the lower plate outward
3Insert the plate
�
Tilt both plates upward1.
�
Fold the lower plate outward2.
�
Guide the tabs of the lower plate all the
way into the openings of the base
plate3.
Vehicle jackWarning!
G
The jack is designed exclusively for jacking
up the vehicle at the jack take-up brackets
built into both sides of the vehicle. To help
avoid personal injury, use the jack only to lift
the vehicle during a wheel change. Never
get beneath the vehicle while it is supported
by the jack. Keep hands and feet away from
the area under the lifted vehicle. Always
firmly set parking brake and block wheels
before raising vehicle with jack.
Do not disengage parking brake while the
vehicle is raised. Be certain that the jack is
always vertical (plumb line) when in use,
especially on hills. Always try to use the jack
on level surface. Make sure the jack arm is
fully seated in the jack take-up bracket.
Always lower the vehicle onto sufficient
capacity jackstands before working under
the vehicle.
Page 427 of 521
426 Practical hintsUnlocking/locking in an emergencyUnlocking the vehicle
If you cannot unlock the vehicle with the
SmartKey or SmartKey with
KEYLESS-GO*, open the driver’s door and
the trunk using the mechanical key. Removing the mechanical key
1Mechanical key locking tab
2Mechanical key
�
Move locking tab1 in direction of ar-
row.
�
Slide mechanical key2 out of the
housing.Unlocking the driver’s door
1Unlocking
�
Insert the mechanical key into the
driver’s door lock until it stops.
�
Turn the mechanical key counterclock-
wise to position1.
The driver’s door is unlocked.
iUnlocking your vehicle with the me-
chanical key will trigger the anti-theft
alarm system. To cancel the alarm, do
one of the following:�
Press button Œ or ‹ on the
SmartKey.
�
Insert the SmartKey in the starter
switch.
Vehicles with KEYLESS-GO*
�
Pull the outside door handle.
�
Press the KEYLESS-GO* start/stop
button.
Page 428 of 521
 is required to open the trunk lid.
The handle is located above the rear li-
c")
427 Practical hints
Unlocking/locking in an emergency
Unlocking the trunk
A minimum height clearance of 5.90 ft
(1.80 m) is required to open the trunk lid.
The handle is located above the rear li-
cense plate recess.
1Unlocking in an emergency
2Handle�
Insert the mechanical key into the
trunk lid lock until it stops.
�
Turn the mechanical key counterclock-
wise to position1 and hold it in this
position.
�
Pull the handle2 and lift the trunk lid.
The trunk opens.
�
Turn the mechanical key back and re-
move it from the trunk lid lock.
Locking the vehicle
If you are unable to lock the vehicle with
the SmartKey or SmartKey with
KEYLESS-GO*, do the following:�
Close the passenger door, the rear
doors and the trunk.
�
Press the central locking switch in the
center console (
�page 130).
�
Check to see whether the locking
knobs on the doors have moved down.
�
If necessary, push them down
manually.
�
Remove the mechanical key out of the
SmartKey (
�page 426).
�
Check whether the trunk is locked.
�
If necessary, lock the trunk with the
mechanical key (
�page 128).
Except for the driver’s door, the vehicle
should now be locked.
1Locking
�
Insert the mechanical key into the
driver’s door lock until it stops.
�
Turn the mechanical key clockwise to
position1.
The driver’s door is locked.
!Always make sure there is sufficient
overhead clearance.
Page 429 of 521
428 Practical hintsUnlocking/locking in an emergencyFuel filler flap emergency release
In case the central locking system does
not release the fuel filler flap, you can open
it manually.
1Release knob�
Open the trunk.
�
Remove right-side tail trim.
�
Turn release knob1 clockwise (ar-
row).
The fuel filler flap can know be opened.Manually unlocking the gear selector
lever
In case of power failure, the gear selector
lever can be manually unlocked, e.g. to tow
the vehicle.
1Pin�
Open the storage compartment in the
center armrest (
�page 279).
�
Take out the cup holder (
�page 279).
�
Insert a suitable object1 (e.g. a pin)
through the hole and press the pin
downward.
�
Remove pin1.
iThe gear selector lever is locked again
when moving it to positionP.
Page 452 of 521

451 Practical hints
Batteries
Disconnecting the battery�
Depress parking brake firmly or move
gear selector lever to positionP.
�
Turn off all electrical consumers.
�
Remove SmartKey from starter switch.
Vehicles with KEYLESS-GO*:�
Press the start/stop button until
the engine shuts off.
�
Open the driver’s door.
�
Open the trunk.
!Never loosen or detach battery termi-
nal clamps while the engine is running
or the SmartKey is in the starter switch.
Otherwise the alternator and other
electronic components could be se-
verely damaged.
Have the battery checked regularly by
an authorized Mercedes-Benz Center.
Refer to Maintenance Booklet for main-
tenance intervals or contact an autho-
rized Mercedes-Benz Center for further
information.Warning!
G
Do not place metal objects on the battery as
this could result in a short circuit.
Use leak-proof battery only to avoid the risk
of acid burns in the event of an accident.
Warning!
G
The electrohydraulic brake system requires
electrical power to operate.
A malfunction in the vehicle’s power supply
or electrical system may impair brake sys-
tem operation and switch it into its emer-
gency operation mode. The same applies if
battery is disconnected. To brake, the driver
must then apply significantly greater brake
pedal pressure and depress the pedal much
further to obtain the expected braking ef-
fect. If necessary, apply full pressure to the
brake pedal. Brakes may only be applied to
the front wheels. Stopping distance is in-
creased! Adjust your driving style according-
ly. For more information, refer to
“Electrohydraulic brake system”
(�page 97).
Warning!
G
With a disconnected battery�
you will no longer be able to turn the
SmartKey in the starter switch and
pressing the KEYLESS-GO* start/stop
button on the gear selector lever will
have no effect
�
the gear selector lever will remain
locked in positionP
��
Page 456 of 521
455 Practical hints
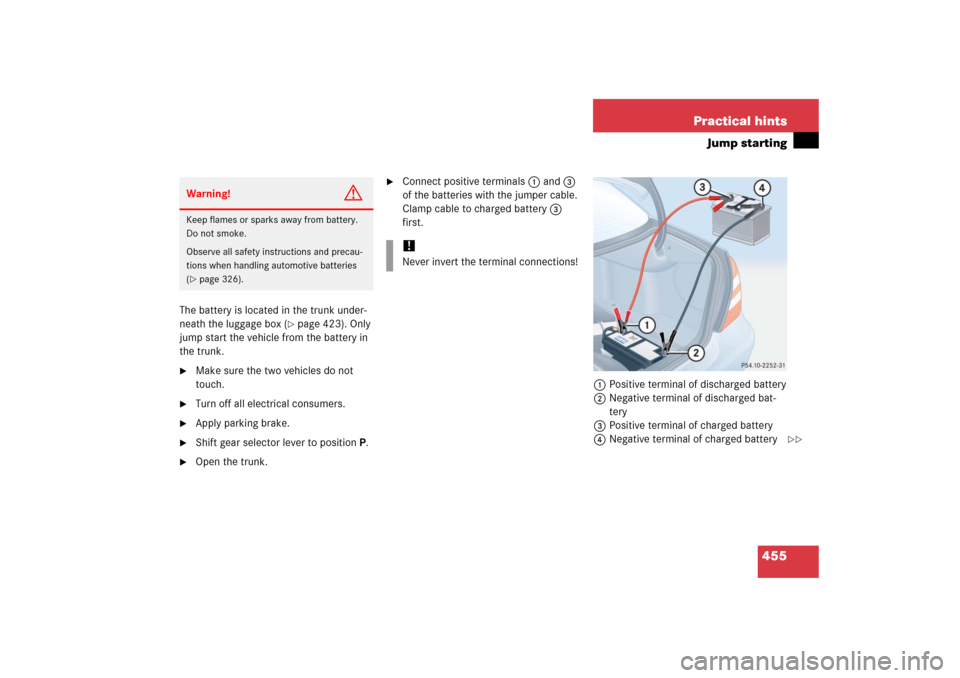
Jump starting
The battery is located in the trunk under-
neath the luggage box (
�page 423). Only
jump start the vehicle from the battery in
the trunk.
�
Make sure the two vehicles do not
touch.
�
Turn off all electrical consumers.
�
Apply parking brake.
�
Shift gear selector lever to positionP.
�
Open the trunk.
�
Connect positive terminals1 and3
of the batteries with the jumper cable.
Clamp cable to charged battery3
first.
1Positive terminal of discharged battery
2Negative terminal of discharged bat-
tery
3Positive terminal of charged battery
4Negative terminal of charged battery
Warning!
G
Keep flames or sparks away from battery.
Do not smoke.
Observe all safety instructions and precau-
tions when handling automotive batteries
(�page 326).
!Never invert the terminal connections!
��
Page 463 of 521
462 Practical hintsFusesMain fuse box in passenger compartment
The main fuse box is located behind a cov-
er in the dashboard on the driver’s side.
1Recess in the cover
2CoverOpening
�
Open the driver’s door.
�
Insert flat, blunt object as a lever in
recess1 on the edge of cover2.
�
Loosen cover2 from the dashboard
using lever.
�
Using your hands, pull cover2 in di-
rection of arrow and remove.
Closing
�
Hook cover2 into the opening at the
front.
�
Press cover2 back on until it engag-
es.
Fuse box in trunk
The fuse box is located behind the
left-hand trim panel in the trunk.
Fuse box cover design may vary depending
on vehicle equipment. Cover with turn catches shown 1Cover
2Catches
Opening cover (with turn catches)�
Turn catches2 counter-clockwise.
and remove cover1.
�
Remove cover1.
!Do not use sharp objects such as a
screw driver to open the fuse box
cover2 in the dashboard, as this
could damage it.
Page 508 of 521
 360
Fuel")
507 Index
Front passenger front air bag
Messages in display 384
Front passenger front air bag off indicator
lamp 72, 85
Front seat head restraints see Head re-
straints
FSS (Canada vehicles) 360
Fuel 303, 316
Additives 488
Capacities, Fuel tank 486
Diesel fuel 316, 486, 489
Filling the tank 315
Fuel filler flap and cap 315
Fuel reserve warning lamp 380, 411
Premium unleaded gasoline 316
Requirements
Gasoline additives 488
Premium unleaded gasoline 488
Requirements, Diesel fuel 489
Requirements, Octane rating (Gasoline
engine) 489
Technical data 484
Fuel consumption statistics
After start 178
Since last reset 178Fuel filler flap 315
Locking/unlocking 315
Opening 315
Opening in an emergency 428
Fuel reserve warning lamp 25, 411
Fuel tank
Capacity 486
Filler flap 315
Fuel, Premium unleaded gasoline 316,
486, 489
Fuels, coolants, lubricants etc.
Capacities 484
Fuses 461
Aids for replacing fuses 461
Fuse box (main) in passenger
compartment 462
Fuse box in trunk 462
Fuse chart 461
Fuse extractor 461
Replacing 461
Spare fuses 461
G
Garage door opener* 293
Gasoline see Fuel
GAWR 354Gear range 495
Automatic transmission 188
Limiting 188
Shifting into optimal 190
Gear selector lever 50, 183
Lock 50
Message in display 392
Position indicator 183, 185
Unlocking in an emergency 428
Gear selector lever, Cleaning 371
Global Positioning System see GPS
Glove box 276
Good visibility 197
GPS 495
Gross Axle Weight Rating see GAWR
Gross Vehicle Weight Rating see GVWR
Gross Vehicle Weight see GVW
GVW 354
GVWR 354
H
Halogen headlamps see Headlamps
Hard plastic trim items, cleaning 371
Hazard warning flasher 146