Page 102 of 521

101 Safety and Security
Anti-theft systems
�Anti-theft systems
Immobilizer
The immobilizer prevents unauthorized
persons from starting your vehicle.
Activating
With the SmartKey�
Remove the SmartKey from the starter
switch.
With KEYLESS-GO*
�
Turn off the engine by means of the
start/stop button on the gear selector
lever.
�
Open the driver’s door.Deactivating
With the SmartKey
�
Switch on the ignition (
�page 36).
With KEYLESS-GO*
�
Start the engine by means of the
start/stop button on the gear selector
lever.
Anti-theft alarm system
Once the alarm system has been armed, a
visual and audible alarm is triggered when
someone opens:�
a door
�
the trunk
�
the hood
The alarm will stay on, even if the activat-
ing element (a door, for example) is imme-
diately closed.
iIn case the engine cannot be started
(yet the vehicle’s battery is charged),
the system is not operational. Contact
an authorized Mercedes-Benz Center
or call 1-800-FOR-MERCedes (in the
USA), or 1-800-387-0100 (in Canada).
Page 105 of 521

104 Safety and SecurityAnti-theft systemsDisarming tow-away alarm
To prevent triggering the tow-away alarm
feature, switch off the tow-away alarm be-
fore towing the vehicle, or when parking on
a surface subject to movement, such as a
ferry or auto train.
The button is located on the overhead con-
trol panel.
1Tow-away alarm off button�
Switch off the ignition and remove the
SmartKey from the starter switch.
�
Press button1.
The indicator lamp in the button1
comes on briefly.
�
Exit and lock the vehicle with the
SmartKey or (vehicles with
KEYLESS-GO*) the lock button at each
door handle.Canceling tow-away alarm
With the SmartKey
�
Insert the SmartKey in the starter
switch.
or
�
Press button Œ or ‹ on the
SmartKey.
With KEYLESS-GO*
�
Pull an outside door handle.
The SmartKey with KEYLESS-GO must
be within 3 ft (1 m) of the vehicle.
or
�
Press the KEYLESS-GO* start/stop
button (
�page 38).
The SmartKey with KEYLESS-GO must
be inside the vehicle.
iYou cannot disarm the tow-away alarm
when the ignition is switched on.
iWhen you unlock the vehicle, the
tow-away protection disarms automati-
cally.
The tow-away alarm remains disarmed
until you lock the vehicle again.
Page 130 of 521

129 Controls in detail
Locking and unlocking
Automatic central locking
The doors and the trunk automatically lock
when the ignition is switched on and the
wheels are turning at vehicle speeds of ap-
proximately 9mph (15km/h) or more.
You can open a locked door from the in-
side. Open door only when conditions are
safe to do so.For more information on towing the vehi-
cle, see the “Practical hints” section
(
�page 457).
You can deactivate the automatic locking
mode using the control system
(�page 174).
Locking and unlocking from the inside
You can lock or unlock the doors and the
trunk from inside using the central locking
switch. This can be useful, for example, if
you want to lock the vehicle before starting
to drive.
The fuel filler flap cannot be locked or un-
locked with the central locking switch.
iThe doors unlock automatically after an
accident if the force of the impact ex-
ceeds a preset threshold.
The vehicle automatically locks when
the ignition is switched on and the
wheels are turning at vehicle speeds of
approximately 9 mph (15 km/h) or
more. You could therefore lock yourself
out when the vehicle�
is pushed or towed
�
is on a test stand
Warning!
G
When leaving the vehicle, always remove the
SmartKey or the SmartKey with
KEYLESS-GO* from the starter switch, take
it with you, and lock the vehicle. Do not
leave children unattended in the vehicle, or
with access to an unlocked vehicle. Unsu-
pervised use of vehicle equipment may
cause an accident and/or serious personal
injury.
Page 132 of 521
.
Front seat active head restraints
You cannot remove the active head re-")
131 Controls in detailSeats
� Seats
For more information on seat adjustment,
see the “Getting started” section
(�page 41).
Front seat active head restraints
You cannot remove the active head re-
straint on the driver’s and passenger’s
seats.For removal of the active head restraints
we recommend that you contact an autho-
rized Mercedes-Benz Center.
For information on head restraint adjust-
ment, see “Seats” (
�page 42).
For information on active head restraints,
see “Active head restraints” (
�page 77).
Rear seat head restraints
Folding head restraints back with
switch in the center console
The rear seat head restraints can be folded
backward for increased visibility.
1Head restraint release switch�
Switch on the ignition (
�page 36).
Warning!
G
For your protection, drive only with properly
positioned head restraints.
Adjust head restraint so that the center of
the head restraint supports the back of the
head at eye level. This will reduce the poten-
tial for injury to the head and neck in the
event of an accident or similar situation.
Do not drive the vehicle without the seat
head restraints. Head restraints are intend-
ed to help reduce injuries during an acci-
dent.
iAdjust the head restraint in such a way
that it is as close to the head as possi-
ble.
iThe rear seat head restraints cannot be
adjusted.
��
Page 135 of 521

134 Controls in detailSeatsDrive - Dynamic seat* with multicon-tour features
The Drive - Dynamic seat automatically ad-
justs the lateral support provided by the
backrest to your driving style.
The Drive - Dynamic seat electronically
controls the air pressure in the air cham-
bers of the backrest side bolsters. This
function improves driving comfort and
pleasure.
In addition, the Drive-Dynamic seat has a
movable seat cushion and inflatable air
cushions built into the backrest to provide
additional lumbar and side support.
The seat cushion movement, backrest
cushion height and curvature can be con-
tinuously varied with switches on the right
side of the seat on the driver side, or the
left side of the seat on the passenger side
after turning the SmartKey in the starter
switch to position2 or pressing the KEY-
LESS-GO* start/stop button twice.1Backrest center
2Backrest bottom
3Seat cushion depth
4Activate drive dynamic function
5Backrest side bolsters
6Massage function
�
Switch on the ignition (
�page 36).Multicontour features
Seat cushion depth
�
Adjust the seat cushion depth to the
length of your upper leg using
switch3.
Backrest contour
�
Move the backrest support to the bot-
tom by using button2 or to the center
by using button1.
�
Adjust the contour of the backrest to
the desired position using æ or
ç.
Backrest side bolsters
�
Adjust the side bolsters so that they
provide good lateral support using
switch5.
Page 137 of 521
.
Switching seat heating on
�
Press switch1 repeatedly until the
desired heating level is set.
One or more red indic")
136 Controls in detailSeats1Seat heating switch�
Switch on the ignition (
�page 36).
Switching seat heating on
�
Press switch1 repeatedly until the
desired heating level is set.
One or more red indicator lamps on the
switch show the selected heating level.Switching seat heating off
�
Press switch1 repeatedly until all in-
dicator lamps go out.
Seat ventilation*
The switch is located on the center con-
sole. Seat ventilation can be activated
manually with the ignition on, or by the
summer opening feature (
�page 234).
The blue indicator lamps on the switch
show the ventilation level selected:
iIf one or more of the lamps on the seat
heating switch are flashing, there is in-
sufficient voltage available since too
many electrical consumers are turned
on. The seat heating switches off auto-
matically.
The seat heating will switch back on
again automatically as soon as suffi-
cient voltage is available.
Level3
Three indicator lamps on
(highest level)
2
Two indicator lamps on
1
One indicator lamp on
(lowest level)
off
No indicator lamp on
Page 138 of 521
137 Controls in detailSeats
1Seat ventilation switch�
Switch on the ignition (
�page 36).Switching seat ventilation on
�
Press button1 repeatedly until the
desired ventilation level is set.
Switching seat ventilation off
�
Press button1 repeatedly until all in-
dicator lamps go out.iThe seat ventilation is automatically set
to the highest level if activated via sum-
mer opening feature (
�page 234).
iIf one or more of the lamps on the seat
ventilation switch are flashing, there is
insufficient voltage available since too
many electrical consumers are turned
on. The seat ventilation switches off au-
tomatically.
The seat ventilation will switch back on
again automatically as soon as suffi-
cient voltage is available.
Page 140 of 521
139 Controls in detail
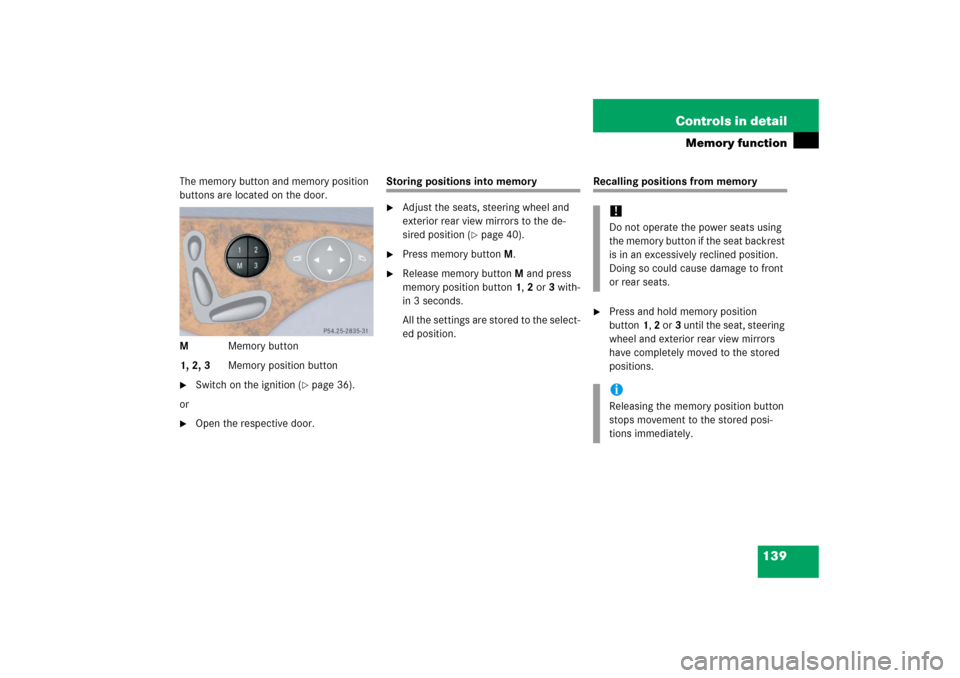
Memory function
The memory button and memory position
buttons are located on the door.
MMemory button
1, 2, 3Memory position button�
Switch on the ignition (
�page 36).
or
�
Open the respective door.
Storing positions into memory�
Adjust the seats, steering wheel and
exterior rear view mirrors to the de-
sired position (
�page 40).
�
Press memory buttonM.
�
Release memory buttonM and press
memory position button 1, 2 or 3 with-
in 3 seconds.
All the settings are stored to the select-
ed position.
Recalling positions from memory�
Press and hold memory position
button1, 2 or3 until the seat, steering
wheel and exterior rear view mirrors
have completely moved to the stored
positions.!Do not operate the power seats using
the memory button if the seat backrest
is in an excessively reclined position.
Doing so could cause damage to front
or rear seats.iReleasing the memory position button
stops movement to the stored posi-
tions immediately.