Page 86 of 521

85 Safety and Security
Occupant safety
The 75 indicator lamp is located
in the center console.
1Indicator lampThe 75 indicator lamp1 will be
illuminated, except with the SmartKey re-
moved or in starter switch position0.
�
that the seat was occupied by a
small individual (such as a young
teenager or a small adult) or a child
weighing more than the weight of a
typical 12-month-old child in a stan-
dard child restraint - instances
where the system may suppress de-
ployment of the passenger front
air bag even though the impact met
the criteria and was of sufficient se-
verity to deploy the driver front
air bag.
Warning!
G
If the 1indicator lamp and the
75 indicator lamp are lit at the
same time, there is a malfunction in the
Occupant Classification System. The front
passenger front air bag will be deactivated
in this case.
In order to ensure proper operation of the
air bag system and OCS:�
Have the system checked as soon as
possible by qualified technicians.
Contact an authorized Mercedes-Benz
Center.
�
Do not place more than 4.4 lbs (2 kg)
into the ruffled storage bag on the back
of the front passenger seat. Otherwise,
the OCS may not be able to properly ap-
proximate the occupant weight
category.
�
Do not place objects under and/or
around the front passenger seat.
�
Do not hang anything from or attach any
items to the seats.
�
Do not stuff objects such as books be-
tween the middle console and the front
passenger seat.
�
Do not move the front passenger seat
backwards against stiff objects.
�
Sit properly belted in a nearly upright
position with your back against the seat
backrest.
�
Do not lean on the armrests or lift your-
self from the seat by using the handle
over the door as this may cause the OCS
to be unable to correctly approximate
the occupant weight category.
�
Only have the seat repaired or replaced
by an authorized Mercedes-Benz
Center.
�
Read and observe all warnings in this
chapter.
Page 87 of 521

86 Safety and SecurityOccupant safetySelf-test Occupant Classification Sys-
tem
After turning the SmartKey in the starter
switch to position1 or2 or pressing the
KEYLESS-GO* start/stop button once or
twice, the 75 indicator lamp1
located in the center console illuminates. If
an adult occupant is properly sitting on the
front passenger seat and the system sens-
es the occupant as being an adult, the
75 indicator lamp will illuminate
and go out after approximately 6 seconds.
If the seat is not occupied and the system
senses the front passenger seat as being
empty, the 75 indicator lamp will
illuminate and not go out. For more information, see the “Practical
hints” section (
�page 393).Installation of infant and child restraint
systems
This vehicle is equipped with tether an-
chorages for a top tether strap at each of
the rear seating positions.
Not foldable rear seat backrest
1Cover
�
Remove cover1 from anchorage ring.
�
Guide tether strap between head re-
straint and top of the seat back.
Warning!
G
If the indicator lamp should not illuminate,
the system is not functioning. You must see
an authorized Mercedes-Benz Center before
seating any child on the front passenger
seat.Warning!
G
Never place anything between seat cushion
and child seat (e.g. pillow), since it reduces
the effectiveness of the Occupant Classifi-
cation System. The bottom of the child seat
must make full contact with the passenger
seat cushion. An incorrectly mounted child
seat could cause injuries to the child in case
of an accident, instead of increasing protec-
tion for the child.
Follow the manufacturer’s instructions for
installation of child seats.
Page 88 of 521
 and positioned such that the
top tether strap can pass freely be-
tween the head restraint and the top of
t")
87 Safety and Security
Occupant safety
�
Head restraint must be installed (if re-
movable) and positioned such that the
top tether strap can pass freely be-
tween the head restraint and the top of
the seat back.
Make sure the tether strap is not twist-
ed.
2Hook
3Anchorage ring
�
Securely fasten the hook2 to the an-
chorage ring3.Once the top tether anchorage hook is at-
tached, the child restraint itself can be se-
cured. Secure the child restraint and
tighten the top tether strap according to
the child restraint manufacturer’s instruc-
tions.
Foldable rear seat backrest*
�
Fold rear seat backrest slightly forward
(�page 271).
�
Remove cover from anchorage ring.
�
Guide tether strap between head re-
straint and top of the seat back.
�
Head restraint must be positioned such
that the top tether strap can pass freely
between the head restraint and the top
of the seat back.
Make sure the tether strap is not twist-
ed.2Hook
3Anchorage ring
�
Securely fasten the hook2 to the an-
chorage ring3.
iFor safety, make sure the hook2 has
attached to the ring3 beyond the
safety catch, as illustrated.
iFor safety, make sure the hook2 has
attached to the ring3 beyond the
safety catch, as illustrated below.
��
Page 89 of 521
88 Safety and SecurityOccupant safety2Hook
3Anchorage ring�
Swing rear seat backrest to the rear un-
til it engages.
�
Check the rear seat backrest to be
locked in its upright position
(�page 399).
Once the top tether anchorage hook is
attached, the child restraint itself can be
secured. Secure the child restraint and
tighten the top tether strap according to
the child restraint manufacturer’s instruc-
tions. Child seat anchors - LATCH type
This vehicle is equipped with two LATCH
(L
ower A
nchors and T
ethers for CH
ildren)
type anchors (at each of the outer rear
seats) for the installation of a “LATCH”
child seat with the matching mounting fit-
tings.
The anchors are located behind an uphol-
stery blend.
1Indicates the position of the anchors
2Anchors
�
Lift up upholstery blend to access the
anchors.
�
Install child seat according to the
manufacturer’s instructions.
��
Page 134 of 521
133 Controls in detailSeats
1Release catch
Removing rear seat head restraints�
Fold the backrest forward
(�page 271).
�
Fold back head restraint (
�page 131).
�
Press head restraint release catch1
and pull the head restraints out of the
guides.
�
Fold the backrest back to its original
position.Installing rear seat head restraints
Lumbar support
The curvature of the driver’s seat can be
adjusted to help enhance lower back sup-
port and seating comfort.
1Adjustment lever�
Move adjustment lever1 in direction
of the arrows until you have reached a
comfortable seating position.
iWhen installing the head restraints,
make sure that:�
you place the correct head restraint
on the middle seat. It is marked
with the letter “M” on the outside of
the metal bars.
�
the head restraints engage fully.
Page 135 of 521

134 Controls in detailSeatsDrive - Dynamic seat* with multicon-tour features
The Drive - Dynamic seat automatically ad-
justs the lateral support provided by the
backrest to your driving style.
The Drive - Dynamic seat electronically
controls the air pressure in the air cham-
bers of the backrest side bolsters. This
function improves driving comfort and
pleasure.
In addition, the Drive-Dynamic seat has a
movable seat cushion and inflatable air
cushions built into the backrest to provide
additional lumbar and side support.
The seat cushion movement, backrest
cushion height and curvature can be con-
tinuously varied with switches on the right
side of the seat on the driver side, or the
left side of the seat on the passenger side
after turning the SmartKey in the starter
switch to position2 or pressing the KEY-
LESS-GO* start/stop button twice.1Backrest center
2Backrest bottom
3Seat cushion depth
4Activate drive dynamic function
5Backrest side bolsters
6Massage function
�
Switch on the ignition (
�page 36).Multicontour features
Seat cushion depth
�
Adjust the seat cushion depth to the
length of your upper leg using
switch3.
Backrest contour
�
Move the backrest support to the bot-
tom by using button2 or to the center
by using button1.
�
Adjust the contour of the backrest to
the desired position using æ or
ç.
Backrest side bolsters
�
Adjust the side bolsters so that they
provide good lateral support using
switch5.
Page 139 of 521

138 Controls in detailMemory functionPrior to operating the vehicle, the driver
should check and adjust the seat height,
seat position fore and aft, and seat back-
rest angle if necessary, to ensure adequate
control, reach and comfort. The head re-
straint should also be adjusted for proper
height. See also the section on air bags
(�page 67) for more information on prop-
er seat positioning.
In addition, adjust the steering wheel to
ensure adequate control, reach, operation
and comfort. Both the interior and exterior
rear view mirrors should be adjusted for
adequate rear vision.
Fasten seat belts. Infants and small chil-
dren should be seated in a properly se-
cured restraint system that complies with
U.S. Federal Motor Vehicle Safety Stan-
dards 213 and 225 and Canadian Motor
Vehicle Safety Standards 213 and 210.2.The following settings are stored when us-
ing the buttons on the driver’s door:
�
Driver’s seat, backrest, head restraint
position and settings for multicontour
seat
�
Steering wheel position
�
Exterior rear view mirror positions
The following settings are stored when us-
ing the buttons on the front passenger
door:
�
Front passenger seat, backrest, head
restraint position and settings for mul-
ticontour seat
Warning!
G
Do not activate the memory function while
driving. Activating the memory function
while driving could cause the driver to lose
control of the vehicle.
Page 140 of 521
139 Controls in detail
Memory function
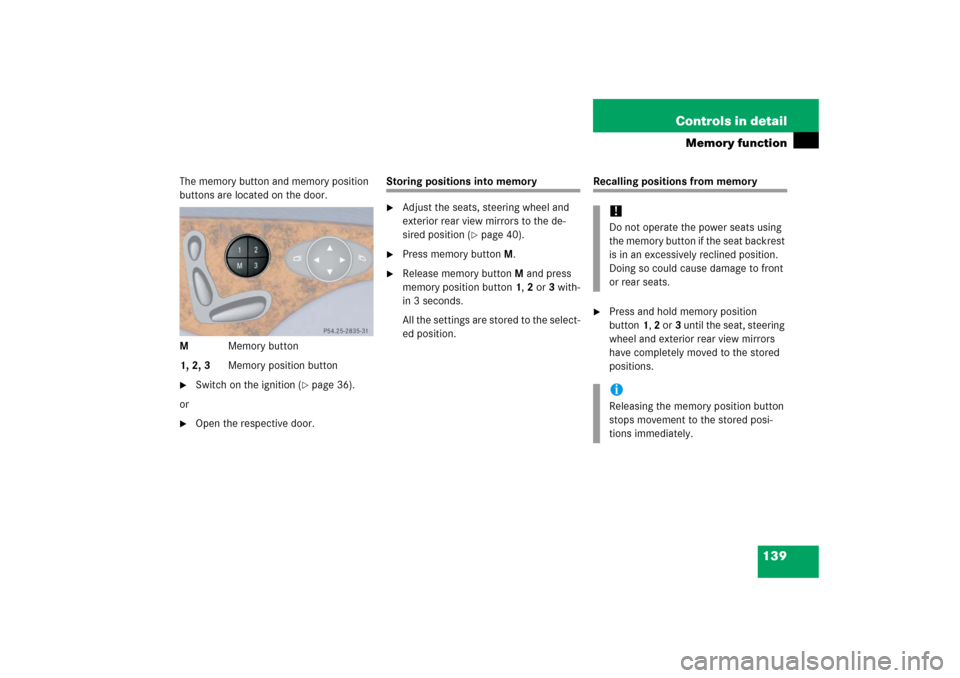
The memory button and memory position
buttons are located on the door.
MMemory button
1, 2, 3Memory position button�
Switch on the ignition (
�page 36).
or
�
Open the respective door.
Storing positions into memory�
Adjust the seats, steering wheel and
exterior rear view mirrors to the de-
sired position (
�page 40).
�
Press memory buttonM.
�
Release memory buttonM and press
memory position button 1, 2 or 3 with-
in 3 seconds.
All the settings are stored to the select-
ed position.
Recalling positions from memory�
Press and hold memory position
button1, 2 or3 until the seat, steering
wheel and exterior rear view mirrors
have completely moved to the stored
positions.!Do not operate the power seats using
the memory button if the seat backrest
is in an excessively reclined position.
Doing so could cause damage to front
or rear seats.iReleasing the memory position button
stops movement to the stored posi-
tions immediately.