Page 136 of 521
.
The indicator lamp on the button
comes on and the following display ap-
pears in the multifunction display f")
135 Controls in detailSeats
Drive-dynamic features
Activating�
Press button4 (
�page 134).
The indicator lamp on the button
comes on and the following display ap-
pears in the multifunction display for
about 5 seconds.
Deactivating
�
Press button4 (
�page 134) again.
The indicator lamp on the button goes
out.Massage function (PULSE)
The massage function can help prevent
muscle tension during long drives.
�
Press button6 (
�page 134).
The indicator lamp on the button
comes on. The air cushions in the lum-
bar area pulsate.
Seat heating*
Both switches for the front seats are locat-
ed in the center console. The red indicator
lamps in the switch come on to show
which heating level you have selected:
iYou can adjust the characteristics of
the Drive - Dynamic seat using the con-
trol system (
�page 177).
iWhen the engine is turned off, the last
cushion setting is retained in memory.
The cushion is automatically adjusted
to this setting when the engine is re-
started.iThe massage function turns off auto-
matically after approximately
5 minutes.
Level3
Three indicator lamps on
(highest level)
The seat heating automatically
switches to level2 after approxi-
mately 5 minutes.
2
Two indicator lamps on
The seat heating automatically
switches to level1 after approxi-
mately 10 minutes.
1
One indicator lamp on
(lowest level)
The seat heating automatically
switches off after approximately
20 minutes.
off
No indicator lamp on
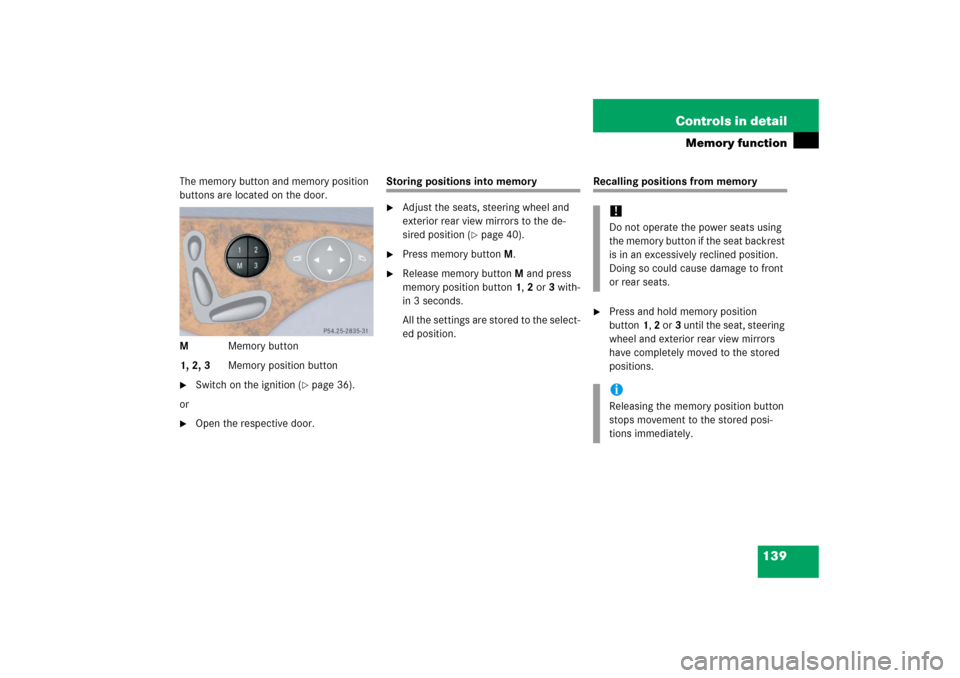
Page 139 of 521

138 Controls in detailMemory functionPrior to operating the vehicle, the driver
should check and adjust the seat height,
seat position fore and aft, and seat back-
rest angle if necessary, to ensure adequate
control, reach and comfort. The head re-
straint should also be adjusted for proper
height. See also the section on air bags
(�page 67) for more information on prop-
er seat positioning.
In addition, adjust the steering wheel to
ensure adequate control, reach, operation
and comfort. Both the interior and exterior
rear view mirrors should be adjusted for
adequate rear vision.
Fasten seat belts. Infants and small chil-
dren should be seated in a properly se-
cured restraint system that complies with
U.S. Federal Motor Vehicle Safety Stan-
dards 213 and 225 and Canadian Motor
Vehicle Safety Standards 213 and 210.2.The following settings are stored when us-
ing the buttons on the driver’s door:
�
Driver’s seat, backrest, head restraint
position and settings for multicontour
seat
�
Steering wheel position
�
Exterior rear view mirror positions
The following settings are stored when us-
ing the buttons on the front passenger
door:
�
Front passenger seat, backrest, head
restraint position and settings for mul-
ticontour seat
Warning!
G
Do not activate the memory function while
driving. Activating the memory function
while driving could cause the driver to lose
control of the vehicle.
Page 140 of 521
139 Controls in detail
Memory function
The memory button and memory position
buttons are located on the door.
MMemory button
1, 2, 3Memory position button�
Switch on the ignition (
�page 36).
or
�
Open the respective door.
Storing positions into memory�
Adjust the seats, steering wheel and
exterior rear view mirrors to the de-
sired position (
�page 40).
�
Press memory buttonM.
�
Release memory buttonM and press
memory position button 1, 2 or 3 with-
in 3 seconds.
All the settings are stored to the select-
ed position.
Recalling positions from memory�
Press and hold memory position
button1, 2 or3 until the seat, steering
wheel and exterior rear view mirrors
have completely moved to the stored
positions.!Do not operate the power seats using
the memory button if the seat backrest
is in an excessively reclined position.
Doing so could cause damage to front
or rear seats.iReleasing the memory position button
stops movement to the stored posi-
tions immediately.
Page 141 of 521
140 Controls in detailMemory functionStoring exterior rear view mirror park-ing position
For easier parking, you can adjust the pas-
senger-side exterior rear view mirror so
that you can see the right rear wheel as
soon as you engage reverse gearR.
For information on activating the parking
position, see “Activating exterior rear view
mirror parking position” (
�page 198).
1Passenger side, exterior rear view mir-
ror
2Adjustment button
�
Stop the vehicle.
�
Switch on the ignition (
�page 36).
�
Press button1.
The passenger-side exterior rear view
mirror is selected.
�
Adjust the exterior rear view mirror
with button2 so that you see the rear
wheel and the road curb.
�
Press memory button M.
�
Within 3 seconds, press bottom of ad-
justment button2.
The parking position is stored if the
mirror does not move.iIf the mirror does move, repeat the
above steps. After the setting is stored,
you can move the mirror again.
Page 159 of 521
158 Controls in detailControl system
Menu5
Menu6
Menu7
Menu8
Vehicle status message
memory
1
1The vehicle status message memory menu is only displayed if there is a message stored.
Settings
Trip computer
TEL*
(�page 162)
(�page 163)
(�page 178)
(�page 180)
Commands/submenusCall up vehicle malfunction,
warning and system status mes-
sages stored in memory
Reset to factory settings
Fuel consumption statistics after
start
Load phone book
Instrument cluster submenu
Fuel consumption statistics since
the last reset
Search for name in phone
book
Time/Date submenu
Call up range
Lighting submenuVehicle submenuConvenience submenuDynamic seat* submenu
iThe headings used in the menus table
are designed to facilitate navigation
within the system and are not neces-
sarily identical to those shown in the
control system displays.
The first function displayed in each
menu will automatically show you
which part of the system you are in.
Page 161 of 521

The satellite radio is treated as a radio ap-
plication.�
Select SAT radio with the correspond-
ing softkey in the radio")
160 Controls in detailControl systemSelect satellite radio station*
(USA only)
The satellite radio is treated as a radio ap-
plication.�
Select SAT radio with the correspond-
ing softkey in the radio menu.
1SAT mode and preset number
2Setting for station selection using
memory
3Channel name or number
�
Press buttonk orj repeatedly
until the desired channel is found.Operate the CD player
�
Turn on COMAND and select CD. Refer
to separate COMAND operating in-
structions.
�
Press buttonè orÿ repeatedly
until the settings for the CD currently
being played appear in the multifunc-
tion display.
1Current CD (for CD changer*)
2Current track
�
Press buttonk orj repeatedly
until the desired track is selected.
iYou can only store new stations using
the corresponding feature on the radio,
see separate operating instructions.
You can also operate the radio in the
usual manner.
iAdditional optional satellite radio
equipment and a subscription to satel-
lite radio service provider are required
for satellite radio operation. Contact an
authorized Mercedes-Benz Center for
details and availability for your vehicle.
For more information, refer to separate
COMAND operating instructions.
iTo select a CD from the magazine,
press a number on the COMAND
system key pad located in the center
console.
Page 163 of 521

162 Controls in detailControl systemDistronic activated
With Distronic activated, the
Distronic
display is shown in the multifunction dis-
play and one or two segments around the
set speed are illuminated in the
speedometer.
1Distronic activated
Vehicle status message memory menu
Use the vehicle status message memory
menu to scan malfunction and warning
messages that may be stored in the sys-
tem. Such messages appear in the multi-
function display and are based on
conditions or system status the vehicle’s
system has recorded.
The vehicle status message memory menu
only appears if there are any messages
stored.
�
Press buttonè orÿ repeatedly
until the vehicle status message mem-
ory appears in the multifunction dis-
play.
If the vehicle status message memory
menu does not appear, then there are
no messages stored.Warning!
G
Malfunction and warning messages are only
indicated for certain systems and are inten-
tionally not very detailed. The malfunction
and warning messages are simply a remind-
er with respect to the operation of certain
systems and do not replace the owner’s
and/or driver’s responsibility to maintain
the vehicle’s operating safety by having all
required maintenance and safety checks
performed on the vehicle and by bringing
the vehicle to an authorized Mercedes-Benz
Center to address the malfunction and
warning messages (
�page 386).
Page 164 of 521

163 Controls in detail
Control system
Vehicle status messages have been re-
corded
If conditions have occurred causing status
messages to be recorded, the number of
messages appears in the multifunction dis-
play:
�
Press buttonk orj.
The stored messages will now be dis-
played in the order in which they have
occurred. For malfunction and warning
messages, see “Vehicle status messag-
es in the multifunction display”
(�page 386).
Should the vehicle’s system record any
conditions while driving, the number of
messages will reappear in the multifunc-
tion display when the SmartKey in the
starter switch is turned to position0 or re-
moved from the starter switch.
Settings menu
In the
Settings
menu there are two func-
tions:
�
The function
To reset: Press reset
button for 3 seconds
, with which you
can reset all the settings to the original
factory settings.
�
A collection of submenus with which
you can make individual settings for
your vehicle.
�
Press buttonè orÿ repeatedly
until the
Settings
menu is seen in the
multifunction display.
iThe vehicle status message memory
will be cleared when you turn the
SmartKey in the starter switch to
position1 or2. You will then only see
high priority messages in the multifunc-
tion display (
�page 386).