Page 119 of 521
 is required to open the trunk")
118 Controls in detailLocking and unlockingUnlocking and opening the trunk
You can unlock and open the trunk sepa-
rately.
A minimum height clearance of 5.90 ft
(1.80 m) is required to open the trunk lid.
The handle is located in the rear license
plate recess.�
Pull on the handle
or
�
Press and hold buttonŠ until the
trunk lid unlocks and begins to open.Loss of the SmartKey with KEYLESS-GO
If you lose your SmartKey with
KEYLESS-GO, you should do the following:
�
Have the SmartKey with KEYLESS-GO
deactivated by an authorized
Mercedes-Benz Center.
�
Report the loss immediately to your car
insurance company.
�
Have the mechanical lock replaced if
necessary.
Your authorized Mercedes-Benz Center
will be glad to supply you with a replace-
ment.
!The trunk lid swings open upwards au-
tomatically. Always make sure there is
sufficient overhead clearance.
Vehicles with trunk opening/closing
system*: to stop the opening proce-
dure, press buttonŠ. The trunk lid
stops moving.iIf the trunk does not open, it is still
locked separately (
�page 128).
iIf the vehicle was previously centrally
locked with KEYLESS-GO, the trunk will
lock automatically after closing it.
To confirm locking all turn signal lamps
flash three times.
Page 143 of 521

142 Controls in detailLightingManual headlamp mode
The low beam headlamps and the parking
lamps can be switched on and off with the
exterior lamp switch.
Automatic headlamp mode
The following lamps switch on and off au-
tomatically depending on the brightness of
the ambient light:�
Low beam headlamps
�
Tail and parking lamps
�
License plate lamps
�
Side marker lamps
�
Turn exterior lamp switch to
positionU.
With the SmartKey in starter switch
position1 or the KEYLESS-GO* start/stop
button pressed once, only the parking
lamps will switch on and off automatically.When the engine is running, the low beam
headlamps, the tail and parking lamps, the
license plate lamps, and the side marker
lamps will switch on and off automatically.
Daytime running lamp mode
�
Turn the exterior lamp switch to
positionM orU.
When the engine is running, the low
beam headlamps are automatically
switched on.
In low ambient light conditions, the fol-
lowing lamps will switch on additional-
ly:�
Tail and parking lamps
�
License plate lamps
�
Side marker lamps
For nighttime driving you should turn the
exterior lamp switch to positionB to
permit activation of the high beam head-
lamps.
Warning!
G
If the exterior lamp switch is set toU,�
the headlamps may switch off unexpect-
edly when the system senses bright am-
bient light, for example light from
oncoming traffic.
�
the headlamps will not be automatically
switched on under foggy conditions.
To minimize risk to you and to others, acti-
vate headlamps by turning exterior lamp
switch to B when driving or when traffic
and/or ambient lighting conditions require
you to do so.
In low ambient lighting conditions, only
switch from position U to B with the
vehicle at a standstill in a safe location.
Switching from U to B will briefly
switch off the headlamps. Doing so while
driving in low ambient lighting conditions
may result in an accident.
The automatic headlamp feature is only an
aid to the driver. The driver is responsible for
the operation of the vehicle’s lights at all
times.
Page 172 of 521
 or daytime
running lamp mode (
constant
) activat-
ed.
With daytime running lamp mode activated
and")
171 Controls in detail
Control system
�
Press buttonæ orç to select
manual operation (
manual
) or daytime
running lamp mode (
constant
) activat-
ed.
With daytime running lamp mode activated
and the exterior lamp switch at
positionM orU, the low beam
headlamps are switched on when the en-
gine is running.
In low ambient light conditions the follow-
ing lamps will switch on additionally:
�
Parking lamps
�
Tail lamps
�
License plate lamps
�
Side marker lamps
For more information on the daytime run-
ning lamp mode, see “Lighting”
(
�page 141).Setting locator lighting
With the locator lighting feature activated
and the exterior lamp switch in
positionU, the following lamps will
switch on during darkness when the vehi-
cle is unlocked using button Πon the
SmartKey or SmartKey with
KEYLESS-GO*:
�
Parking lamps
�
Tail lamps
�
License plate lamps
�
Side marker lamps
�
Front fog lamps
The locator lighting switches off when the
driver’s door is opened.
If you do not open a door after unlocking
the vehicle with the SmartKey, the lamps
will switch off automatically after approxi-
mately 40 seconds.
�
Move the selection marker with
buttonæ orç to the
Lighting
submenu.
iFor safety reasons, resetting the Lighting
submenu to factory settings
while driving (
�page 164) will not de-
activate the daytime running lamp
mode.
The following message appears in the
multifunction display:
Lighting - Can-
not be completely reset to factory
settings while driving.
��
Page 173 of 521

172 Controls in detailControl system�
Press buttonj ork repeatedly
until the message
Function Surround
lighting
appears in the multifunction
display.
The selection marker is on the current
setting.
�
Press buttonæ orç to switch
the locator lighting function
on or
off
.
�
Turn the exterior lamp switch to
positionU when exiting the vehicle.
The locator lighting feature is activat-
ed.Setting ambient lighting
Use this function to adjust the brightness
of the ambient lighting.
�
Move the selection marker with
buttonæ orç to the
Lighting
submenu.
�
Press buttonj ork repeatedly
until the message
Ambient light Lev-
el
appears in the multifunction display.
The selection marker is on the current
setting.
�
Press buttonæ orç to select
the desired brightness of the ambient
lighting.
The setting
1 represents the darkest
level and setting
5 the brightest level.
The ambient light is switched off at set-
ting
0.Setting night security illumination
(Headlamps delayed shut-off)
Use this function to set whether you would
like the exterior lamps to remain on for
15 seconds during darkness after exiting
the vehicle and closing all doors.
With the delayed shut-off feature activated
and the exterior lamp switch in
positionU before the engine is turned
off, the following lamps will switch on
when the engine is turned off:
�
Parking lamps
�
Tail lamps
�
License plate lamps
�
Side marker lamps
�
Front fog lamps
If after turning off the engine you do not
open a door or do not close an opened
door, the lamps will automatically switch
off after 60 seconds.
��
Page 415 of 521
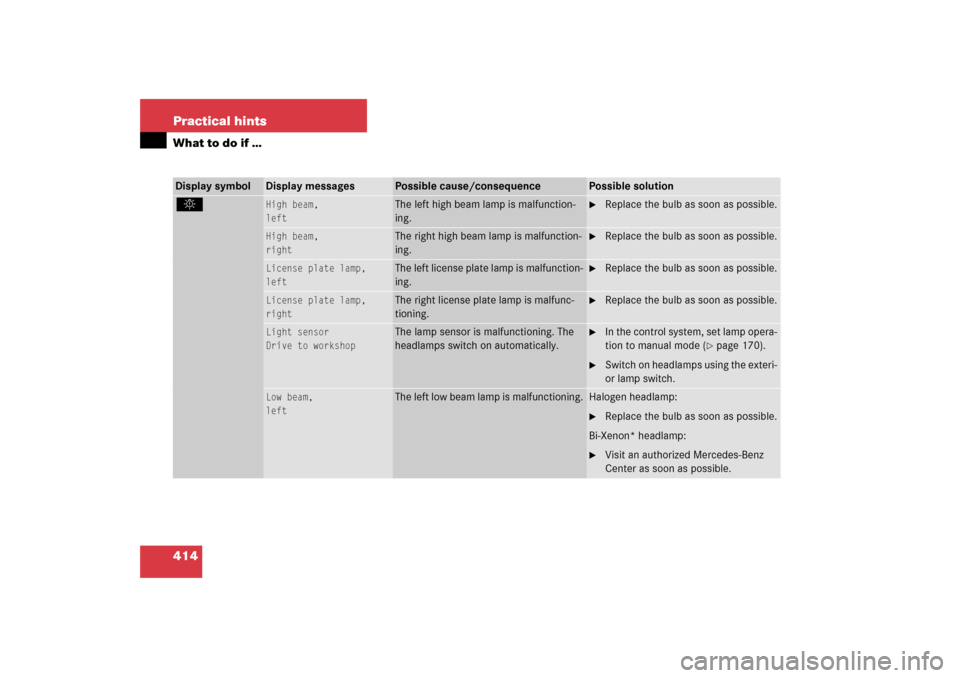
414 Practical hintsWhat to do if …Display symbol
Display messages
Possible cause/consequence
Possible solution
.
High beam,
left
The left high beam lamp is malfunction-
ing.
�
Replace the bulb as soon as possible.
High beam,
right
The right high beam lamp is malfunction-
ing.
�
Replace the bulb as soon as possible.
License plate lamp,
left
The left license plate lamp is malfunction-
ing.
�
Replace the bulb as soon as possible.
License plate lamp,
right
The right license plate lamp is malfunc-
tioning.
�
Replace the bulb as soon as possible.
Light sensor
Drive to workshop
The lamp sensor is malfunctioning. The
headlamps switch on automatically.
�
In the control system, set lamp opera-
tion to manual mode (
�page 170).
�
Switch on headlamps using the exteri-
or lamp switch.
Low beam,
left
The left low beam lamp is malfunctioning.
Halogen headlamp:�
Replace the bulb as soon as possible.
Bi-Xenon* headlamp:
�
Visit an authorized Mercedes-Benz
Center as soon as possible.
Page 435 of 521
434 Practical hintsReplacing bulbs
Front lamps Rear lamps
Lamp
Type
1
Additional turn signal
lamp
LED
2
Turn signal lamp
1156 NA
3
Side marker lamp
W 5 W
4
Halogen headlamp:
Low beam
Bi-Xenon* headlamp:
Low and high beam
1
1Vehicles with Bi-Xenon* headlamps: Low beam
and high beam use the same D2S-35W lamp. Do
not replace the Bi-Xenon bulbs yourself. Contact
your authorized Mercedes-Benz Center.
H7 (55 W)
D2S-35 W
5
Halogen headlamp:
High beam/high beam
flasher
Bi-Xenon* headlamp:
High beam flasher
H7 (55 W)
H7 (55 W)
Parking and standing
lamp
W 5 W
6
Front fog lamp
HB4 (51 W)
Lamp
Type
7
High mounted brake
lamp
LED
8
Brake, tail, parking,
standing, backup lamp
and turn signal lamp.
Rear fog lamp (only
driver’s side)
HiP
LED*
9
License plate lamps
C5W
Page 436 of 521

435 Practical hints
Replacing bulbs
Notes on bulb replacement�
Only use 12 volt bulbs of the same type
and with the specified watt rating.
�
Switch lights off before changing a bulb
to prevent short circuits.
�
Always use a clean lint-free cloth when
handling bulbs.
�
Your hands should be dry and free of oil
and grease.
�
If the newly installed bulb does not light
up, visit an authorized Mercedes-Benz
Center.Have the LEDs and bulbs for the following
lamps replaced by an authorized
Mercedes-Benz Center:
�
Additional turn signals in the exterior
rear view mirrors
�
High mounted brake lamp
�
Bi-Xenon* lamps
�
Front fog lamps
�
Rear lamps (except license plate
lamps)
�
Front side marker lamps
Warning!
G
Bulbs and bulb sockets can be very hot. Al-
low the lamp to cool down before changing
a bulb.
Keep bulbs out of reach of children.
Halogen lamps contain pressurized gas.
A bulb can explode if you:�
touch or move it when hot
�
drop the bulb
�
scratch the bulb
Wear eye and hand protection.
Because of high voltage in Bi-Xenon* lamps,
it is dangerous to replace the bulb or repair
the lamp and its components. We recom-
mend that you have such work done by a
qualified technician.
iHave the headlamp adjustment
checked regularly.
Page 439 of 521
438 Practical hintsReplacing bulbsReplacing bulbs for rear lamps
Tail lamp unit
The tail lamps are equipped with HiP bulbs.License plate lamp
1Screw
�
Turn the exterior lamp switch to
positionM (
�page 141).
�
Loosen both screws1.
�
Remove the license plate lamp.
�
Replace the bulb.
�
Reinstall the license plate lamp.
�
Retighten screws1.
Warning!
G
The bulbs in the tail lamps cannot be re-
placed individually. The tail lamp bulbs are
under pressure and could explode during an
attempt to replace them.
If the tail lamps are malfunctioning, have
them exchanged at an authorized
Mercedes-Benz Center.