Page 261 of 521

260 Controls in detailDriving systems1Damping button
2Indicator lamps�
Start the engine.
�
Press the damping button1 until the
desired suspension style is set.Vehicle level control
Your vehicle automatically adjusts its ride
height to
�
increase vehicle safety
�
reduce fuel consumption
The following vehicle chassis ride heights
can be selected:
�
Normal
�
Raised
The vehicle chassis ride height is raised or
lowered according to the selected level
setting and to the vehicle speed:
�
At a speed exceeding approximately
68 mph (110 km/h) with normal level
set or exceeding 75 mph (120 km/h)
with raised level set, the ride height is
reduced automatically. The table on
the next page provides an overview of
the vehicle levels.
�
With decreasing speed, the ride height
is again raised to the normal level.
!If you have selected the Comfort sus-
pension tuning, the vehicle lowers
slightly when you lock it within approx-
imately 60 seconds after switching off
the engine. When parking, make sure
that your vehicle cannot come into con-
tact with other objects, such as a curb,
while lowering. Your vehicle could oth-
erwise be damaged.iThe selected suspension style is stored
in memory, even after the SmartKey is
removed from the starter switch.
Page 283 of 521
.
1Cigarette lighter
�
Switch on t")
282 Controls in detailUseful featuresCigarette lighterThe cigarette lighter is located in the cen-
ter console compartment in front of the
center armrest (
�page 28).
1Cigarette lighter
�
Switch on the ignition (
�page 36).
�
Push in cigarette lighter1.
The lighter will pop out automatically
when hot.
Warning!
G
Never touch the heating element or sides of
the lighter; they are extremely hot. Hold the
knob only.
When leaving the vehicle, always remove the
SmartKey or the SmartKey with
KEYLESS-GO* from the starter switch, take
it with you, and lock the vehicle. Do not
leave children unattended in the vehicle, or
with access to an unlocked vehicle. Unsu-
pervised use of vehicle equipment may
cause an accident and/or serious personal
injury.
!The lighter socket can be used to ac-
commodate 12V DC electrical acces-
sories (up to a maximum of 85 W)
designed for use with the standard
“cigarette lighter” plug type. Keep in
mind, however, that connecting acces-
sories to the lighter socket (for exam-
ple extensive connecting and
disconnecting, or using plugs that do
not fit properly) can damage the lighter
socket. With the socket damaged, the
lighter may no longer be able to be
placed in the heating (pushed-in) posi-
tion, or the lighter may pop out too ear-
ly with the lighter not hot enough.
To help avoid damaging the cigarette
lighter socket, we recommend con-
necting 12V DC electrical accessories
designed for use with a standard “ciga-
rette lighter” plug type to the 12V pow-
er outlets in your vehicle whenever
possible.
Page 284 of 521
.
�
Flip up cover and insert electrical plug
(c")
283 Controls in detail
Useful features
Power outlet
The power outlet is located in the rear pas-
senger compartment.�
Switch on the ignition (
�page 36).
�
Flip up cover and insert electrical plug
(cigarette lighter type).
Heated steering wheel*
The steering wheel heating warms up the
leather area of the steering wheel.
The stalk is on the lower left-hand side of
the steering wheel.
1Indicator lamp
2Switching off
3Switching onSwitching on
�
Switch on the ignition (
�page 36).
�
Turn switch at the tip of stalk in direc-
tion of arrow3.
The steering wheel is heated. Indicator
lamp1 comes on.
iThe power outlet can be used to
accommodate 12V DC electrical ac-
cessories (e.g. air pump, auxiliary
lamps) up to a maximum of 180 W.
An additional power outlet is located on
the left side in the trunk.
iThe steering wheel heating is tempo-
rarily suspended while indicator
lamp1 remains on when�
the temperature of the vehicle inte-
rior is above 86°F (30°C)
�
the temperature of the steering
wheel is above 95°F (35°C)
When these conditions do not apply
anymore, steering wheel heating con-
tinues.
Page 319 of 521

318 OperationAt the gas stationWindshield washer system and
headlamp cleaning system*
For information on refilling the reservoir,
see “Windshield washer system and
headlamp cleaning system*”
(�page 327).
Brake fluid
For information on brake fluid, see “Fuels,
coolants, lubricants etc.” (
�page 484).Coolant
For normal replenishing, use water (pota-
ble water quality). For more information on
coolant, see “Coolant level” (
�page 325)
and see “Fuels, coolants, lubricants etc.”
(
�page 484).
Engine oil level
For more information on engine oil level,
see “Engine oil” (
�page 320).Vehicle lighting
Check function and cleanliness. For more
information on replacing light bulbs, see
“Replacing bulbs” (
�page 433).
For more information, see “Exterior lamp
switch” (
�page 141).
Tire inflation pressure
For more information, see “Checking tire
inflation pressure” (
�page 339).
!If you find that the brake fluid in the
brake fluid reservoir has fallen to the
minimum mark or below, have the
brake system checked for brake pad
thickness and leaks immediately. Noti-
fy an authorized Mercedes-Benz Center
immediately. Do not add brake fluid as
this will not solve the problem. For
more information, see “Practical hints”
(�page 376).
Page 414 of 521

413 Practical hints
What to do if …
Display symbol
Display messages
Possible cause/consequence
Possible solution
.
Low beam,
right
The right low beam lamp is malfunction-
ing.
Halogen headlamp:�
Replace the bulb as soon as possible.
Bi-Xenon* headlamp:
�
Visit an authorized Mercedes-Benz
Center as soon as possible.
Front Marker light,
left
The front left side marker lamp is mal-
functioning.
�
Visit an authorized Mercedes-Benz
Center as soon as possible.
Front Marker light,
right
The front right side marker lamp is mal-
functioning.
�
Visit an authorized Mercedes-Benz
Center as soon as possible.
Fr. Park. lamp, left
The left parking lamps are malfunction-
ing.
�
Visit an authorized Mercedes-Benz
Center as soon as possible.
Fr. Park. lamp, right
The right parking lamps are malfunction-
ing.
�
Visit an authorized Mercedes-Benz
Center as soon as possible.
Rear foglamp
Substitute bulb on
The rear fog lamp is malfunctioning. A
substitute bulb is being used.
�
Replace the bulb as soon as possible.
Backup lamp, left
The left reverse lamp is malfunctioning.
�
Replace the bulb as soon as possible.
Backup lamp, right
The right reverse lamp is malfunctioning.
�
Replace the bulb as soon as possible.
Switch off lamps
Lamps have been turned on although the
SmartKey in the starter switch is in posi-
tion 0.
�
Switch off the headlights.
Page 415 of 521
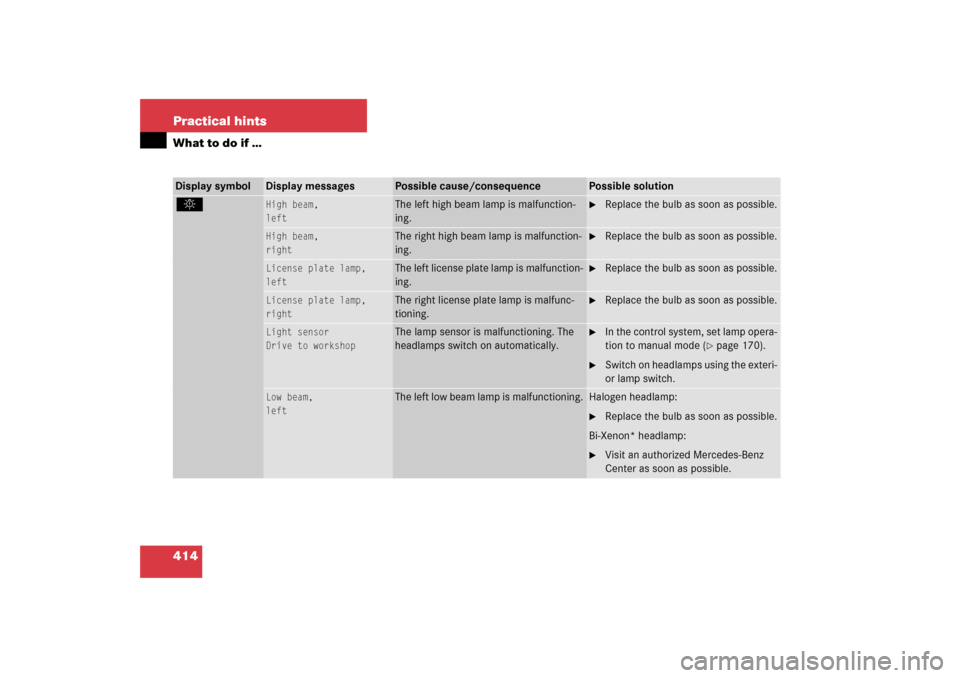
414 Practical hintsWhat to do if …Display symbol
Display messages
Possible cause/consequence
Possible solution
.
High beam,
left
The left high beam lamp is malfunction-
ing.
�
Replace the bulb as soon as possible.
High beam,
right
The right high beam lamp is malfunction-
ing.
�
Replace the bulb as soon as possible.
License plate lamp,
left
The left license plate lamp is malfunction-
ing.
�
Replace the bulb as soon as possible.
License plate lamp,
right
The right license plate lamp is malfunc-
tioning.
�
Replace the bulb as soon as possible.
Light sensor
Drive to workshop
The lamp sensor is malfunctioning. The
headlamps switch on automatically.
�
In the control system, set lamp opera-
tion to manual mode (
�page 170).
�
Switch on headlamps using the exteri-
or lamp switch.
Low beam,
left
The left low beam lamp is malfunctioning.
Halogen headlamp:�
Replace the bulb as soon as possible.
Bi-Xenon* headlamp:
�
Visit an authorized Mercedes-Benz
Center as soon as possible.
Page 430 of 521
429 Practical hints
Opening/closing in an emergency
�Opening/closing in an emergency
Power tilt/sliding sunroof* or panora-ma roof with power tilt/sliding panel*
You can open or close the tilt/sliding sun-
roof or tilt/sliding panel manually should
an electrical malfunction occur.
The tilt/sliding sunroof or tilt/sliding panel
drive is located behind cover1 of the in-
terior overhead light.
1Cover�
Remove the SmartKey from the starter
switch.
�
Press on cover1 in direction of the ar-
row to release it.2Hole
3Crank
�
Take crank3 out of the glove box.
�
Insert crank3 through hole2.
�
Turn crank3 clockwise to:�
slide roof panel/sunroof closed
�
raise roof panel/sunroof at the rear
�
Turn crank3 counterclockwise to:�
slide roof panel/sunroof open
�
lower roof panel/sunroof at the
rear
iTurn crank3 slowly and smoothly.
The tilt/sliding sunroof or tilt/sliding
panel must be synchronized after being
operated manually (
�page 238) or
(
�page 242).
Page 436 of 521

435 Practical hints
Replacing bulbs
Notes on bulb replacement�
Only use 12 volt bulbs of the same type
and with the specified watt rating.
�
Switch lights off before changing a bulb
to prevent short circuits.
�
Always use a clean lint-free cloth when
handling bulbs.
�
Your hands should be dry and free of oil
and grease.
�
If the newly installed bulb does not light
up, visit an authorized Mercedes-Benz
Center.Have the LEDs and bulbs for the following
lamps replaced by an authorized
Mercedes-Benz Center:
�
Additional turn signals in the exterior
rear view mirrors
�
High mounted brake lamp
�
Bi-Xenon* lamps
�
Front fog lamps
�
Rear lamps (except license plate
lamps)
�
Front side marker lamps
Warning!
G
Bulbs and bulb sockets can be very hot. Al-
low the lamp to cool down before changing
a bulb.
Keep bulbs out of reach of children.
Halogen lamps contain pressurized gas.
A bulb can explode if you:�
touch or move it when hot
�
drop the bulb
�
scratch the bulb
Wear eye and hand protection.
Because of high voltage in Bi-Xenon* lamps,
it is dangerous to replace the bulb or repair
the lamp and its components. We recom-
mend that you have such work done by a
qualified technician.
iHave the headlamp adjustment
checked regularly.