Page 140 of 521
139 Controls in detail
Memory function
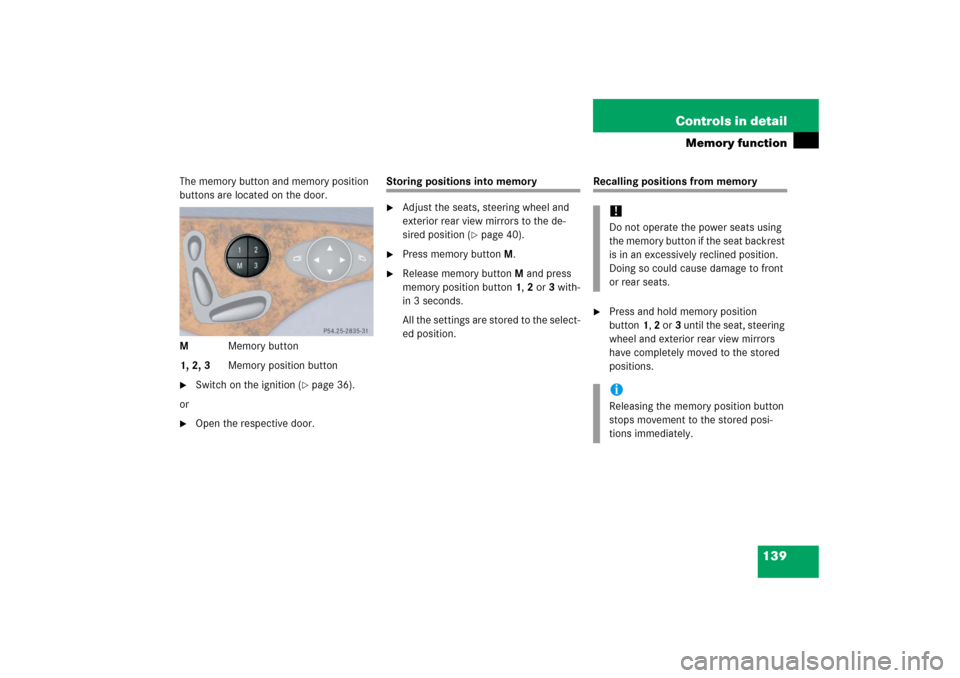
The memory button and memory position
buttons are located on the door.
MMemory button
1, 2, 3Memory position button�
Switch on the ignition (
�page 36).
or
�
Open the respective door.
Storing positions into memory�
Adjust the seats, steering wheel and
exterior rear view mirrors to the de-
sired position (
�page 40).
�
Press memory buttonM.
�
Release memory buttonM and press
memory position button 1, 2 or 3 with-
in 3 seconds.
All the settings are stored to the select-
ed position.
Recalling positions from memory�
Press and hold memory position
button1, 2 or3 until the seat, steering
wheel and exterior rear view mirrors
have completely moved to the stored
positions.!Do not operate the power seats using
the memory button if the seat backrest
is in an excessively reclined position.
Doing so could cause damage to front
or rear seats.iReleasing the memory position button
stops movement to the stored posi-
tions immediately.
Page 143 of 521

142 Controls in detailLightingManual headlamp mode
The low beam headlamps and the parking
lamps can be switched on and off with the
exterior lamp switch.
Automatic headlamp mode
The following lamps switch on and off au-
tomatically depending on the brightness of
the ambient light:�
Low beam headlamps
�
Tail and parking lamps
�
License plate lamps
�
Side marker lamps
�
Turn exterior lamp switch to
positionU.
With the SmartKey in starter switch
position1 or the KEYLESS-GO* start/stop
button pressed once, only the parking
lamps will switch on and off automatically.When the engine is running, the low beam
headlamps, the tail and parking lamps, the
license plate lamps, and the side marker
lamps will switch on and off automatically.
Daytime running lamp mode
�
Turn the exterior lamp switch to
positionM orU.
When the engine is running, the low
beam headlamps are automatically
switched on.
In low ambient light conditions, the fol-
lowing lamps will switch on additional-
ly:�
Tail and parking lamps
�
License plate lamps
�
Side marker lamps
For nighttime driving you should turn the
exterior lamp switch to positionB to
permit activation of the high beam head-
lamps.
Warning!
G
If the exterior lamp switch is set toU,�
the headlamps may switch off unexpect-
edly when the system senses bright am-
bient light, for example light from
oncoming traffic.
�
the headlamps will not be automatically
switched on under foggy conditions.
To minimize risk to you and to others, acti-
vate headlamps by turning exterior lamp
switch to B when driving or when traffic
and/or ambient lighting conditions require
you to do so.
In low ambient lighting conditions, only
switch from position U to B with the
vehicle at a standstill in a safe location.
Switching from U to B will briefly
switch off the headlamps. Doing so while
driving in low ambient lighting conditions
may result in an accident.
The automatic headlamp feature is only an
aid to the driver. The driver is responsible for
the operation of the vehicle’s lights at all
times.
Page 144 of 521

143 Controls in detail
Lighting
Canada only:
The daytime running lamp mode is manda-
tory and therefore in a constant mode.
When the engine is running, and you shift
from a driving position to positionN orP,
the low beam headlamps will switch off
with a three-minute delay.
When the engine is running, and you�
turn the exterior lamp switch to
positionC, the parking lamps
switch on additionally.
�
turn the exterior lamp switch to
positionB, the manual headlamp
mode has priority over the daytime run-
ning lamp mode.
The corresponding exterior lamps
switch on (
�page 54).USA only:
By default, the daytime running lamp mode
is deactivated. Activate the daytime run-
ning lamp mode using the control system,
see “Setting daytime running lamp mode
(USA only)” (
�page 170).
When the engine is running, and you turn
the exterior lamp switch to
positionCorB, the manual head-
lamp mode has priority over the daytime
running lamp mode.
The corresponding exterior lamps switch
on (
�page 54).
iWith the daytime running lamp mode
activated and the exterior lamp switch
in positionM, the high beam head-
lamps cannot be switched on.
The high beam flasher is available at all
times.
Page 149 of 521

148 Controls in detailLightingManual control
Front interior lighting�
Press front interior lighting switch4.
The front interior lighting switches on.
�
Press front interior lighting switch4
again.
The front interior lighting switches off.
Rear interior lighting
�
Press rear interior lighting switch2.
The rear interior lighting switches on.
�
Press rear interior lighting switch2
again.
The rear interior lighting switches off.Front reading lamps
The front reading lamps are located in the
lower edge of the interior rear view mirror.
�
Press front reading lamp
switch1or5 to switch on the de-
sired front reading lamp.
�
Press front reading lamp
switch1or5 again to switch off the
respective front reading lamp.
Door entry lamps
For better orientation in the dark, the cor-
responding door entry lamps will switch on
in the darkness when you open a door and
the automatic control is activated.
The door entry lamps will switch off when
the corresponding door is closed.
iThe setting selected for the interior
lighting is used for the trunk lighting as
well.
If the trunk remains open, the trunk
lighting switches off automatically after
approximately 10 minutes.
iIf you turn the SmartKey in the starter
switch to position0 and switch off the
headlamps, the door entry lamps will
remain lit for approximately 5 minutes.
Page 150 of 521
149 Controls in detail
Lighting
Interior lighting in the rear
The overhead control panel is located
above the rear seat bench.
1Ambient lighting switch, to brighten
2Rear reading lamp
3Rear reading lamp on/off
4Rear interior lamp
5Ambient lighting
6Ambient lighting switch, to dimRear reading lamps
�
Press respective rear reading lamp
switch3 to switch on the correspond-
ing rear reading lamp.
�
Press respective rear reading lamp
switch3 again to switch off the corre-
sponding rear reading lamp.
Ambient lighting
�
Press ambient lighting switch1or6
repeatedly until ambient lighting5
has reached the desired intensity.
You can switch the ambient lighting on and
off, using the Control system
(
�page 172).
Trunk lamp
The trunk lamp switches on if the trunk is
opened.
If the trunk remains open, the trunk lamp
switches off automatically after approxi-
mately 10 minutes.
Page 153 of 521

152 Controls in detailInstrument clusterTachometer
The red marking on the tachometer de-
notes excessive engine speed.
To help protect the engine, the fuel supply
is interrupted if the engine is operated
within the red marking.
Outside temperature indicator
The outside temperature is displayed in
the instrument cluster (
�page 24).The temperature sensor is located in the
front bumper area. Due to its location, the
sensor can be affected by road or engine
heat during idling or slow driving. This
means that the accuracy of the displayed
temperature can only be verified by com-
parison to a thermometer placed next to
the sensor, not by comparison to external
displays (e.g. bank signs etc.).
When moving the vehicle into colder ambi-
ent temperatures (e.g. when leaving your
garage), you will notice a delay before the
lower temperature is displayed.
A delay also occurs when ambient temper-
atures rise. This prevents inaccurate tem-
perature indications caused by heat
radiated from the engine during idling or
slow driving.
!Avoid driving at excessive engine
speeds, as it may result in serious en-
gine damage that is not covered by the
Mercedes-Benz Limited Warranty.
Warning!
G
The outside temperature indicator is not de-
signed to serve as an ice-warning device and
is therefore unsuitable for that purpose.
Indicated temperatures just above the freez-
ing point do not guarantee that the road sur-
face is free of ice. The road may still be icy,
especially in wooded areas or on bridges.
Page 161 of 521

The satellite radio is treated as a radio ap-
plication.�
Select SAT radio with the correspond-
ing softkey in the radio")
160 Controls in detailControl systemSelect satellite radio station*
(USA only)
The satellite radio is treated as a radio ap-
plication.�
Select SAT radio with the correspond-
ing softkey in the radio menu.
1SAT mode and preset number
2Setting for station selection using
memory
3Channel name or number
�
Press buttonk orj repeatedly
until the desired channel is found.Operate the CD player
�
Turn on COMAND and select CD. Refer
to separate COMAND operating in-
structions.
�
Press buttonè orÿ repeatedly
until the settings for the CD currently
being played appear in the multifunc-
tion display.
1Current CD (for CD changer*)
2Current track
�
Press buttonk orj repeatedly
until the desired track is selected.
iYou can only store new stations using
the corresponding feature on the radio,
see separate operating instructions.
You can also operate the radio in the
usual manner.
iAdditional optional satellite radio
equipment and a subscription to satel-
lite radio service provider are required
for satellite radio operation. Contact an
authorized Mercedes-Benz Center for
details and availability for your vehicle.
For more information, refer to separate
COMAND operating instructions.
iTo select a CD from the magazine,
press a number on the COMAND
system key pad located in the center
console.
Page 163 of 521

162 Controls in detailControl systemDistronic activated
With Distronic activated, the
Distronic
display is shown in the multifunction dis-
play and one or two segments around the
set speed are illuminated in the
speedometer.
1Distronic activated
Vehicle status message memory menu
Use the vehicle status message memory
menu to scan malfunction and warning
messages that may be stored in the sys-
tem. Such messages appear in the multi-
function display and are based on
conditions or system status the vehicle’s
system has recorded.
The vehicle status message memory menu
only appears if there are any messages
stored.
�
Press buttonè orÿ repeatedly
until the vehicle status message mem-
ory appears in the multifunction dis-
play.
If the vehicle status message memory
menu does not appear, then there are
no messages stored.Warning!
G
Malfunction and warning messages are only
indicated for certain systems and are inten-
tionally not very detailed. The malfunction
and warning messages are simply a remind-
er with respect to the operation of certain
systems and do not replace the owner’s
and/or driver’s responsibility to maintain
the vehicle’s operating safety by having all
required maintenance and safety checks
performed on the vehicle and by bringing
the vehicle to an authorized Mercedes-Benz
Center to address the malfunction and
warning messages (
�page 386).