Page 411 of 521
.
F
Key
Ch")
410 Practical hintsWhat to do if …Display symbol
Display messages
Possible cause/consequence
Possible solution
Y
Hood open
You are driving with the hood open.
�
Close the hood (
�page 319).
F
Key
Check battery
The SmartKey with KEYLESS-GO* batter-
ies are discharged.
�
Change the batteries (
�page 431).
Key
not recognized
The SmartKey with KEYLESS-GO* is not
recognized while the engine is running
because�
the SmartKey with KEYLESS-GO* is
not in the vehicle
�
there is strong radio-frequency inter-
ference
�
Stop the vehicle in a safe location as
soon as it is safe to do so.
�
Search for the SmartKey.
Otherwise the vehicle cannot be cen-
trally locked nor can the engine be
started again after the engine is
stopped.
Key
not recognized
The SmartKey with KEYLESS-GO* is mo-
mentarily not recognized.
�
Change the position of the SmartKey
in the vehicle.
�
Operate the vehicle with the
SmartKey in the starter switch if nec-
essary.
Key
still in vehicle
A SmartKey with KEYLESS-GO* left in the
vehicle was recognized while locking the
vehicle from the outside.
�
Take the SmartKey out of the vehicle.
Keyless Go
Check system
The KEYLESS-GO* system is malfunction-
ing.
�
Visit an authorized Mercedes-Benz
Center as soon as possible.
Page 412 of 521
 if the driver")
411 Practical hints
What to do if …
Display symbol
Display messages
Possible cause/consequence
Possible solution
F
Do not
forget key
This display appears (for a maximum of
60 seconds) if the driver’s door is opened
with the engine shut off and no SmartKey
in the starter switch.
This message is only a reminder.
�
Insert SmartKey in the starter switch.
�
Take the SmartKey with
KEYLESS-GO* with you when leaving
the vehicle.
Remove key
You have forgotten to remove the
SmartKey.
�
Remove the SmartKey from the start-
er switch.
Replace key
There is no additional code available for
SmartKey or SmartKey with
KEYLESS-GO*.
�
Visit an authorized Mercedes-Benz
Center as soon as possible.
A
Reserve fuel
The fuel level has dropped below the re-
serve mark.
�
Refuel at the next gas station
(�page 315).
Check gas cap
See Operator’s Manual
A loss of pressure has been detected in
the fuel system. The fuel cap may not be
closed properly or the fuel system may be
leaky.
�
Check the fuel cap (
�page 315).
If it is not closed properly:
�
Close the fuel cap.
If it is closed properly:
�
Have the fuel system checked by an
authorized Mercedes-Benz Center.
Page 415 of 521
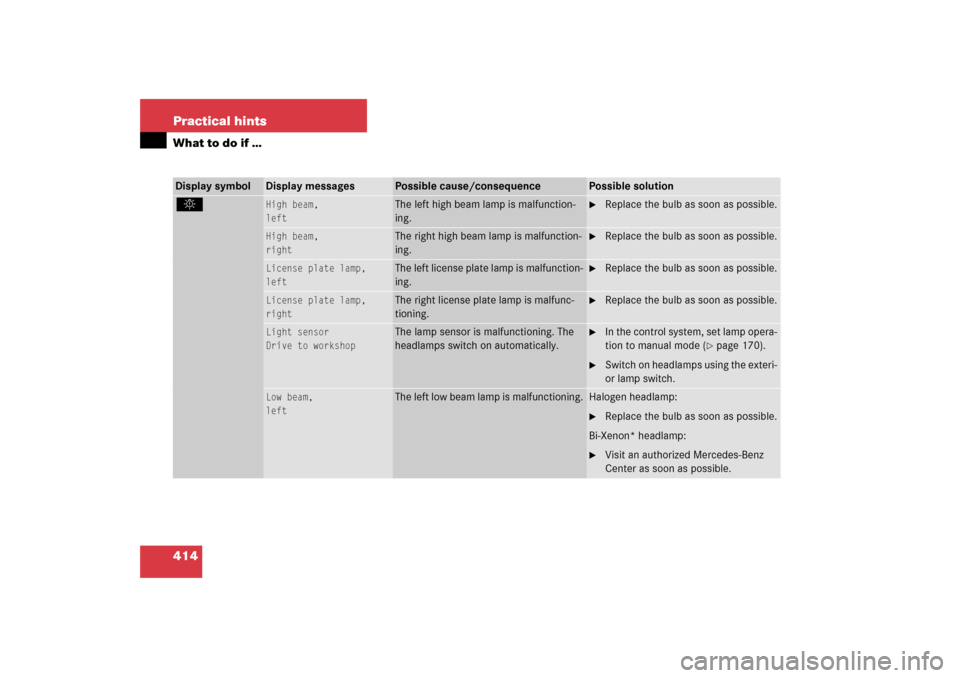
414 Practical hintsWhat to do if …Display symbol
Display messages
Possible cause/consequence
Possible solution
.
High beam,
left
The left high beam lamp is malfunction-
ing.
�
Replace the bulb as soon as possible.
High beam,
right
The right high beam lamp is malfunction-
ing.
�
Replace the bulb as soon as possible.
License plate lamp,
left
The left license plate lamp is malfunction-
ing.
�
Replace the bulb as soon as possible.
License plate lamp,
right
The right license plate lamp is malfunc-
tioning.
�
Replace the bulb as soon as possible.
Light sensor
Drive to workshop
The lamp sensor is malfunctioning. The
headlamps switch on automatically.
�
In the control system, set lamp opera-
tion to manual mode (
�page 170).
�
Switch on headlamps using the exteri-
or lamp switch.
Low beam,
left
The left low beam lamp is malfunctioning.
Halogen headlamp:�
Replace the bulb as soon as possible.
Bi-Xenon* headlamp:
�
Visit an authorized Mercedes-Benz
Center as soon as possible.
Page 417 of 521
416 Practical hintsWhat to do if …Display symbol
Display messages
Possible cause/consequence
Possible solution
H
Please rectify
tire pressure
The pressure is too low in one or
more tires.
�
Check and correct tire inflation pressure as
required (
�page 339).
Tire pressure
Caution, tire defect
One or more tires are deflating.
�
Carefully bring the vehicle to a halt, avoiding
abrupt steering and braking maneuvers.
�
If necessary, change the wheel (
�page 441).
Tire pressure
Check tires
The tire pressure in one or more
tires is already below the mini-
mum value.
�
Carefully bring the vehicle to a halt, avoiding
abrupt steering and braking maneuvers.
�
Check and adjust tire pressure as required.
�
If necessary, change the wheel (
�page 441).
Warning!
G
Do not drive with a flat tire. A flat tire affects
the ability to steer or brake the vehicle. You
may lose control of the vehicle. Continued
driving with a flat tire will cause excessive
heat build-up and possibly a fire.
Page 418 of 521

417 Practical hints
What to do if …
Display symbol
Display messages
Possible cause/consequence
Possible solution
<
Seat belt system
Drive to workshop
The seat belt system is malfunctioning.
�
Visit an authorized Mercedes-Benz
Center as soon as possible.
9
Service memory full
See Operator’s Manual
The maintenance service system memory
cannot save any more data.
�
Have the service memory checked by
an authorized Mercedes-Benz Center.
K
Close
tilt/sliding sunroof
You have opened the driver’s door with
the SmartKey removed from the starter
switch and the sliding portion of the
tilt/sliding sunroof* or tilt/sliding panel*
open.
�
Close the tilt/sliding sunroof*
(�page 237) or tilt/sliding panel*
(�page 241).
J
Close
tilt/sliding sunroof
You have opened the driver’s door with
the SmartKey removed from the starter
switch and the tilting portion of the
tilt/sliding sunroof* or tilt/sliding panel*
open.
�
Close the tilt/sliding sunroof*
(�page 237) or tilt/sliding panel*
(�page 241).
Page 420 of 521
419 Practical hints
What to do if …
Display symbol
Display messages
Possible cause/consequence
Possible solution
t
Function
unavailable
This display appears if button t or
s on the multifunction steering wheel
is pressed and the vehicle is not equipped
with a telephone.
Ê
Trunk open
This message will appear whenever the
trunk is open.
�
Close the trunk.
W
Washer fluid,
please refill
The fluid level has dropped to about
1/3
of total reservoir capacity.�
Add washer fluid (
�page 327).
Page 423 of 521
422 Practical hintsWhere will I find ...?First aid kit
The first aid kit is in the storage compart-
ment at the front edge of the front passen-
ger seat.
1Tab�
Pull tab1 upward.
�
Fold the covering forward.
�
Remove the first aid kit.
Spare wheel
The spare wheel is located under the trunk
floor.�
Lift the trunk floor and engage the han-
dle in the upper edge of trunk.
�
Remove the luggage box (
�page 423).
1Vehicle tool kit
Wheel bolt wrench and jack
2Spare wheel
3Luggage bowlRemoving the spare wheel
�
Turn luggage bowl3 counterclock-
wise.
�
Remove spare wheel2.
Storing the spare wheel
�
Place spare wheel2 in wheel well.
�
Turn luggage bowl3 clockwise to its
stop to secure the spare wheel.
iCheck expiration dates and contents
for completeness at least once a year
and replace missing/expired items.
!Always lower trunk floor before closing
trunk.
Page 424 of 521

423 Practical hints
Where will I find ...?
In case of a flat tire, you may temporarily
use the spare wheel when observing the
following restrictions:�
Do not exceed a vehicle speed of
50 mph (80 km / h).
�
Drive to the nearest tire repair facility
to have the flat tire repaired or re-
placed as appropriate.
�
Do not operate vehicle with more than
one spare wheel mounted.
For more information, see “Spare wheel”
(
�page 480).
Luggage box
Remove luggage box
1Fastening clip
2Luggage box�
Turn fastening clips1 to the left up-
wards from fastening bolts.
�
Lift luggage box in the area of the fas-
tening bolts and remove it from trunk.Install luggage box
�
Insert luggage box into trunk so that
fastening clips are in line with fastening
bolts.
�
Push front edge of luggage box in direc-
tion of arrow under cover of trunk sill.
�
Press fastening clips onto fastening
bolts until they lock into place.
Warning!
G
The dimension of the Minispare wheel is dif-
ferent from those of the road wheels. As a
result, the vehicle handling characteristics
change when driving with a spare wheel
mounted.
The spare wheel should only be used tempo-
rarily, and replaced with a regular road
wheel as quickly as possible.