Page 265 of 521

264 Controls in detailDriving systemsThe Parktronic system is an electronic aid
designed to assist the driver during park-
ing maneuvers. It visually and audibly indi-
cates the relative distance between the
vehicle and an obstacle.
The Parktronic system is automatically ac-
tivated when you switch on the ignition, re-
lease the parking brake, and placed the
gear selector lever in positionD,R,orN.
The Parktronic system deactivates at
speeds over approximately 11 mph
(18 km/h). At lower speeds the Parktronic
system turns on again.
The Parktronic system also deactivates
when you place the gear selector lever in
positionP or depress the parking brake
pedal.The Parktronic system monitors the sur-
roundings of your vehicle with six sensors
in the front bumper and four sensors in the
rear bumper.
1Sensors in the front bumper
Range of the sensors
To function properly, the sensors must be
free of dirt, ice, snow and slush. Clean the
sensors regularly, being careful not to
scratch or damage the sensors, see
“Cleaning the Parktronic system* sensors”
(
�page 368).
Warning!
G
Make sure no persons or animals are in the
area in which you are maneuvering. You
could otherwise injure them.
Page 267 of 521

266 Controls in detailDriving systemsEach warning indicator is divided into five
yellow and two red segments for either
side of the vehicle. The Parktronic system
is operational when the yellow readiness
indicators3 are illuminated.
The position of the gear selector lever de-
termines which warning indicators will be
activated.
As your vehicle approaches an object, one
or more segments will come on, depending
on the distance. When the seventh seg-
ment illuminates, you have reached the
minimum distance.
�
Front area: An intermittent acoustic
warning will sound as the first red dis-
tance segment illuminates and a con-
stant acoustic warning lasting a
maximum of 2 seconds will sound for
the second red distance segment. The
signal is canceled when the gear selec-
tor lever is placed in positionP or the
parking brake is activated.
�
Rear area: An intermittent acoustic
warning will sound as the first red dis-
tance segment illuminates and a con-
stant acoustic warning lasting a
maximum of 2 seconds will sound for
the second red distance segment. The
signal is canceled when the gear selec-
tor lever is placed in position D,P or
the parking brake is activated.Switching the Parktronic system
on/off
The Parktronic system can be switched off
manually.
The Parktronic switch is located in the low-
er part of the center console (
�page 28).
1Parktronic switch
2Indicator lamp
Gear selector
lever position
Warning indicator
D
Front area activated
R or N
Front and rear area
activated
P
Neither activated
Page 268 of 521

267 Controls in detail
Driving systems
Switching off the Parktronic system�
Press Parktronic switch 1.
Indicator lamp 2 comes on.
Switching on the Parktronic system
�
Press Parktronic switch 1 again.
Indicator lamp 2 goes out.
Parktronic system malfunction
If only the red distance segments illumi-
nates and an acoustic warning sounds,
there is a malfunction in the Parktronic
system. The Parktronic system will auto-
matically switch off after 20 seconds and
the indicator lamp in the Parktronic switch
comes on.
�
Have the Parktronic system checked
by an authorized Mercedes-Benz Cen-
ter as soon as possible.If only the red distance segments illumi-
nates and no acoustic warning sounds, the
Parktronic system sensors are dirty or
there is an interference from other radio or
ultrasonic signals. The Parktronic system
will automatically switch off after 20 sec-
onds and the indicator lamp in the Park-
tronic switch comes on.
�
Switch off the ignition (
�page 36).
�
Clean the Parktronic system sensors
(�page 368).
�
Switch on the ignition (
�page 36).
or
�
Check the Parktronic system operation
at another location to rule out interfer-
ence from outside radio or ultrasonic
signals.
iThe Parktronic system is automatically
switched on when the ignition is
switched on (
�page 36).
Page 272 of 521

271 Controls in detail
Loading
Removal of ski sack
For removal of the ski sack, we recom-
mend that you contact an authorized
Mercedes-Benz Center.
Split rear bench seat*
To expand the trunk, you can fold down the
left and right rear seat backrests.
The two sections can be folded down sep-
arately to enlarge the trunk.Folding the backrest forward
1Release handle
Warning!
G
Never drive vehicle with trunk open while
the ski sack is removed. Deadly carbon
monoxide (CO) gases may enter vehicle in-
terior, resulting in unconsciousness and
death.iTo prevent unauthorized persons from
access to the trunk, always close the
cover.
Warning!
G
When expanding the luggage compartment,
always fold the seat cushions fully forward.
Unless you are transporting cargo, the back-
rests must remain properly locked in the up-
right position.
In an accident, during hard braking or sud-
den maneuvers, loose items will be thrown
around inside the vehicle, and cause injury
to vehicle occupants unless the items are
securely fastened in the vehicle.
Always use the cargo tie down rings
(�page 275).
!You must always release the seat cush-
ion and fold it up before folding the seat
backrests forward. The upholstery on
the seat backrest may otherwise be
damaged.
Page 274 of 521
273 Controls in detail
Loading
�
Swing the head restraint forward by
hand until it engages.
Expanding the cargo area*
Removing the rear seat cushions will pro-
vide you with a larger, flat cargo area.�
Fold the seat cushions and the back-
rests forward (
�page 271).
�
Remove the head restraints
(�page 133).
�
Fold the backrest into the vertical posi-
tion.
1Release lever
�
Pull seat cushion release lever1 and
remove the seat cushion by pulling it
upward.
Warning!
G
Always lock backrest in its upright position
when rear seat bench is occupied, or the ex-
tended trunk compartment is not in use.
Check for secure locking by pushing and
pulling on the backrest.
In an accident, during hard braking or sud-
den maneuvers, loose items will be thrown
around inside the vehicle, and cause injury
to vehicle occupants unless the items are
securely fastened in the vehicle.
To help avoid personal injury during a colli-
sion or sudden maneuver, exercise care
when transporting cargo.
��
Page 276 of 521

275 Controls in detail
Loading
Cargo tie-down rings*
Four rings1 are located in the trunk.�
Carefully secure cargo by applying
even load on all rings with rope of suffi-
cient strength to hold down the cargo.
Always follow loading instructions
(�page 274).Rear seat
There is a cargo tie-down ring located on
each side of the footwell under the rear
seat.
Warning!
G
Always fasten items being carried as secure-
ly as possible.
In an accident, during hard braking or sud-
den maneuvers, loose items will be thrown
around inside the vehicle and can cause in-
jury to vehicle occupants unless the items
are securely fastened in the vehicle.
To help avoid personal injury during a colli-
sion or sudden maneuver, exercise care
when transporting cargo. Put luggage or car-
go in the trunk if possible. Do not pile lug-
gage or cargo higher than the seat backs.
Do not place anything on the rear-window
shelf.
Never drive vehicle with trunk open. Deadly
carbon monoxide (CO) gases may enter ve-
hicle interior resulting in unconsciousness
and death.
Page 278 of 521
277 Controls in detail
Useful features
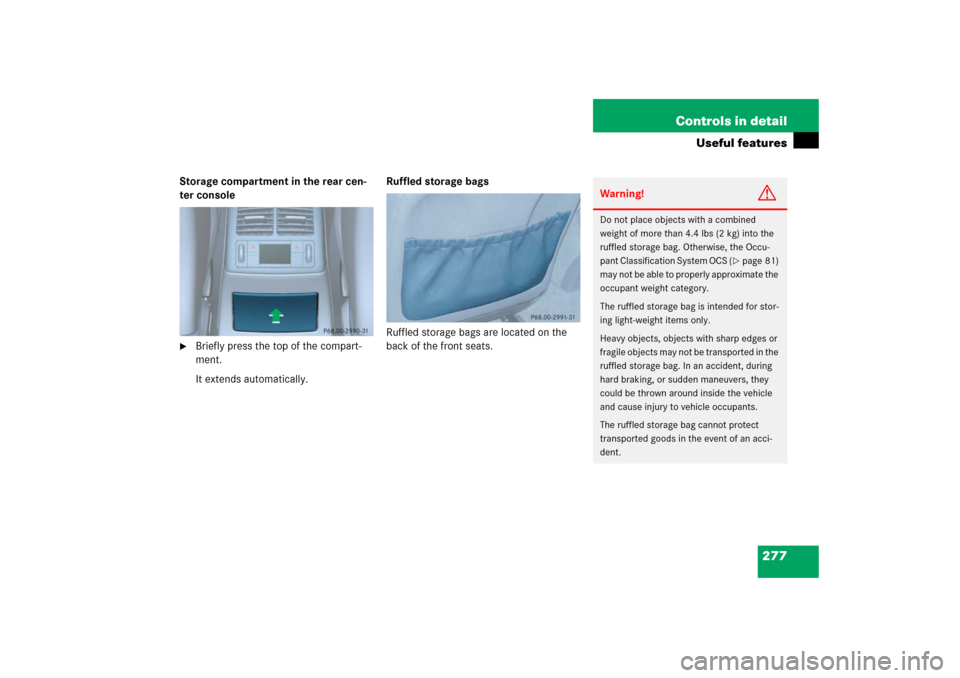
Storage compartment in the rear cen-
ter console�
Briefly press the top of the compart-
ment.
It extends automatically.Ruffled storage bags
Ruffled storage bags are located on the
back of the front seats.
Warning!
G
Do not place objects with a combined
weight of more than 4.4 lbs (2 kg) into the
ruffled storage bag. Otherwise, the Occu-
pant Classification System OCS (
�page 81)
may not be able to properly approximate the
occupant weight category.
The ruffled storage bag is intended for stor-
ing light-weight items only.
Heavy objects, objects with sharp edges or
fragile objects may not be transported in the
ruffled storage bag. In an accident, during
hard braking, or sudden maneuvers, they
could be thrown around inside the vehicle
and cause injury to vehicle occupants.
The ruffled storage bag cannot protect
transported goods in the event of an acci-
dent.
Page 280 of 521
279 Controls in detail
Useful features
Storage compartment with cup holder
in the center armrest
The storage compartment in the center
armrest contains a removable dual cup
holder.
Opening storage compartment
1Cover�
Slide cover1 in direction of arrow.2Dual cup holder
3Telephone* compartment
Closing storage compartment
�
Slide cover1 back.
Keep in mind that objects placed in the cup
holder may come loose during braking, vehi-
cle maneuvers, or in an accident and be
thrown around in the vehicle interior. Ob-
jects thrown around in the vehicle interior
may cause an accident and/or serious per-
sonal injury.
iThe cup holder can be removed to in-
crease storage space and for cleaning.
Clean the cup holder only with clear,
lukewarm water.
Make sure to insert the cup holder in
the guides when reinstalling it
(�page 280).