Page 261 of 521

260 Controls in detailDriving systems1Damping button
2Indicator lamps�
Start the engine.
�
Press the damping button1 until the
desired suspension style is set.Vehicle level control
Your vehicle automatically adjusts its ride
height to
�
increase vehicle safety
�
reduce fuel consumption
The following vehicle chassis ride heights
can be selected:
�
Normal
�
Raised
The vehicle chassis ride height is raised or
lowered according to the selected level
setting and to the vehicle speed:
�
At a speed exceeding approximately
68 mph (110 km/h) with normal level
set or exceeding 75 mph (120 km/h)
with raised level set, the ride height is
reduced automatically. The table on
the next page provides an overview of
the vehicle levels.
�
With decreasing speed, the ride height
is again raised to the normal level.
!If you have selected the Comfort sus-
pension tuning, the vehicle lowers
slightly when you lock it within approx-
imately 60 seconds after switching off
the engine. When parking, make sure
that your vehicle cannot come into con-
tact with other objects, such as a curb,
while lowering. Your vehicle could oth-
erwise be damaged.iThe selected suspension style is stored
in memory, even after the SmartKey is
removed from the starter switch.
Page 284 of 521
.
�
Flip up cover and insert electrical plug
(c")
283 Controls in detail
Useful features
Power outlet
The power outlet is located in the rear pas-
senger compartment.�
Switch on the ignition (
�page 36).
�
Flip up cover and insert electrical plug
(cigarette lighter type).
Heated steering wheel*
The steering wheel heating warms up the
leather area of the steering wheel.
The stalk is on the lower left-hand side of
the steering wheel.
1Indicator lamp
2Switching off
3Switching onSwitching on
�
Switch on the ignition (
�page 36).
�
Turn switch at the tip of stalk in direc-
tion of arrow3.
The steering wheel is heated. Indicator
lamp1 comes on.
iThe power outlet can be used to
accommodate 12V DC electrical ac-
cessories (e.g. air pump, auxiliary
lamps) up to a maximum of 180 W.
An additional power outlet is located on
the left side in the trunk.
iThe steering wheel heating is tempo-
rarily suspended while indicator
lamp1 remains on when�
the temperature of the vehicle inte-
rior is above 86°F (30°C)
�
the temperature of the steering
wheel is above 95°F (35°C)
When these conditions do not apply
anymore, steering wheel heating con-
tinues.
Page 413 of 521

412 Practical hintsWhat to do if …Display symbol
Display messages
Possible cause/consequence
Possible solution
.
Brake lamp
Drive to workshop
Brake lamp illumination is delayed or
lamp is permanently on.
�
Visit an authorized Mercedes-Benz
Center as soon as possible.
Brake lamp, left
Substitute bulb on
The left brake lamp is malfunctioning. A
substitute bulb is being used.
�
Visit an authorized Mercedes-Benz
Center as soon as possible.
Brake lamp, right
Substitute bulb on
The right brake lamp is malfunctioning. A
substitute bulb is being used.
�
Visit an authorized Mercedes-Benz
Center as soon as possible.
Display malfunction
Visit workshop
The display for the lamps or the system is
malfunctioning.
�
Visit an authorized Mercedes-Benz
Center as soon as possible.
Front foglamp,
left
The left front fog lamp is malfunctioning.
�
Replace the bulb as soon as possible.
Front foglamp,
right
The right front fog lamp is malfunctioning.
�
Replace the bulb as soon as possible.
Active headlamps
currently
unavailable
The active headlamps are malfunctioning.
�
Visit an authorized Mercedes-Benz
Center as soon as possible.
Active headlamps
Backup lamp on
The active headlamps are malfunctioning.
Another light is being used.
�
Visit an authorized Mercedes-Benz
Center as soon as possible.
Active headlamps
malfunction
Drive to workshop
The active headlamps have malfunc-
tioned several times in succession.
�
Visit an authorized Mercedes-Benz
Center as soon as possible.
Page 414 of 521

413 Practical hints
What to do if …
Display symbol
Display messages
Possible cause/consequence
Possible solution
.
Low beam,
right
The right low beam lamp is malfunction-
ing.
Halogen headlamp:�
Replace the bulb as soon as possible.
Bi-Xenon* headlamp:
�
Visit an authorized Mercedes-Benz
Center as soon as possible.
Front Marker light,
left
The front left side marker lamp is mal-
functioning.
�
Visit an authorized Mercedes-Benz
Center as soon as possible.
Front Marker light,
right
The front right side marker lamp is mal-
functioning.
�
Visit an authorized Mercedes-Benz
Center as soon as possible.
Fr. Park. lamp, left
The left parking lamps are malfunction-
ing.
�
Visit an authorized Mercedes-Benz
Center as soon as possible.
Fr. Park. lamp, right
The right parking lamps are malfunction-
ing.
�
Visit an authorized Mercedes-Benz
Center as soon as possible.
Rear foglamp
Substitute bulb on
The rear fog lamp is malfunctioning. A
substitute bulb is being used.
�
Replace the bulb as soon as possible.
Backup lamp, left
The left reverse lamp is malfunctioning.
�
Replace the bulb as soon as possible.
Backup lamp, right
The right reverse lamp is malfunctioning.
�
Replace the bulb as soon as possible.
Switch off lamps
Lamps have been turned on although the
SmartKey in the starter switch is in posi-
tion 0.
�
Switch off the headlights.
Page 415 of 521
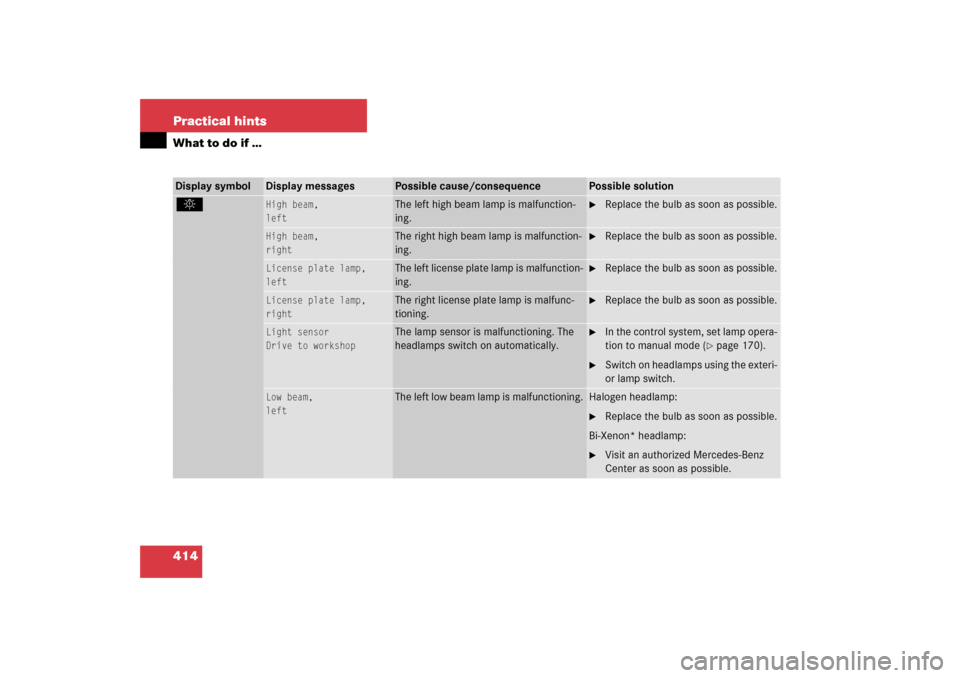
414 Practical hintsWhat to do if …Display symbol
Display messages
Possible cause/consequence
Possible solution
.
High beam,
left
The left high beam lamp is malfunction-
ing.
�
Replace the bulb as soon as possible.
High beam,
right
The right high beam lamp is malfunction-
ing.
�
Replace the bulb as soon as possible.
License plate lamp,
left
The left license plate lamp is malfunction-
ing.
�
Replace the bulb as soon as possible.
License plate lamp,
right
The right license plate lamp is malfunc-
tioning.
�
Replace the bulb as soon as possible.
Light sensor
Drive to workshop
The lamp sensor is malfunctioning. The
headlamps switch on automatically.
�
In the control system, set lamp opera-
tion to manual mode (
�page 170).
�
Switch on headlamps using the exteri-
or lamp switch.
Low beam,
left
The left low beam lamp is malfunctioning.
Halogen headlamp:�
Replace the bulb as soon as possible.
Bi-Xenon* headlamp:
�
Visit an authorized Mercedes-Benz
Center as soon as possible.
Page 434 of 521
433 Practical hints
Replacing bulbs
�Replacing bulbs
Bulbs
Safe vehicle operation depends on proper
exterior lighting and signaling. It is there-
fore essential that all bulbs and lamp as-
semblies are in good working order at all
times.
Correct headlamp adjustment is extremely
important. Have headlamps checked and
readjusted at regular intervals and when a
bulb has been replaced. See your autho-
rized Mercedes-Benz Center for headlamp
adjustment.
iIf the headlamps or front fog lamps are
fogged up on the inside as a result of
high humidity, driving the vehicle a dis-
tance with the lights on should clear up
the fogging.
iSubstitute bulbs will be brought into
use when lamps malfunction. Read and
observe messages in the multifunction
display (
�page 412).
Page 436 of 521

435 Practical hints
Replacing bulbs
Notes on bulb replacement�
Only use 12 volt bulbs of the same type
and with the specified watt rating.
�
Switch lights off before changing a bulb
to prevent short circuits.
�
Always use a clean lint-free cloth when
handling bulbs.
�
Your hands should be dry and free of oil
and grease.
�
If the newly installed bulb does not light
up, visit an authorized Mercedes-Benz
Center.Have the LEDs and bulbs for the following
lamps replaced by an authorized
Mercedes-Benz Center:
�
Additional turn signals in the exterior
rear view mirrors
�
High mounted brake lamp
�
Bi-Xenon* lamps
�
Front fog lamps
�
Rear lamps (except license plate
lamps)
�
Front side marker lamps
Warning!
G
Bulbs and bulb sockets can be very hot. Al-
low the lamp to cool down before changing
a bulb.
Keep bulbs out of reach of children.
Halogen lamps contain pressurized gas.
A bulb can explode if you:�
touch or move it when hot
�
drop the bulb
�
scratch the bulb
Wear eye and hand protection.
Because of high voltage in Bi-Xenon* lamps,
it is dangerous to replace the bulb or repair
the lamp and its components. We recom-
mend that you have such work done by a
qualified technician.
iHave the headlamp adjustment
checked regularly.
Page 494 of 521

Prevents the wheels from locking up
during braking so that the vehicle can
continue to be steered.
Accessory weight
(
�page 353)
ADS
(Adaptive D
am")
493 Technical terms
ABS
(A
ntilock B
rake S
ystem)
Prevents the wheels from locking up
during braking so that the vehicle can
continue to be steered.
Accessory weight
(
�page 353)
ADS
(Adaptive D
amping S
ystem)
Automatically adapts the optimum sus-
pension damping to prevailing driving
conditions.
Air pressure
(
�page 353)
Airmatic DC*
(Airmatic D
ual C
ontrol)
Automatically selects the optimum sus-
pension tuning and ride height for your
vehicle. Airmatic consists of two com-
ponents:
�
Adaptive Damping System
�
Vehicle level controlAlignment bolt
Metal pin with thread. The centering
pin is an aid used when changing a tire
to align the wheel with the wheel hub.
Aspect ratio
(
�page 353)
Bar
(�page 354)
BAS
(Brake A
ssist S
ystem)
System for potentially reducing braking
distances in emergency braking situa-
tions. The system is activated when it
senses an emergency based on how
fast the brake is applied.
Bead
(
�page 354)
Bi-Xenon headlamps*
Headlamps which use an electric arc as
a light source and produce a more in-
tense light than filament headlamps.
Bi-Xenon headlamps produce low
beam and high beam.CAC
(C
ustomer A
ssistance C
enter)
Mercedes-Benz customer service cen-
ter which can help you with any ques-
tions about your vehicle and provide
assistance in the event of a break-
down.
CAN system
(C
ontroller A
rea N
etwork)
Data bus network serving to control ve-
hicle functions such as door locking or
windshield wiping.
Cockpit
All instruments, switches, buttons and
indicator/warning lamps in the passen-
ger compartment needed for vehicle
operation and monitoring.
Cold tire inflation pressure
(
�page 354)