Page 313 of 521

312 OperationAt the gas stationRefueling
The fuel filler flap is located on the
right-hand side of the vehicle towards the
rear. Locking/unlocking the vehicle with
the remote control automatically
locks/unlocks the fuel filler flap.
�
Turn the engine off �
by turning the SmartKey to
position0.
�
by pressing the KEYLESS-GO*
start/stop button. Open the driv-
er’s door (with the driver’s door
open, starter switch is now in
position0, same as SmartKey re-
moved from starter switch).
�
Remove the SmartKey from the starter
switch.
�
Open the fuel filler flap by pushing at
the point indicated by the arrow.
The fuel filler flap springs open.
�
Turn the fuel cap to the left and hold on
to it until possible pressure is released.
�
Take off the cap and set it in the recess
on the fuel filler flap.
To prevent fuel vapors from escaping
into open air, fully insert filler nozzle
unit.
�
Only fill your tank until the filler nozzle
unit cuts out – do not top up or over-
fill.
�
Replace fuel cap by turning it clockwise
until it audibly engages.
�
Close the fuel filler flap.
Warning!
G
Gasoline is highly flammable and poisonous.
It burns violently and can cause serious
injury. Whenever you are around gasoline,
avoid inhaling fumes and skin contact, extin-
guish all smoking materials. Never allow
sparks, flame or smoking materials near
gasoline!
Warning!
G
Overfilling of the fuel tank may create pres-
sure in the system which could cause a gas
discharge. This could cause the gasoline to
spray back out when removing the fuel
pump nozzle, which could cause personal in-
jury.
Page 318 of 521

When checking the oil level�
the vehicle must be parked on level
ground
�
with the engine at ope")
317 Operation
Engine compartment
Checking engine oil level with the con-
trol system (E 500, E 55 AMG)
When checking the oil level�
the vehicle must be parked on level
ground
�
with the engine at operating tempera-
ture, the vehicle must have been
stationary for at least 5 minutes with
the engine turned off
�
with the engine not at operating tem-
perature yet, the vehicle must have
been stationary for at least 30 minutes
with the engine turned off
To check the engine oil level via the multi-
function display, do the following:
�
Switch on the ignition (
�page 36).
The standard display (
�page 155) should
appear in the multifunction display.
�
Press button k or j on the mul-
tifunction steering wheel until the fol-
lowing message is seen in the
multifunction display:One of the following messages will
subsequently appear in the multifunc-
tion display:
�
Engine oil level
ok
�
Add 1.0 Qt.
to reach max. oil level(Canada:
1.0 Liter
)
�
Add 1.5 Qts.
to reach max. oil level(Canada:
1.5 Liters
)
�
Add 2.0 Qts.
to reach max. oil level(Canada:
2.0 Liters
)
�
If necessary, add engine oil.
For adding engine oil, see (
�page 319).
For more information on engine oil, see the
“Technical data” section (
�page 482) and
(
�page 485).
Other display messages
If the SmartKey or KEYLESS-GO start/stop
button* is not in position 2, the following
message will appear:
Switch ignition on
to check engine oil level�
Switch on the ignition (
�page 36).
If you see the message:
Observe waiting period
iIf you want to interrupt the checking
procedure, press buttonk orj
on the multifunction steering wheel.
��
Page 368 of 521

367 Operation
Vehicle care
Light alloy wheels
If possible, clean wheels once a week.�
Use Mercedes-Benz approved Wheel
Care, a soft bristle brush and a strong
spray of water for cleaning the light al-
loy wheels.
Plastic and rubber parts
�
Use a gentle dishwashing detergent or
mild detergent for delicate fabrics as a
washing solution.
Instrument cluster and cup holders
�
Use a gentle dishwashing detergent or
mild detergent for delicate fabrics as a
washing solution.
�
Wipe with a cloth moistened in a luke-
warm solution.
!Fold the windshield wiper arms back
onto the windshield before turning the
SmartKey in the starter switch or
pressing the KEYLESS-GO start/stop
button (vehicles with KEYLESS-GO*).
Hold on to the wiper when folding the
wiper arm back. If released, the force
of the impact from the tensioning
spring could crack the windshield.!To clean the window interior, do not
use a dry cloth, abrasives, solvents or
cleaners containing solvents. Do not
touch the inside of the front, rear or
side windows with hard objects such as
an ice scraper or ring. Doing so may
damage the windows.
!Only use acid-free cleaning materials.
Acid may cause corrosion or damage
the clear coat.!The vehicle should not be parked for an
extended period of time immediately
after it has been cleaned, especially not
after the wheel rims have been cleaned
with wheel rim cleaner. Wheel rim
cleaners can lead to increased corro-
sion of the brake disks and brake pads.
Therefore, the vehicle’s brake system
should always be warmed-up before it
is parked after cleaning. To do so,
please drive your vehicle for several
minutes to allow the brakes to dry.
When applying Mercedes-Benz ap-
proved Tire Care and Mercedes-Benz
approved Wheel Care products, take
care not to spray them on the brake
disks. !Do not use oil or wax on these parts.!To prevent scratches, do not use scour-
ing agents.
Page 390 of 521
389 Practical hints
What to do if …
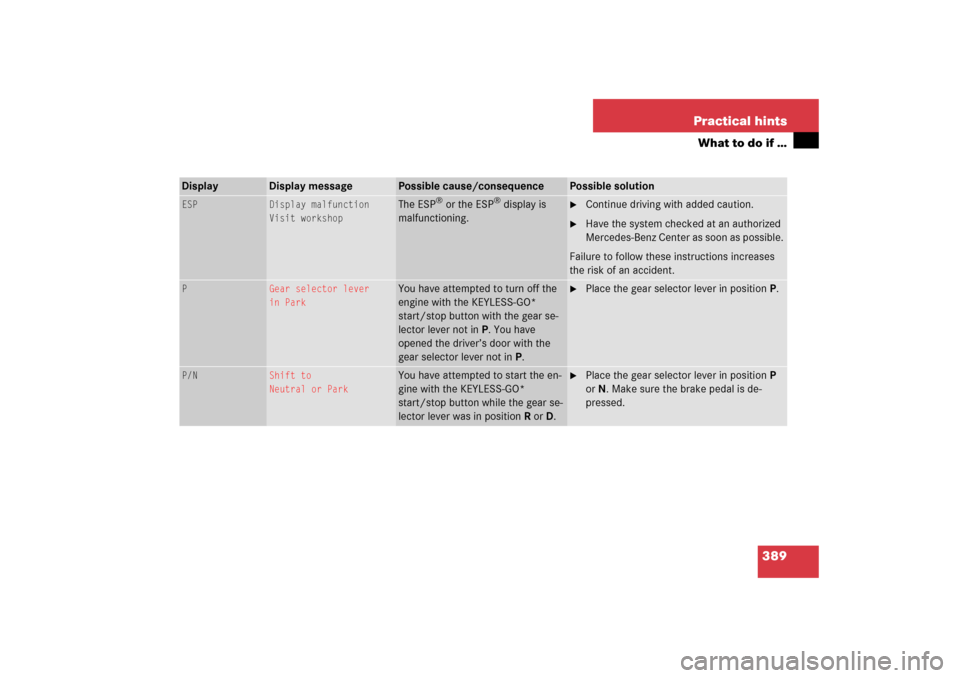
Display
Display message
Possible cause/consequence
Possible solution
ESP
Display malfunction
Visit workshop
The ESP
® or the ESP
® display is
malfunctioning.
�
Continue driving with added caution.
�
Have the system checked at an authorized
Mercedes-Benz Center as soon as possible.
Failure to follow these instructions increases
the risk of an accident.
P
Gear selector lever
in Park
You have attempted to turn off the
engine with the KEYLESS-GO*
start/stop button with the gear se-
lector lever not inP. You have
opened the driver’s door with the
gear selector lever not inP.
�
Place the gear selector lever in positionP.
P/N
Shift to
Neutral or Park
You have attempted to start the en-
gine with the KEYLESS-GO*
start/stop button while the gear se-
lector lever was in positionR orD.
�
Place the gear selector lever in positionP
orN. Make sure the brake pedal is de-
pressed.
Page 425 of 521
424 Practical hintsUnlocking/locking in an emergencyUnlocking the vehicle
If you cannot unlock the vehicle with the
SmartKey or SmartKey with
KEYLESS-GO*, open the driver’s door and
the tailgate using the mechanical key. Removing the mechanical key
1Mechanical key locking tab
2Mechanical key
�
Move locking tab1 in direction of ar-
row.
�
Slide mechanical key2 out of the
housing.Unlocking the driver’s door
1Unlocking
�
Insert the mechanical key into the
driver’s door lock until it stops.
�
Turn the mechanical key counterclock-
wise to position1.
The driver’s door is unlocked.
iUnlocking your vehicle with the me-
chanical key will trigger the anti-theft
alarm system. To cancel the alarm, do
one of the following:�
Press button Œ or ‹ on the
SmartKey.
�
Insert the SmartKey in the starter
switch.
Vehicles with KEYLESS-GO*
�
Pull the outside door handle.
�
Press the KEYLESS-GO* start/stop
button.
Page 441 of 521
.
�")
440 Practical hintsFlat tirePreparing the vehicle�
Park the vehicle in a safe distance from
moving traffic on a hard, flat surface
when possible.
�
Turn on the hazard warning flasher
(�page 147).
�
Turn the steering wheel so that the
front wheels are in a straight ahead po-
sition.
�
Set the parking brake (
�page 60).
�
Move the gear selector lever toP.
Vehicles with SmartKey:
�
Turn off the engine (
�page 61).
�
Remove the SmartKey from the starter
switch.Vehicles with SmartKey with
KEYLESS-GO*:
�
Turn off the engine by pressing the
KEYLESS-GO* start/stop button on the
gear selector lever once (
�page 61).
�
Open the driver’s door (this puts the ig-
nition in position0, same as with the
SmartKey removed from the starter
switch). The driver’s door then can be
closed again.
�
Have any passenger exit the vehicle at
a safe distance from the roadway.
Sealing tires with TIREFIT
E 55 AMG vehicles with foldable third row
seat are equipped with TIREFIT.
Small tire punctures, particularly those in
the tread, can be sealed with TIREFIT.
TIREFIT can be used in ambient tempera-
tures down to -4°F (-20°C).
iOpen door only when conditions are
safe to do so.
Warning!
G
Keep TIREFIT away from sparks, open flame
or heat source.
Do not smoke.
Page 443 of 521

442 Practical hintsFlat tire�
Screw the air pump’s air hose5 onto
flange6 of the TIREFIT container.
�
Stick TIREFIT container1 upside
down into notch3 of the electric air
pump.
7Tire valve
8Electric air pump switch
9Air hose with pressure gauge and vent
screw
aFiller hose
�
Unscrew the valve cap from tire
valve7.
�
Screw filler hosea onto tire valve7.
�
Insert electrical plug4 into the vehi-
cle cigarette lighter socket
(�page 278).
�
Turn the SmartKey in the starter switch
to position1 (
�page 36).
or
�
Press the KEYLESS-GO* start/stop
button (
�page 38) on the gear selec-
tor lever once. Do not depress brake
pedal.
�
PressI on electric air pump switch8.
The electric air pump should now
switch on and inflate the tire.After 5 minutes, the pressure gauge must
display at least 26 psi (1.8 bar). The air
hose can become hot during inflation.
Please exercise appropriate caution.
�
If this tire inflation pressure is not at-
tained, turn off the electric air pump,
detach the filler hose from the tire
valve, and drive vehicle back and forth
very slowly approximately 30 ft (10 m).
This serves to better distribute the
TIREFIT sealant material inside the tire.
�
Unscrew the air pump’s air hose5
from flange6 of the TIREFIT contain-
er.
�
Screw air hose5onto tire valve7.
�
Inflate the tire again.
Warning!
G
Observe safety instructions on air pump la-
bel.
!Do not operate the electric air pump
longer than 8 minutes without interrup-
tion. Otherwise it may overheat.
You may operate the air pump again af-
ter it has cooled off.
��
Page 444 of 521
, press0 on electric
air pump switch8.
The electric air pump should now be
switched off.
�
Turn the Smar")
443 Practical hints
Flat tire
�
After attaining a tire inflation pressure
of 26 psi (1.8 bar), press0 on electric
air pump switch8.
The electric air pump should now be
switched off.
�
Turn the SmartKey in the ignition to
position0 (
�page 36).
or
�
Press the KEYLESS-GO* start/stop
button (
�page 38) on the gear selec-
tor lever twice. Do not depress brake
pedal.
�
Detach the electric air pump.
The air hose may still be hot. Please ex-
ercise appropriate caution.
�
Place the electric air pump back in the
cargo compartment.
�
Close the cargo compartment.
�
Drive away immediately.
The TIREFIT sealant will distribute itself
evenly inside the tire.
Warning!
G
If a tire inflation pressure of 26 psi (1.8 bar)
is not attained, tire is too severely damaged
for TIREFIT to provide a reliable tire repair.
In this case, TIREFIT cannot properly seal
the tire.
Do not drive the vehicle.
Contact the nearest Mercedes-Benz Center
or call Roadside Assistance.
Warning!
G
Do not exceed vehicle speed of
50 mph (80 km/h). A TIREFIT repair is not
designed to operate at higher speeds.
The sticker must be attached on the instru-
ment cluster where it will be easily seen by
the driver.
Vehicle handling characteristics may
change. Adapt your driving accordingly.
��