Page 398 of 521

397 Practical hints
What to do if …
Display symbol
Display messages
Possible cause/consequence
Possible solution
2
Brake wear
Visit workshop
The brake pads have reached their wear
limit.
�
Brake pad thickness must be visually
inspected at the intervals specified in
the Maintenance Booklet.
�
Have the brake pads replaced as soon
as possible.
T
Reduced braking power
Depress brake
pedal fully
The electrohydraulic brake system is in
emergency operation mode. Consider-
ably greater brake pedal force is required
and the stopping distance is increased.
The maximum speed is limited to 55 mph
(90 km/h).
�
Do not drive any further.
�
Stop the vehicle in a safe location as
soon as it is safe to do so and notify
an authorized Mercedes-Benz Center.
�
Prevent the vehicle from rolling away
by blocking the wheels with wheel
chocks or other sizable objects.
�
Call for Roadside Assistance.
(USA only);(Canada only)3
Reduced braking power
Start engine
The battery has insufficient voltage and
cannot supply sufficient power to the
electrohydraulic brake system.
�
Start the engine (
�page 50).
The message disappears when suffi-
cient voltage is available.
!Brake pad thickness must be visually
inspected by a qualified technician at
the intervals specified in the
Maintenance Booklet.
Page 400 of 521
;(Canada only)3
Brake fluid
Visit workshop
There is insufficient brake flui")
399 Practical hints
What to do if …
Display symbol
Display messages
Possible cause/consequence
Possible solution
(USA only);(Canada only)3
Brake fluid
Visit workshop
There is insufficient brake fluid in the
reservoir.
�
Risk of accident! Stop the vehicle in a
safe location as soon as it is safe to do
so and notify an authorized
Mercedes-Benz Center. Do not add
brake fluid! This will not solve the
problem.
Warning!
G
Driving with the message
Brake fluid
Visit workshop
displayed can result in an
accident. Have your brake system checked
immediately.
If there is a malfunction in the electrohy-
draulic brake system, we recommend that
the vehicle be transported with all wheels
off the ground using flatbed or appropriate
wheel lift/dolly equipment.
A tow bar must be used if circumstances do
not permit the use of the recommended
towing methods and the vehicle requires
towing with all four wheels on the ground.
Towing the vehicle with all four wheels on
the ground is only permissible for distances
u p t o 3 0 m i l e s ( 5 0 k m ) a n d a t a s p e e d n o t t o
exceed 30 mph (50 km/h). For more infor-
mation, refer to “Towing the vehicle”
(�page 458).
If the electrohydraulic brake system enters
its emergency operation mode, the driver
must apply significantly greater brake pedal
pressure and depress the pedal much fur-
ther than normal to obtain braking effect. If
necessary, apply full pressure to the brake
pedal. Brakes may only be applied to the
front wheels. Stopping distance is in-
creased!
Do not add brake fluid before checking the
brake system. Overfilling the brake fluid res-
ervoir can result in spilling brake fluid on hot
engine parts and the brake fluid catching
fire. You can be seriously burned.!If you find that the brake fluid in the
brake fluid reservoir has fallen to the
minimum mark or below, have the
brake system checked for brake pad
thickness and leaks.
Page 414 of 521
413 Practical hints
What to do if …
Display symbol
Display messages
Possible cause/consequence
Possible solution
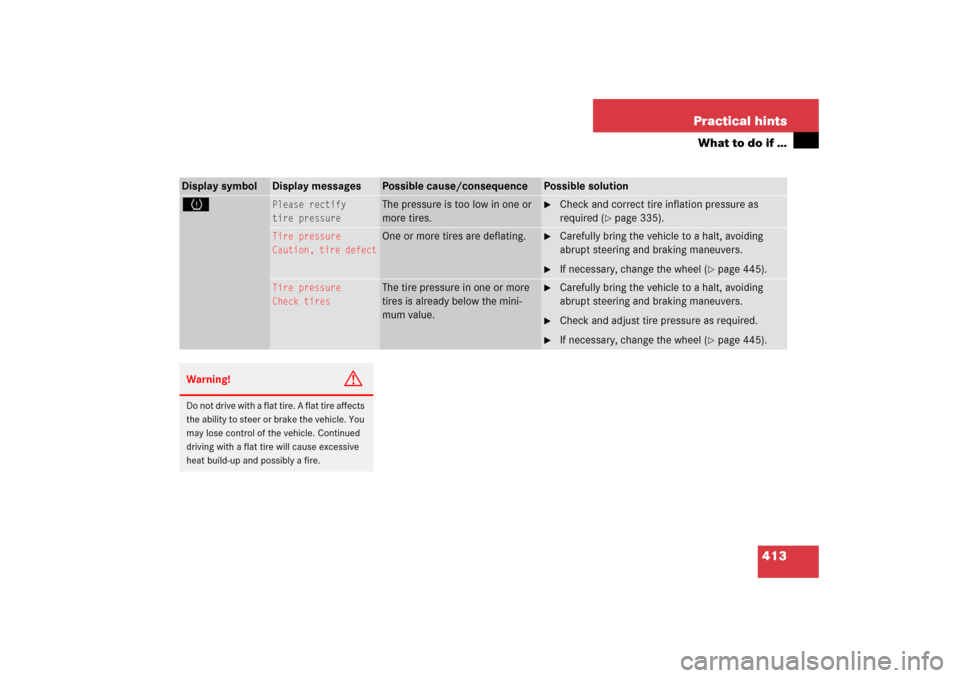
H
Please rectify
tire pressure
The pressure is too low in one or
more tires.
�
Check and correct tire inflation pressure as
required (
�page 335).
Tire pressure
Caution, tire defect
One or more tires are deflating.
�
Carefully bring the vehicle to a halt, avoiding
abrupt steering and braking maneuvers.
�
If necessary, change the wheel (
�page 445).
Tire pressure
Check tires
The tire pressure in one or more
tires is already below the mini-
mum value.
�
Carefully bring the vehicle to a halt, avoiding
abrupt steering and braking maneuvers.
�
Check and adjust tire pressure as required.
�
If necessary, change the wheel (
�page 445).
Warning!
G
Do not drive with a flat tire. A flat tire affects
the ability to steer or brake the vehicle. You
may lose control of the vehicle. Continued
driving with a flat tire will cause excessive
heat build-up and possibly a fire.
Page 417 of 521
416 Practical hintsWhat to do if …Display symbol
Display messages
Possible cause/consequence
Possible solution
t
Function
unavailable
This display appears if button t or
s on the multifunction steering wheel
is pressed and the vehicle is not equipped
with a telephone.
&
Tailgate open
This message will appear whenever the
cargo compartment is open.
�
Close the cargo compartment.
W
Washer fluid,
please refill
The fluid level has dropped to about
1/3
of total reservoir capacity.�
Add washer fluid (
�page 323).
Page 420 of 521

419 Practical hints
Where will I find ...?
�Where will I find ...?
First aid kit
The first aid kit is in the storage compart-
ment at the front edge of the front passen-
ger seat.
1Tab�
Pull tab1 upward.
�
Fold the covering forward.
�
Remove the first aid kit.
Vehicle tool kit, jack and spare wheel
The vehicle tool kit, jack and spare wheel
are stored in the compartment underneath
the third row seat cushions and footwell
(�page 420) or underneath the cargo
compartment floor (E 55 AMG only).
The vehicle tool kit includes:
�
One pair of universal pliers
�
One towing eye bolt
�
One wheel wrench
�
One alignment bolt
�
One fuse extractor
�
Spare fuses
�
Collapsible wheel chock
�
A pair of glovesVehicles without foldable third row
seat (E 55 AMG only) - Vehicle tool kit,
jack and collapsible tire
The vehicle tool kit is located in the cargo
compartment underneath the cargo com-
partment floor.
1Release handle
2Unlocking
�
Pull release handle 1 and fold cargo
compartment floor upward.
�
If the cargo compartment floor is
locked, insert mechanical key
(�page 429) into the lock and turn it to
position 2.
iCheck expiration dates and contents
for completeness at least once a year
and replace missing/expired items.
Page 421 of 521
420 Practical hintsWhere will I find ...?Vehicles with foldable third row seat -
Vehicle tool kit, jack and spare wheel
(except E 55 AMG) or
TIREFIT (E 55 AMG only)
The vehicle tool kit is located in the cargo
compartment underneath the third row
seat cushions and footwell.
1Release handle for seat backrest
2Release handle for seat cushion�
Pull release handle 1 and fold seat
backrest for the folding bench seat up-
ward.
�
Pull release handle 2, fold seat cush-
ion upward and remove it
(�page 138).1Release handle
2Footwell
�
Pull release handle 1 and fold
footwell2 up.
�
To lock, fold footwell 2 back into its
original position and press it down until
it engages.Vehicle tool kit (vehicles with spare
wheel)
1Handle
2Cover
�
Turn handle 1 to the right as far as it
will go and remove cover 2.iIn order to access the vehicle tool kit,
you must first detach the side cover.
Page 422 of 521

1Vehicle tool kit and jack
2Electric air pump
3TIREFIT kitVehicle jackThe vehicle jack is located in the cargo
comp")
421 Practical hints
Where will I find ...?
Vehicle tool kit (vehicles with TIREFIT)
1Vehicle tool kit and jack
2Electric air pump
3TIREFIT kitVehicle jackThe vehicle jack is located in the cargo
compartment underneath the third row
seat cushions and footwell (
�page 420) or
underneath the cargo compartment floor
(
�page 419).
Storage position�
Remove vehicle jack from its
compartment.
�
Turn crank handle in direction of arrow
as far as it will go.
Warning!
G
The jack is designed exclusively for jacking
up the vehicle at the jack take-up brackets
built into both sides of the vehicle. To help
avoid personal injury, use the jack only to lift
the vehicle during a wheel change. Never
get beneath the vehicle while it is supported
by the jack. Keep hands and feet away from
the area under the lifted vehicle. Always
firmly set parking brake and block wheels
before raising vehicle with jack.
Do not disengage parking brake while the
vehicle is raised. Be certain that the jack is
always vertical (plumb line) when in use,
especially on hills. Always try to use the jack
on level surface. Make sure the jack arm is
fully seated in the jack take-up bracket.
Always lower the vehicle onto sufficient
capacity jackstands before working under
the vehicle.
Page 423 of 521

422 Practical hintsWhere will I find ...?Operational position�
Turn crank handle clockwise.
Before storing the vehicle jack in its
compartment:
�
It should be fully collapsed.
�
The handle must be folded in (storage
position).Spare wheel
If your vehicle is equipped with a spare
wheel (Minispare or collapsible tire), it is
located in the cargo compartment under-
neath the third row seat cushions and foot-
well (
�page 420) or underneath the cargo
compartment floor (
�page 419). To ac-
cess the spare wheel, fold seat cushions
and footwell up (
�page 420).
1Vehicle tool kit
Wheel bolt wrench and Jack
2Spare wheel
3Luggage bowlRemoving the spare wheel
�
Turn luggage bowl3 counterclock-
wise.
�
Remove spare wheel2.
Storing the spare wheel
�
Place spare wheel2 in wheel well.
�
Turn luggage bowl3 clockwise to its
stop to secure the spare wheel.Warning!
G
The dimensions of the spare wheel
(Minispare or collapsible tire) are different
from those of the road wheels. As a result,
the vehicle handling characteristics change
when driving with a spare wheel mounted.
The Minispare wheel and collapsible tire
should only be used temporarily, and re-
placed with a regular road wheel as quickly
as possible.

 or
TIREFIT (E 55 AMG only)
The vehicle tool kit is located")