Page 410 of 521

409 Practical hints
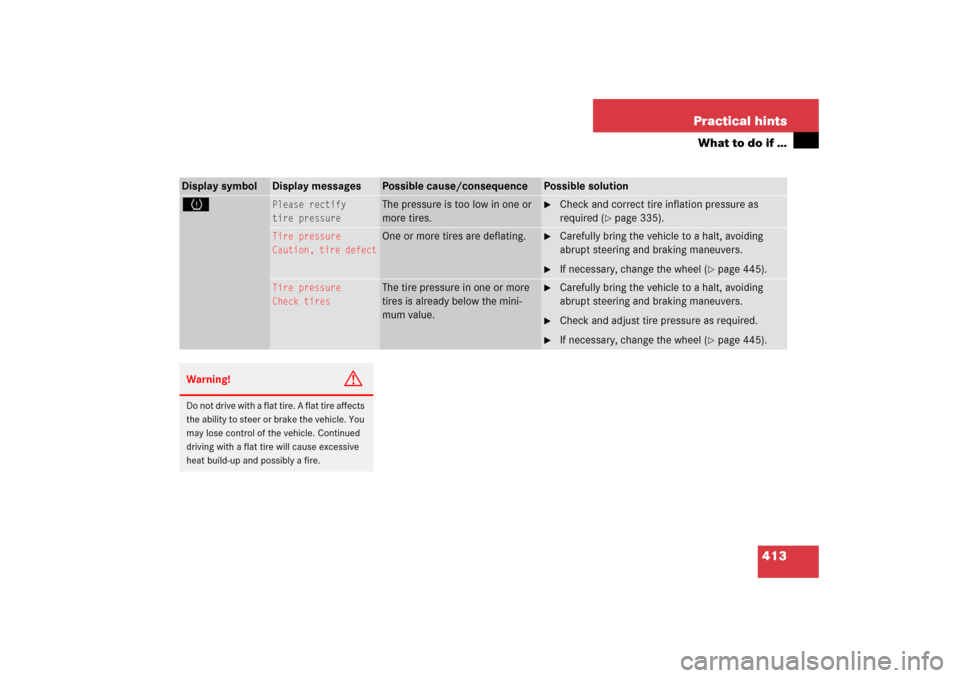
What to do if …
Display symbol
Display messages
Possible cause/consequence
Possible solution
.
Brake lamp
Drive to workshop
Brake lamp illumination is delayed or
lamp is permanently on.
�
Visit an authorized Mercedes-Benz
Center as soon as possible.
Brake lamp, left
Substitute bulb on
The left brake lamp is malfunctioning. A
substitute bulb is being used.
�
Visit an authorized Mercedes-Benz
Center as soon as possible.
Brake lamp, right
Substitute bulb on
The right brake lamp is malfunctioning. A
substitute bulb is being used.
�
Visit an authorized Mercedes-Benz
Center as soon as possible.
Display malfunction
Visit workshop
The display for the lamps or the system is
malfunctioning.
�
Visit an authorized Mercedes-Benz
Center as soon as possible.
Front foglamp,
left
The left front fog lamp is malfunctioning.
�
Replace the bulb as soon as possible.
Front foglamp,
right
The right front fog lamp is malfunctioning.
�
Replace the bulb as soon as possible.
Active headlamps
currently
unavailable
The active headlamps are malfunctioning.
�
Visit an authorized Mercedes-Benz
Center as soon as possible.
Active headlamps
Backup lamp on
The active headlamps are malfunctioning.
Another light is being used.
�
Visit an authorized Mercedes-Benz
Center as soon as possible.
Active headlamps
malfunction
Drive to workshop
The active headlamps have malfunc-
tioned several times in succession.
�
Visit an authorized Mercedes-Benz
Center as soon as possible.
Page 414 of 521
413 Practical hints
What to do if …
Display symbol
Display messages
Possible cause/consequence
Possible solution
H
Please rectify
tire pressure
The pressure is too low in one or
more tires.
�
Check and correct tire inflation pressure as
required (
�page 335).
Tire pressure
Caution, tire defect
One or more tires are deflating.
�
Carefully bring the vehicle to a halt, avoiding
abrupt steering and braking maneuvers.
�
If necessary, change the wheel (
�page 445).
Tire pressure
Check tires
The tire pressure in one or more
tires is already below the mini-
mum value.
�
Carefully bring the vehicle to a halt, avoiding
abrupt steering and braking maneuvers.
�
Check and adjust tire pressure as required.
�
If necessary, change the wheel (
�page 445).
Warning!
G
Do not drive with a flat tire. A flat tire affects
the ability to steer or brake the vehicle. You
may lose control of the vehicle. Continued
driving with a flat tire will cause excessive
heat build-up and possibly a fire.
Page 422 of 521

1Vehicle tool kit and jack
2Electric air pump
3TIREFIT kitVehicle jackThe vehicle jack is located in the cargo
comp")
421 Practical hints
Where will I find ...?
Vehicle tool kit (vehicles with TIREFIT)
1Vehicle tool kit and jack
2Electric air pump
3TIREFIT kitVehicle jackThe vehicle jack is located in the cargo
compartment underneath the third row
seat cushions and footwell (
�page 420) or
underneath the cargo compartment floor
(
�page 419).
Storage position�
Remove vehicle jack from its
compartment.
�
Turn crank handle in direction of arrow
as far as it will go.
Warning!
G
The jack is designed exclusively for jacking
up the vehicle at the jack take-up brackets
built into both sides of the vehicle. To help
avoid personal injury, use the jack only to lift
the vehicle during a wheel change. Never
get beneath the vehicle while it is supported
by the jack. Keep hands and feet away from
the area under the lifted vehicle. Always
firmly set parking brake and block wheels
before raising vehicle with jack.
Do not disengage parking brake while the
vehicle is raised. Be certain that the jack is
always vertical (plumb line) when in use,
especially on hills. Always try to use the jack
on level surface. Make sure the jack arm is
fully seated in the jack take-up bracket.
Always lower the vehicle onto sufficient
capacity jackstands before working under
the vehicle.
Page 433 of 521
432 Practical hintsReplacing bulbs
Front lamps Rear lamps
Lamp
Type
1
Additional turn signal
lamp
LED
2
Turn signal lamp
1156 NA
3
Side marker lamp
W 5 W
4
Halogen headlamp:
Low beam
Bi-Xenon* headlamp:
Low and high beam
1
1Vehicles with Bi-Xenon* headlamps: Low beam
and high beam use the same D2S-35W lamp. Do
not replace the Bi-Xenon bulbs yourself. Contact
your authorized Mercedes-Benz Center.
H7 (55 W)
D2S-35 W
5
Halogen headlamp:
High beam/high beam
flasher
Bi-Xenon* headlamp:
High beam flasher
H7 (55 W)
H7 (55 W)
Parking and standing
lamp
W 5 W
6
Front fog lamp
H1 (55 W)
Lamp
Type
7
High mounted brake
lamp
LED
8
Brake, tail, parking,
standing, backup lamp
and turn signal lamp.
Rear fog lamp (only
driver’s side)
HiP
LED*
9
License plate lamps
C 5 W
Page 434 of 521

433 Practical hints
Replacing bulbs
Notes on bulb replacement�
Only use 12-volt bulbs of the same type
and with the specified watt rating.
�
Switch lights off before changing a bulb
to prevent short circuits.
�
Always use a clean lint-free cloth when
handling bulbs.
�
Your hands should be dry and free of oil
and grease.
�
If the newly installed bulb does not light
up, visit an authorized Mercedes-Benz
Center.
�
Have the LEDs and bulbs for the follow-
ing lamps replaced by an authorized
Mercedes-Benz Center:�
Additional turn signals in the exteri-
or rear view mirrors
�
High mounted brake lamp
�
Bi-Xenon* lamps
�
Front fog lamps
�
Rear lamps (except license plate
lamps)
�
Front side marker lamps
Warning!
G
Bulbs and bulb sockets can be very hot. Al-
low the lamp to cool down before changing
a bulb.
Keep bulbs out of reach of children.
Halogen lamps contain pressurized gas. A
bulb can explode if you:�
touch or move it when hot
�
drop the bulb
�
scratch the bulb
Wear eye and hand protection.
Because of high voltage in Bi-Xenon* lamps,
it is dangerous to replace the bulb or repair
the lamp and its components. We recom-
mend that you have such work done by a
qualified technician.
iHave the headlamp adjustment
checked regularly.
Page 441 of 521
.
�")
440 Practical hintsFlat tirePreparing the vehicle�
Park the vehicle in a safe distance from
moving traffic on a hard, flat surface
when possible.
�
Turn on the hazard warning flasher
(�page 147).
�
Turn the steering wheel so that the
front wheels are in a straight ahead po-
sition.
�
Set the parking brake (
�page 60).
�
Move the gear selector lever toP.
Vehicles with SmartKey:
�
Turn off the engine (
�page 61).
�
Remove the SmartKey from the starter
switch.Vehicles with SmartKey with
KEYLESS-GO*:
�
Turn off the engine by pressing the
KEYLESS-GO* start/stop button on the
gear selector lever once (
�page 61).
�
Open the driver’s door (this puts the ig-
nition in position0, same as with the
SmartKey removed from the starter
switch). The driver’s door then can be
closed again.
�
Have any passenger exit the vehicle at
a safe distance from the roadway.
Sealing tires with TIREFIT
E 55 AMG vehicles with foldable third row
seat are equipped with TIREFIT.
Small tire punctures, particularly those in
the tread, can be sealed with TIREFIT.
TIREFIT can be used in ambient tempera-
tures down to -4°F (-20°C).
iOpen door only when conditions are
safe to do so.
Warning!
G
Keep TIREFIT away from sparks, open flame
or heat source.
Do not smoke.
Page 443 of 521

442 Practical hintsFlat tire�
Screw the air pump’s air hose5 onto
flange6 of the TIREFIT container.
�
Stick TIREFIT container1 upside
down into notch3 of the electric air
pump.
7Tire valve
8Electric air pump switch
9Air hose with pressure gauge and vent
screw
aFiller hose
�
Unscrew the valve cap from tire
valve7.
�
Screw filler hosea onto tire valve7.
�
Insert electrical plug4 into the vehi-
cle cigarette lighter socket
(�page 278).
�
Turn the SmartKey in the starter switch
to position1 (
�page 36).
or
�
Press the KEYLESS-GO* start/stop
button (
�page 38) on the gear selec-
tor lever once. Do not depress brake
pedal.
�
PressI on electric air pump switch8.
The electric air pump should now
switch on and inflate the tire.After 5 minutes, the pressure gauge must
display at least 26 psi (1.8 bar). The air
hose can become hot during inflation.
Please exercise appropriate caution.
�
If this tire inflation pressure is not at-
tained, turn off the electric air pump,
detach the filler hose from the tire
valve, and drive vehicle back and forth
very slowly approximately 30 ft (10 m).
This serves to better distribute the
TIREFIT sealant material inside the tire.
�
Unscrew the air pump’s air hose5
from flange6 of the TIREFIT contain-
er.
�
Screw air hose5onto tire valve7.
�
Inflate the tire again.
Warning!
G
Observe safety instructions on air pump la-
bel.
!Do not operate the electric air pump
longer than 8 minutes without interrup-
tion. Otherwise it may overheat.
You may operate the air pump again af-
ter it has cooled off.
��
Page 444 of 521
, press0 on electric
air pump switch8.
The electric air pump should now be
switched off.
�
Turn the Smar")
443 Practical hints
Flat tire
�
After attaining a tire inflation pressure
of 26 psi (1.8 bar), press0 on electric
air pump switch8.
The electric air pump should now be
switched off.
�
Turn the SmartKey in the ignition to
position0 (
�page 36).
or
�
Press the KEYLESS-GO* start/stop
button (
�page 38) on the gear selec-
tor lever twice. Do not depress brake
pedal.
�
Detach the electric air pump.
The air hose may still be hot. Please ex-
ercise appropriate caution.
�
Place the electric air pump back in the
cargo compartment.
�
Close the cargo compartment.
�
Drive away immediately.
The TIREFIT sealant will distribute itself
evenly inside the tire.
Warning!
G
If a tire inflation pressure of 26 psi (1.8 bar)
is not attained, tire is too severely damaged
for TIREFIT to provide a reliable tire repair.
In this case, TIREFIT cannot properly seal
the tire.
Do not drive the vehicle.
Contact the nearest Mercedes-Benz Center
or call Roadside Assistance.
Warning!
G
Do not exceed vehicle speed of
50 mph (80 km/h). A TIREFIT repair is not
designed to operate at higher speeds.
The sticker must be attached on the instru-
ment cluster where it will be easily seen by
the driver.
Vehicle handling characteristics may
change. Adapt your driving accordingly.
��