Page 121 of 498

120 Controls in detailLocking and unlockingTrunk emergency release
With the emergency release button, the
trunk can be opened from inside the trunk.
The emergency release button is located
on the inside of the trunk lid.
1Emergency release button�
Briefly press emergency release
button1.
The trunk unlocks and opens.Illumination of the emergency release but-
ton:
�
The button will flash for 30 minutes
after opening the trunk.
�
The button will flash for 60 minutes
after closing the trunk.iThe emergency release button unlocks
and opens the trunk while the vehicle is
standing still or in motion.iThe emergency release button does
not open the trunk, if the vehicle bat-
tery is discharged or disconnected.
iIf the vehicle has previously been
locked using the SmartKey or
KEYLESS-GO*, the exterior lamps will
flash and the alarm will sound as the
trunk opens.
To cancel the alarm, do one of the fol-
lowing:�
Insert the SmartKey in the starter
switch.
�
Press buttonŒ or ‹ on the
SmartKey.
In vehicles with KEYLESS-GO*
�
Pull an outside door handle.
The SmartKey with KEYLESS-GO
must be within 3 ft (1 m) of the
vehicle.
�
Press the KEYLESS-GO* start/stop
button (
�page 37).
The SmartKey with KEYLESS-GO
must be inside the vehicle.
Page 252 of 498
251 Controls in detail
Useful features
�Useful features
Storage compartments Glove box
1Unlocked
2Locked
3Glove box lid releaseOpening and closing the glove box
�
Press glove box lid release3 to open.
The glove box lid opens downward.
�
Push lid up to close.
Locking and unlocking the glove box
�
Insert mechanical key (
�page 402)
into the glove box lock.
�
Turn the mechanical key to position2
to lock or to position1 to unlock the
glove box.
Warning!
G
To help avoid personal injury during a colli-
sion or sudden maneuver, exercise care
when storing objects in the vehicle. Put lug-
gage or cargo in the trunk if possible. Do not
pile luggage or cargo higher than the seat
backs. Do not place anything on the shelf
below the rear window.
Luggage nets cannot secure hard or heavy
objects.
Keep compartment lids closed. This will help
to prevent stored objects from being thrown
about and injuring vehicle occupants during
an accident.
Page 405 of 498
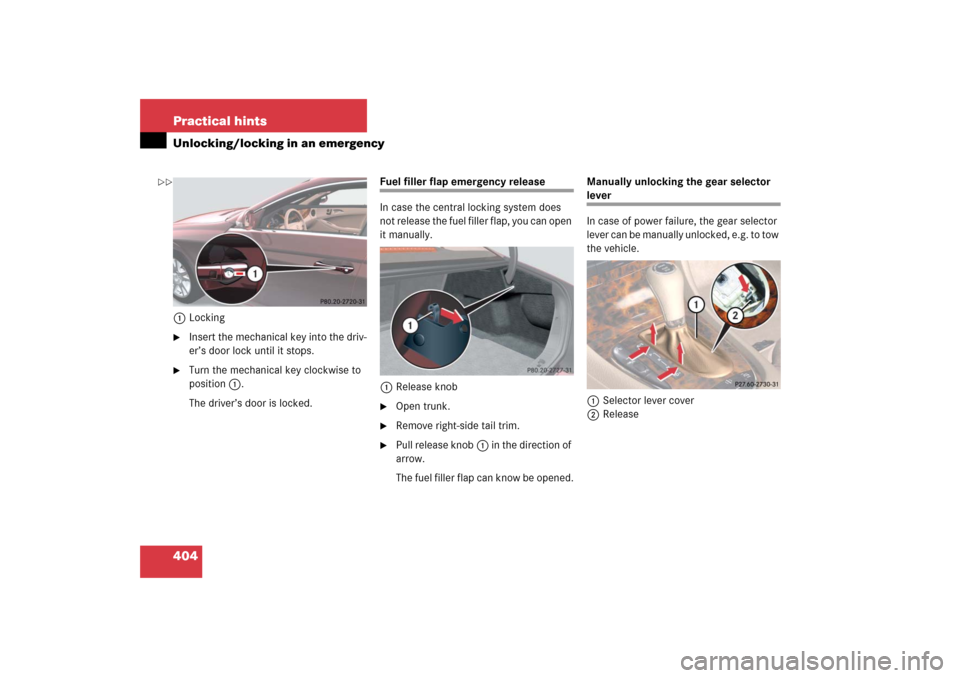
404 Practical hintsUnlocking/locking in an emergency1Locking�
Insert the mechanical key into the driv-
er’s door lock until it stops.
�
Turn the mechanical key clockwise to
position1.
The driver’s door is locked.
Fuel filler flap emergency release
In case the central locking system does
not release the fuel filler flap, you can open
it manually.
1Release knob�
Open trunk.
�
Remove right-side tail trim.
�
Pull release knob1 in the direction of
arrow.
The fuel filler flap can know be opened.Manually unlocking the gear selector
lever
In case of power failure, the gear selector
lever can be manually unlocked, e.g. to tow
the vehicle.
1Selector lever cover
2Release
��
Page 429 of 498
.
�
Turn the SmartKey in the starter switch
to positio")
428 Practical hintsFlat tire�
Screw union nut5 onto the tire valve.
�
Insert electrical plug3 into vehicle
cigarette lighter socket (
�page 258).
�
Turn the SmartKey in the starter switch
to position1.
or
�
Press the KEYLESS-GO* start/stop
button on the gear selector lever once
without depressing the brake pedal.
�
Press I on electric air pump switch2.
The electric air pump should now
switch on and inflate the tire.
�
Inflate the tire to approximately 51 psi
(3.5 bar).
This takes about 5 minutes for the col-
lapsible tire. Air hose4 and union
nut5 can become hot during infla-
tion. Exercise proper caution to avoid
burning yourself when using the equip-
ment.
�
Press 0 on electric air pump switch2.
�
Turn the SmartKey in the starter switch
to position0.
or
�
Press KEYLESS-GO* start/stop button
on the gear selector lever twice without
depressing the brake pedal.
The electric air pump should now be
switched off.
�
If the tire inflation pressure is above
51 psi (3.5 bar), release excess tire in-
flation pressure using the vent screw.
�
Detach the electric air pump.
�
Stow electrical plug3 and air hose4
behind flap1 and place the air pump
back in the trunk.
!Do not operate the air pump longer
than 8 minutes without interruption.
Otherwise it may overheat.
You may operate the air pump again
after it has cooled off.
Warning!
G
Follow recommend inflation pressures.
Do not overinflate tires. Overinflating tires
can result in sudden deflation (blowout)
because they are more likely to become
punctured or damaged by road debris,
potholes, etc.
Do not underinflate tires. Underinflated tires
wear unevenly, adversely affect handling
and fuel economy, and are more likely to fail
from being overheated.
��
Page 496 of 498

495 Index
Trunk
Closing 114
Lamp 143
Message in display 396
Opening 112
Separately locking and
unlocking 121
Trunk lid emergency release 120
Unlocking and opening with
KEYLESS-GO* 110
Unlocking and opening with
SmartKey 103
Unlocking in an emergency 403
Valet locking 121
Turn signal lamp
Replacing bulbs 415
Turn signal lamps
Cleaning lenses 346
Turn signals 53
Additional in mirrors 412
Front bulbs 412
Messages in display 391
Turning off engine 60U
Uniform Tire Quality Grading
Standards 334
Units, Settings
Speedometer 160
Temperature 161
Unleaded gasoline, Premium 465
Unlocking 34, 98
Trunk with KEYLESS-GO* 110
Unlocking in an emergency 402
Upshifting 183
Useful features 251
V
Vacuum line routing diagram label 446
Valet locking 121
Vehicle
Battery 431
Care 342
Dimensions 459
Locking/unlocking in an
emergency 402, 403
Lowering 429
Modifications and alterations,
operating safety 16Towing 437
Unlocking in an emergency 402
Washing 344
Weights 460
Vehicle capacity weight 334
Vehicle jack 399
Vehicle level
Setting
Automatic 241
Vehicle level control system
Airmatic DC 238
Vehicle lighting
Checking 291
Vehicle loading
Cargo tie-down hooks 250
Instructions 247
Load limit 306
Roof rack* 246
Terminology 332
Vehicle maximum load on the tire 334
Vehicle status message memory 156
Vehicle tool kit 399
VIN 478
Voice control system* 478