Page 408 of 514

407 Practical hints
What to do if …?
Display symbol
Display message
Possible cause/consequence
Possible solution
.
Side marker lamp
front left
The front left side marker lamp is malfunc-
tioning.
�
Visit an authorized Mercedes-Benz
Center as soon as possible.
Side marker lamp
front right
The front right side marker lamp is mal-
functioning.
�
Visit an authorized Mercedes-Benz
Center as soon as possible.
Tail lamp left
back-up lamp on
The left tail lamp is malfunctioning. A
back-up bulb is being used.
�
Visit an authorized Mercedes-Benz
Center as soon as possible.
Tail lamp right
back-up lamp on
The right tail lamp is malfunctioning. A
back-up bulb is being used.
�
Visit an authorized Mercedes-Benz
Center as soon as possible.
Turn off lamps
Lamps have been turned on although the
SmartKey in the starter switch is in posi-
tion 0.
�
Turn off the headlamps.
Turn signal,
front left
The left front turn signal lamp is malfunc-
tioning.
�
Replace the bulb as soon as possible.
Turn signal,
front right
The right front turn signal lamp is malfunc-
tioning.
�
Replace the bulb as soon as possible.
Turn signal,
left mirror
The left turn signal in the side mirror is
malfunctioning. This message will only ap-
pear if all light emitting diodes have
stopped working.
�
Have the LEDs replaced as soon as
possible.
Page 420 of 514
419 Practical hints
Unlocking/locking in an emergency
�Unlocking/locking in an emergency
Unlocking the vehicle
If you are unable to unlock the vehicle with
the SmartKey or KEYLESS-GO*, open the
driver’s door and the trunk using the
mechanical key.
1Mechanical key locking tab
2Mechanical key
�
Move locking tab1 in direction of
arrow.
�
Slide mechanical key2 out of the
housing.Unlocking the driver’s door
1Unlocking
�
Insert the mechanical key into the
driver’s door lock until it stops.
�
Turn the mechanical key counterclock-
wise to position1.
The driver’s door is unlocked.
iUnlocking and opening the driver’s
door and/or the trunk with the
mechanical key will trigger the
anti-theft alarm system.
To cancel the alarm, do one of the
following:�
Press button Œ or ‹on the
SmartKey.
�
Insert the SmartKey in the starter
switch.
Vehicles with KEYLESS-GO*:
�
Pull the outside door handle.
�
Press the KEYLESS-GO* start/stop
button (
�page 35).
Page 427 of 514
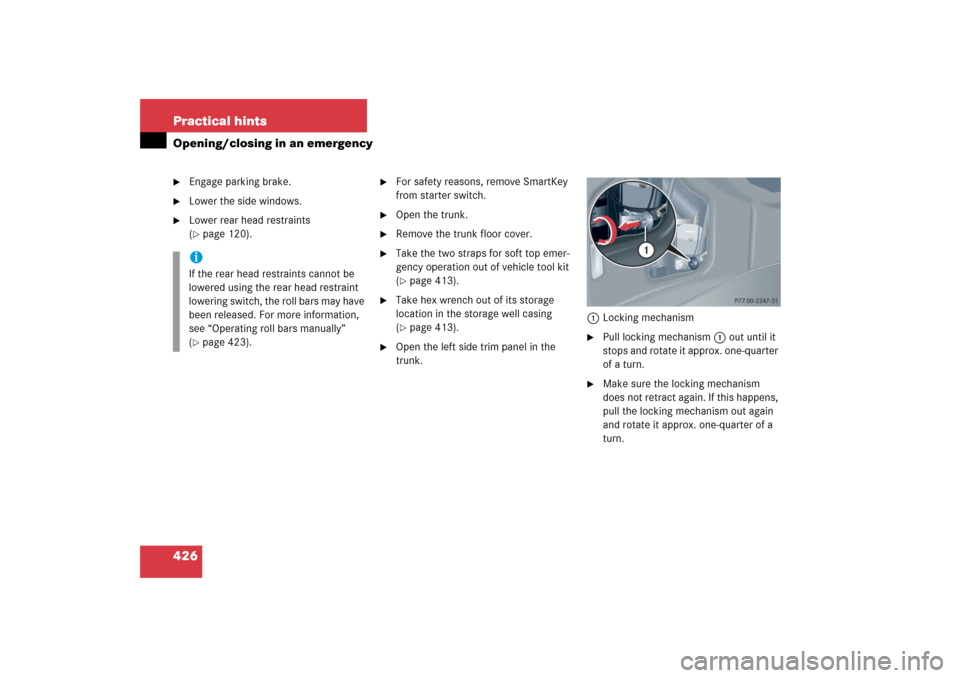
426 Practical hintsOpening/closing in an emergency�
Engage parking brake.
�
Lower the side windows.
�
Lower rear head restraints
(�page 120).
�
For safety reasons, remove SmartKey
from starter switch.
�
Open the trunk.
�
Remove the trunk floor cover.
�
Take the two straps for soft top emer-
gency operation out of vehicle tool kit
(�page 413).
�
Take hex wrench out of its storage
location in the storage well casing
(�page 413).
�
Open the left side trim panel in the
trunk.1Locking mechanism
�
Pull locking mechanism1 out until it
stops and rotate it approx. one-quarter
of a turn.
�
Make sure the locking mechanism
does not retract again. If this happens,
pull the locking mechanism out again
and rotate it approx. one-quarter of a
turn.
iIf the rear head restraints cannot be
lowered using the rear head restraint
lowering switch, the roll bars may have
been released. For more information,
see “Operating roll bars manually”
(�page 423).
Page 447 of 514
.")
446 Practical hintsFlat tire
Preparing the vehicle�
Park the vehicle in a safe distance from
moving traffic on a hard, flat surface
when possible.
�
Turn on the hazard warning flashers
(�page 133).
�
Turn the steering wheel so that the
front wheels are in a straight ahead
position.
�
Set the parking brake (
�page 57).
�
Move the gear selector lever toP.
Vehicles with SmartKey:
�
Turn off the engine (
�page 58).
�
Remove the SmartKey from the starter
switch.Vehicles with SmartKey with
KEYLESS-GO*:
�
Turn off the engine by pressing the
KEYLESS-GO* start/stop button on the
gear selector lever once (
�page 59).
�
Open the driver’s door (this puts the ig-
nition in position0 (
�page 36), same
as with the SmartKey removed from
the starter switch). The driver’s door
then can be closed again.
�
Have any passenger exit the vehicle at
a safe distance from the roadway.
Warning!
G
The dimensions of the Minispare wheel are
different from those of the road wheels. As
a result, the vehicle handling characteristics
change when driving with a Minispare wheel
mounted. Adapt your driving style
accordingly.
The spare wheel is for temporary use only.
When driving with spare wheel mounted,
ensure proper tire inflation pressure and do
not exceed a vehicle speed of 50 mph
(80 km/h).
Drive to the nearest Mercedes-Benz Center
as soon as possible to have the spare wheel
replaced with a regular road wheel.
Never operate the vehicle with more than
one Minispare wheel mounted.
Do not switch off the ESP
® when a Minis-
pare wheel is mounted.
iOpen door only when conditions are
safe to do so.
Page 455 of 514
.
�
Turn off all electrical consumers.
�
Remove SmartKey from starter sw")
454 Practical hintsBattery2Negative terminal
3Positive terminal cover
Disconnecting the battery�
Turn off the engine (
�page 58).
�
Turn off all electrical consumers.
�
Remove SmartKey from starter switch.
Vehicles with KEYLESS-GO*:�
Press the start / stop button until
the engine shuts off.
�
Open the driver’s door.
�
Open the hood (
�page 321).
�
Remove the filter box (
�page 453).
�
Read and observe safety instructions
and precautions (
�page 453).
�
Disconnect the battery negative lead
from negative terminal2.
�
Remove cover3 from the positive ter-
minal.
�
Disconnect the battery positive lead.
Removing the battery�
Remove the screw securing the
battery.
�
Remove the battery support and
bracket.
�
Pull out the ventilation tube from the
battery (depending on battery arrange-
ment in your vehicle model, the ventila-
tion tube is located either on the left or
right side of the battery).
�
Take out the battery.
Warning!
G
With a disconnected battery�
you will no longer be able to turn the
SmartKey in the starter switch and
pressing the KEYLESS-GO* start/stop
button on the gear selector lever will
have no effect
�
the gear selector lever will remain
locked in position
P
Page 456 of 514

455 Practical hints
Battery
Charging and reinstalling the battery�
Charge battery in accordance with the
instructions of the battery charger
manufacturer.
�
Reinstall the charged battery. Follow
the previously described steps in
reverse order.
Reconnecting the battery�
Turn off all electrical consumers.
�
Remove SmartKey from starter switch.
Vehicles with KEYLESS-GO*:�
Press the start / stop button until
the engine shuts off.
�
Open the driver’s door.
�
Connect the battery positive lead and
fasten its cover3.
�
Connect the battery negative lead2.
�
Reinstall the filter box (
�page 453).
Batteries contain materials that can harm
the environment if disposed of improperly.
Large 12-volt storage batteries contain
lead. Recycling of batteries is the preferred
method of disposal. Many states require
sellers of batteries to accept old batteries
for recycling.
Warning!
G
Never charge a battery while still installed in
the vehicle unless the accessory battery
charge unit* approved by Mercedes-Benz is
being used. Gases may escape during charg-
ing and cause explosions that may result in
paint damage, corrosion or personal injury.
An accessory battery charge unit* specially
adapted for Mercedes-Benz vehicles and
tested and approved by Mercedes-Benz is
available, permitting the charging of the bat-
tery in its installed position. Contact an au-
thorized Mercedes-Benz Center for
information and availability. Charge battery
in accordance with the separate instruc-
tions for the accessory battery charger*.
!The battery, its filler caps and the vent
tube must always be securely installed
when the vehicle is in operation.!NEVER invert the terminal connections!
iThe following procedures must be
carried out following any interruption of
battery power (e.g. due to reconnect-
ing):�
Set the clock (
�page 153).
Vehicles with COMAND*:
see COMAND operator’s manual.
�
Synchronize the side windows
(�page 251).
Page 460 of 514

459 Practical hints
Towing the vehicle
Warning!
G
Prior to towing the vehicle with all wheels on
the ground, make certain that the SmartKey
is in starter switch position
2.
If the SmartKey is left in starter switch posi-
tion
0 for an extended period of time, it can
no longer be turned in the switch. In this
case, the steering is locked. To unlock, re-
move SmartKey from starter switch and re-
insert.
If circumstances require towing the vehicle
with all wheels on the ground, always tow
with a tow bar if:
�
the engine will not run
�
there is a malfunction in the power sup-
ply or in the vehicle’s electrical system
as that will be necessary to adequately con-
trol the towed vehicle.
Warning!
G
With the engine not running, there is no
power assistance for the brake and steering
systems. In this case, it is important to keep
in mind that a considerably higher degree of
effort is necessary to brake and steer the ve-
hicle. Adapt your driving accordingly.iTo signal turns while being towed with
the hazard warning flasher in use,
switch on the ignition and activate the
combination switch for the left or right
turn signal in the usual manner – only
the selected turn signal will operate.
Upon canceling the turn signal, the haz-
ard warning flasher will operate again.
!When towing the vehicle with all wheels
on the ground, please note the follow-
ing:
With the automatic central locking acti-
vated and the SmartKey in starter
switch position2, or KEYLESS-GO*
start/stop button in position2, the ve-
hicle doors lock if the left front wheel
as well as the right rear wheel are turn-
ing at vehicle speeds of approx. 9 mph
(15 km / h) or more.
Switch off the tow-away alarm
(�page 94).
To prevent the vehicle door locks from
locking, deactivate the automatic cen-
tral locking (
�page 159).
Towing of the vehicle should only be
done using the properly installed tow-
ing eye bolt. Never attach tow cable,
tow rope or tow rod to the vehicle chas-
sis, frame or suspension parts.
Page 461 of 514
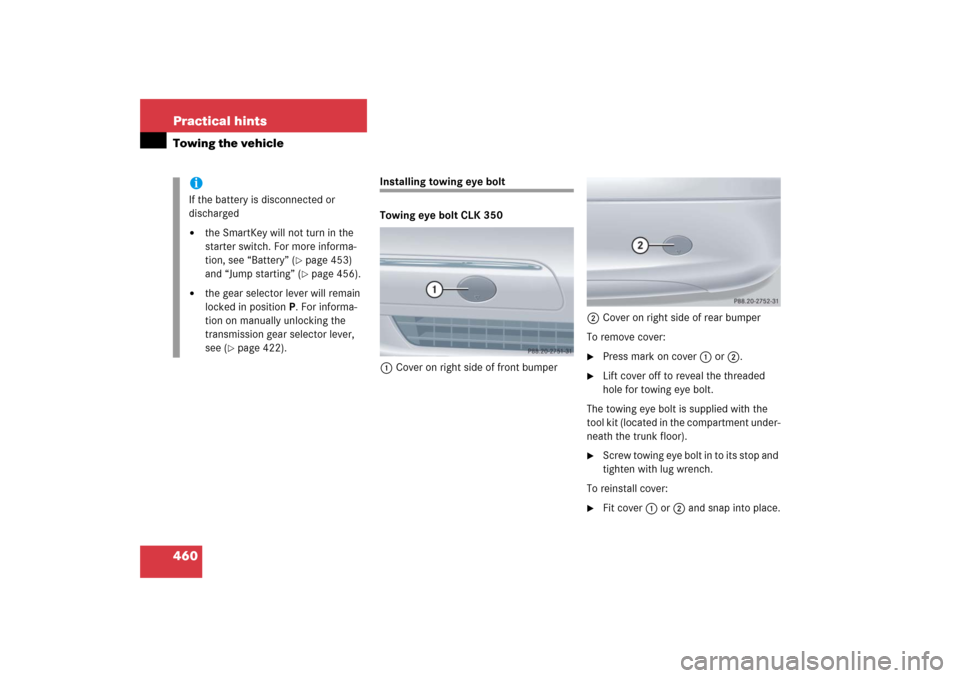
460 Practical hintsTowing the vehicle
Installing towing eye bolt
Towing eye bolt CLK 350
1Cover on right side of front bumper2Cover on right side of rear bumper
To remove cover:
�
Press mark on cover 1 or 2.
�
Lift cover off to reveal the threaded
hole for towing eye bolt.
The towing eye bolt is supplied with the
tool kit (located in the compartment under-
neath the trunk floor).
�
Screw towing eye bolt in to its stop and
tighten with lug wrench.
To reinstall cover:
�
Fit cover 1 or 2 and snap into place.
iIf the battery is disconnected or
discharged�
the SmartKey will not turn in the
starter switch. For more informa-
tion, see “Battery” (
�page 453)
and “Jump starting” (�page 456).
�
the gear selector lever will remain
locked in positionP. For informa-
tion on manually unlocking the
transmission gear selector lever,
see (
�page 422).