Page 126 of 514
125 Controls in detail
Memory function
Storing positions into memory�
Adjust the seats, steering wheel and
exterior rear view mirrors to the
desired position (
�page 37).
�
Turn memory position switch2 to the
desired memory position.
�
Press memory button1.
�
Release memory button1 and press
memory position switch2 within
three seconds.
All settings are stored to the selected
position.
Recalling positions from memory�
Turn memory position switch2 to the
desired memory position.
�
Press and hold memory position
switch2 until the seat, steering wheel
and exterior rear view mirrors have
completely moved to the stored
positions.!Do not operate the seats using the
memory button if the seat backrest is
in an excessively reclined position.
Doing so could cause damage to front
or rear seats.
First move the seat backrest to an
upright position.
iReleasing the memory position switch
stops movement to the stored
positions immediately.
Page 210 of 514

209 Controls in detail
Audio system
�Audio system
Audio and telephone*, operation
These instructions are intended to help
you become familiar with your
Mercedes-Benz audio system. They con-
tain useful tips and a detailed description
of the user functions.
Operating safety
Sound system*
Your vehicle is equipped with a sound sys-
tem. The subwoofer is located between the
rear seats.
Warning!
G
In order to avoid distraction which could
lead to an accident, the driver should enter
system settings with the vehicle at a
standstill and operate the system only when
road and traffic conditions permit. Always
pay full attention to traffic conditions first
before operating system controls while
driving.
Bear in mind that at a speed of just 30 mph
(approximately 50 km/h), your car is
covering a distance of 44 feet
(approximately 14 m) every second.
Warning!
G
Any alterations made to electronic
components can cause malfunctions.
The radio, amplifier, CD changer*, satellite
radio*, and telephone* are interconnected.
When one of the components is not opera-
tional or has not been removed/replaced
properly, the function of other components
may be impaired.
This condition might seriously impair the
operating safety of your vehicle.
We recommend that you have any service
work on electronic components carried out
by an authorized Mercedes-Benz Center.
!Make sure no objects fall into the open-
ings of the subwoofer between the rear
seats.
If necessary, contact an authorized
Mercedes-Benz Center to remove any
objects which may have fallen into the
openings.
Page 265 of 514
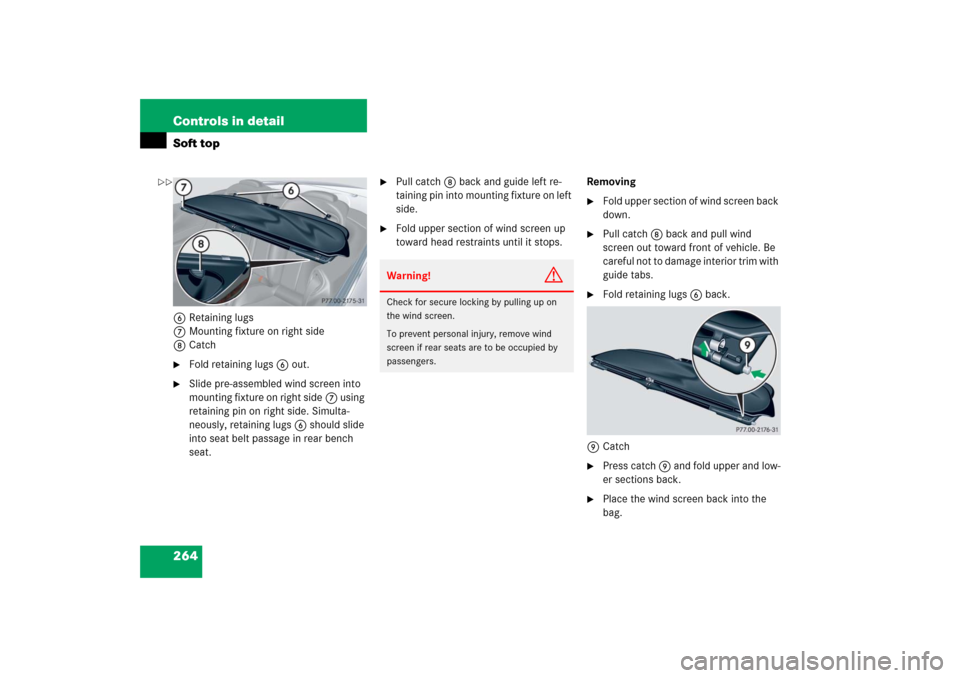
264 Controls in detailSoft top6Retaining lugs
7Mounting fixture on right side
8Catch�
Fold retaining lugs6 out.
�
Slide pre-assembled wind screen into
mounting fixture on right side7 using
retaining pin on right side. Simulta-
neously, retaining lugs6 should slide
into seat belt passage in rear bench
seat.
�
Pull catch8 back and guide left re-
taining pin into mounting fixture on left
side.
�
Fold upper section of wind screen up
toward head restraints until it stops.Removing
�
Fold upper section of wind screen back
down.
�
Pull catch8 back and pull wind
screen out toward front of vehicle. Be
careful not to damage interior trim with
guide tabs.
�
Fold retaining lugs6 back.
9Catch
�
Press catch 9 and fold upper and low-
er sections back.
�
Place the wind screen back into the
bag.
Warning!
G
Check for secure locking by pulling up on
the wind screen.
To prevent personal injury, remove wind
screen if rear seats are to be occupied by
passengers.
��
Page 279 of 514
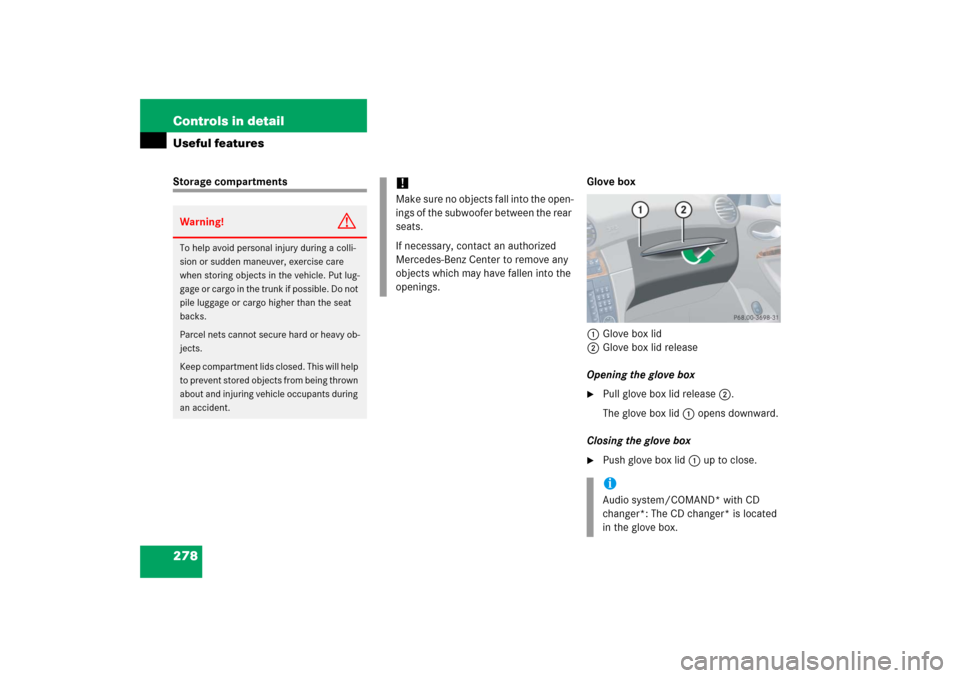
278 Controls in detailUseful featuresStorage compartments Glove box
1Glove box lid
2Glove box lid release
Opening the glove box
�
Pull glove box lid release2.
The glove box lid1 opens downward.
Closing the glove box
�
Push glove box lid1 up to close.
Warning!
G
To help avoid personal injury during a colli-
sion or sudden maneuver, exercise care
when storing objects in the vehicle. Put lug-
gage or cargo in the trunk if possible. Do not
pile luggage or cargo higher than the seat
backs.
Parcel nets cannot secure hard or heavy ob-
jects.
Keep compartment lids closed. This will help
to prevent stored objects from being thrown
about and injuring vehicle occupants during
an accident.
!Make sure no objects fall into the open-
ings of the subwoofer between the rear
seats.
If necessary, contact an authorized
Mercedes-Benz Center to remove any
objects which may have fallen into the
openings.
iAudio system/COMAND* with CD
changer*: The CD changer* is located
in the glove box.
Page 281 of 514
280 Controls in detailUseful featuresRuffled storage bags
1Ruffled storage bags
Storage bags are located on the rear side
of the front seats.Parcel net in front passenger footwell
1Parcel net
A small convenience parcel net is located
in the front passenger footwell. It is for
small and light items, such as road maps,
mail, etc.
Warning!
G
The ruffled storage bag is intended for stor-
ing light-weight items only.
Heavy objects, objects with sharp edges or
fragile objects may not be transported in the
ruffled storage bag. In an accident, during
hard braking, or sudden maneuvers, they
could be thrown around inside the vehicle
and cause injury to vehicle occupants.
The ruffled storage bag cannot protect
transported goods in the event of an
accident.
Page 356 of 514
 of
automatic transmission, power steering,")
355 Operation
Tires and wheels
Tire and loading terminology
Accessory weight
The combined weight (in excess of those
standard items which may be replaced) of
automatic transmission, power steering,
power brakes, power windows, power
seats, radio, and heater, to the extent that
these items are available as
factory-installed equipment (whether
installed or not).
Air pressure
The amount of air inside the tire pressing
outward on each square inch of the tire.
Air pressure is expressed in pounds per
square inch (psi), or kilopascal (kPa) or
bars.
Aspect ratio
Dimensional relationship between tire
section height and section width
expressed in percentage.Bar
Another metric unit for air pressure. There
are 14.5038 pounds per square inch (psi)
to 1 bar; there are 100 kilopascals (kPa)
to 1 bar.
Bead
The tire bead contains steel wires wrapped
by steel cords that hold the tire onto the
rim.
Cold tire inflation pressure
Tire inflation pressure when your vehicle
has been sitting for at least three hours or
driven no more than one mile (1.6 km).
Curb weight
The weight of a motor vehicle with stan-
dard equipment including the maximum
capacity of fuel, oil, and coolant, and, if so
equipped, air conditioning and additional
optional equipment, but without passen-
gers and cargo.DOT (D
epartment o
f T
ransportation)
A tire branding symbol which denotes the
tire meets requirements of the
U.S. Department of Transportation.
GAWR (G
ross A
xle W
eight R
ating)
The GAWR is the maximum permissible
axle weight. The gross vehicle weight on
each axle must never exceed the GAWR for
the front and rear axle indicated on the
certification label located on the driver’s
door B-pillar.
GVW (G
ross V
ehicle W
eight)
The GVW comprises the weight of the
vehicle including fuel, tools, spare wheel,
installed accessories, passengers and
cargo and, if applicable, trailer tongue
load. The GWV must never exceed the
GWVR indicated on the certification label
located on the driver’s door B-pillar.
Page 373 of 514
 may cause
the upholstery to become permanentl")
372 OperationVehicle careUpholstery
Using aftermarket seat covers or wearing
clothing that have the tendency to give off
coloring (e.g. when wet, etc.) may cause
the upholstery to become permanently dis-
colored. By lining the seats with a proper
intermediate cover, contact-discoloration
will be prevented.
Leather upholstery�
Wipe leather upholstery with a damp
cloth and dry thoroughly or clean with
Mercedes-Benz approved Leather
Care.
Exercise particular care when cleaning per-
forated leather as its underside should not
become wet.Nubuck leather upholstery (only for
CLK 55 AMG)
The nubuck leather upholstery is treated
with a protective coating.
�
Wipe nubuck leather upholstery with
damp microfiber cloth to remove dust
and other light stains.
�
Carefully dab nubuck leather uphol-
stery with a dry microfiber cloth to re-
move oil stains.Wood trims
�
Dampen cloth using water and use
damp cloth to clean wood trims in your
vehicle.
!Do not use Mercedes-Benz approved
Leather Care or any solvents to clean
nubuck leather upholstery.
Avoid hard scrubbing on nubuck leath-
er upholstery.
!Do not use solvents like tar remover or
wheel cleaner nor polishes or waxes as
these may be abrasive.
Page 435 of 514

434 Practical hintsResetting activated head restraintsResetting activated head restraints
If the active head restraints have been trig-
gered in a rear-end collision, the active
head restraints must be reset. Otherwise,
the active head restraints cannot offer any
additional protection in the event of anoth-
er rear-end collision.
1Head restraint cushion
2Head restraint cover
3Reset tool
4Hole
�
Take the reset tool3 out of the
Mercedes-Benz vehicle literature
pouch.
�
Guide reset tool3 into the hole4 be-
tween the rear head restraint cover2
and the head restraint cushion1.
�
Press the reset tool3 downward until
you hear the active head restraint re-
lease mechanism audibly engage.
�
Pull out reset tool3.
�
Firmly press the head restraint
cushion1 back toward the rear head
restraint cover2 until it engages.
�
Repeat this procedure on the active
head restraint for the second seat.
For information on active head restraints,
see “Active head restraints” (
�page 73).
For information on head restraint adjust-
ment, see “Seats” (
�page 37).
iFor your convenience, we recommend
that you have this work carried out by
an authorized Mercedes-Benz Center.
You will find the reset tool for manually
operating the active head restraints in
the Mercedes-Benz vehicle literature
pouch.
!Be careful not to damage upholstery.
Warning!
G
When pushing back the head restraint cush-
ion, take care that your fingers do not be-
come caught between the head restraint
cushion and the cover. Failing to do so may
lead to injury.