Page 147 of 514
. Vehicles with
COMAND*: Refer to separate
operating instructions.
�
Press buttonè orÿ repeat")
146 Controls in detailControl systemOperate the CD player�
Turn on the radio and select CD
(�page 227). Vehicles with
COMAND*: Refer to separate
operating instructions.
�
Press buttonè orÿ repeatedly
until the settings for the CD currently
being played appear in the multifunc-
tion display.
1Current CD (for CD changer*)
2Current track
�
Press buttonk orj repeatedly
until the desired track is selected.
NAV* menu
The
Nav
menu contains the functions
needed to operate your navigation system.
�
Press buttonè orÿ repeatedly
until the message
Nav
appears in the
multifunction display.
�
If COMAND* is switched off, the mes-
sage
Nav off
appears in the multifunc-
tion display.
�
With COMAND* switched on but route
guidance not activated, the direction of
travel and, if available, the name of the
street currently traveld on appear in
the multifunction display.
�
With COMAND* switched on and route
guidance activated, the direction of
travel and maneuver instructions ap-
pear in the multifunction display.
Please refer to the COMAND* manual for
instructions on how to activate the route
guidance system*.
Vehicle status message memory menu
Use the vehicle status message memory
menu to scan malfunction and warning
messages that may be stored in the
system. Such messages appear in the
multifunction display and are based on
conditions or system status the vehicle’s
system has recorded.
The vehicle status message memory menu
only appears if there are any messages
stored.
iFor more information on satellite radio
operation, see “Introduction to satellite
radio* (USA only)” (
�page 222).
Vehicles with COMAND*: Refer to
separate operating instructions.
iTo select a CD from the magazine,
press a number on the audio system or
the COMAND* system key pad located
in the center dashboard.
Page 154 of 514
153 Controls in detail
Control system
Time/Date submenu
Access the
Time/Date
submenu via the
Settings
menu. Use the
Time/Date
submenu to change the instrument cluster
display settings.
The following functions are available:Setting time (hours)
This function can only be seen in vehicles
with audio system.
�
Move the selection marker with
buttonæ orç to the
Time
/Date
submenu.
�
Press buttonj ork repeatedly
until the message
Clock, hours
Confirm by press. R
appears in the
multifunction display.
The selection marker is on the hour
setting.
�
Press buttonæ orç to set the
hour.
�
Press the reset button in the instru-
ment cluster (
�page 136) to confirm.
The hour is set and stored.
Function
Page
Setting the time (hours)
153
Setting the time (minutes)
154
Setting the date (month)
154
Setting the date (day)
155
Setting the date (year)
155
iVehicles with COMAND*:
For information on setting the time in
COMAND, refer to the separate
COMAND operating instructions.
Page 155 of 514

This function can only be seen in vehicles
with audio system.�
Move the selection marker with
buttonæ orç to the
Time/Date
submenu.
�")
154 Controls in detailControl systemSetting time (minutes)
This function can only be seen in vehicles
with audio system.�
Move the selection marker with
buttonæ orç to the
Time/Date
submenu.
�
Press buttonj ork repeatedly
until the message
Clock, minutes
Confirm by press. R
appears in the
multifunction display.
The selection marker is on the minutes
setting.
�
Press buttonæ orç to set the
minutes.
�
Press the reset button in the instru-
ment cluster (
�page 136) to confirm.
The minutes are set and stored.
Setting the date (month)
This function can only be seen in vehicles
with audio system.
�
Move the selection marker with
buttonæ orç to the
Time/Date
submenu.
�
Press buttonj ork repeatedly
until the message
Set date month
appears in the multifunction display.
The selection marker is on the month
setting.
�
Press buttonæ orç to set the
month.
iVehicles with COMAND*:
For information on setting the time in
COMAND, refer to the separate
COMAND operating instructions.
iVehicles with COMAND*:
For information on setting the date in
COMAND, refer to the separate
COMAND operating instructions.
Page 156 of 514
155 Controls in detail
Control system
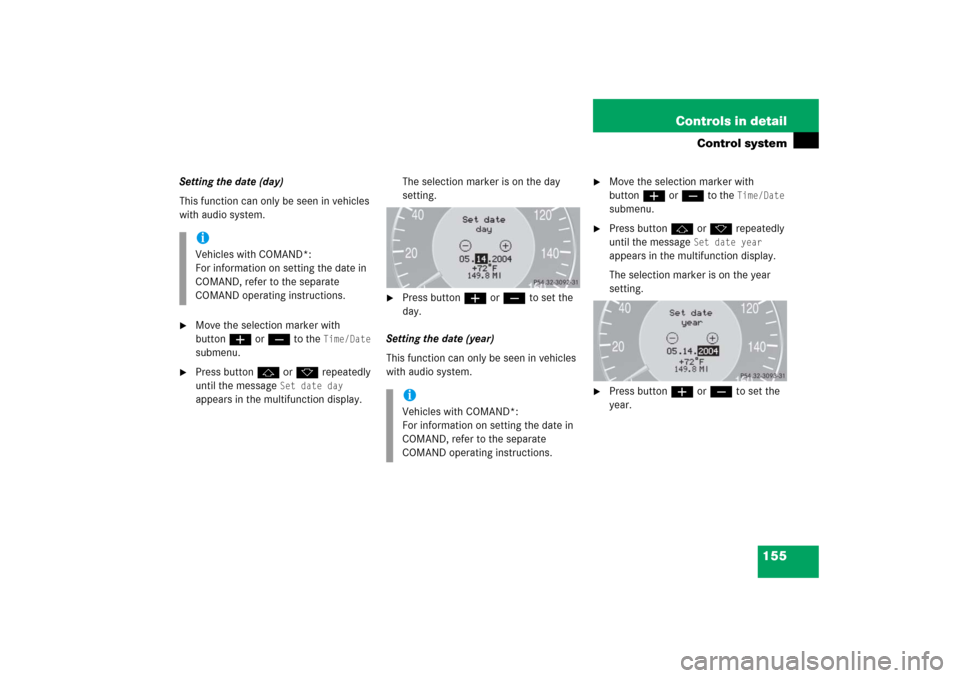
Setting the date (day)
This function can only be seen in vehicles
with audio system.�
Move the selection marker with
buttonæ orç to the
Time/Date
submenu.
�
Press buttonj ork repeatedly
until the message
Set date day
appears in the multifunction display.The selection marker is on the day
setting.
�
Press buttonæ orç to set the
day.
Setting the date (year)
This function can only be seen in vehicles
with audio system.
�
Move the selection marker with
buttonæ orç to the
Time/Date
submenu.
�
Press buttonj ork repeatedly
until the message
Set date year
appears in the multifunction display.
The selection marker is on the year
setting.
�
Press buttonæ orç to set the
year.
iVehicles with COMAND*:
For information on setting the date in
COMAND, refer to the separate
COMAND operating instructions.
iVehicles with COMAND*:
For information on setting the date in
COMAND, refer to the separate
COMAND operating instructions.
Page 164 of 514
�
Switch on the ignition (
�page 36).
�
Press buttonÿ orè repeatedly
until the first function of the trip com-
puter menu a")
163 Controls in detail
Control system
Calling up range (distance to empty)�
Switch on the ignition (
�page 36).
�
Press buttonÿ orè repeatedly
until the first function of the trip com-
puter menu appears in the
multifunction display.
�
Press buttonj ork repeatedly
until the message
Range
appears in the
multifunction display.
The calculated range based on the
current fuel tank level appears in the
multifunction display.
TEL menu*
You can use the functions in the
Tel
menu
to operate your telephone, provided it is
connected to a hands-free system and
switched on.
�
Switch on the telephone and Audio or
COMAND*.
�
Press buttonÿ orè on the
steering wheel repeatedly until the
message
Tel
appears in the
multifunction display.
Warning!
G
A driver’s attention to the road must always
be his/her primary focus when driving. For
your safety and the safety of others, we
recommend that you pull over to a safe
location and stop before placing or taking a
telephone call. If you choose to use the
telephone while driving, please use the
hands-free device and only use the tele-
phone when weather, road and traffic
conditions permit.
Some jurisdictions prohibit the driver from
using a cellular telephone while driving a
vehicle.
Bear in mind that at a speed of just 30 mph
(approximately 50 km/h), your vehicle is
covering a distance of 44 feet
(approximately 14 m) every second.
Never operate radio transmitters equipped
with a built-in or attached antenna (i.e. with-
out being connected to an external antenna)
from inside the vehicle while the engine is
running. Doing so could lead to a malfunc-
tion of the vehicle’s electronic system,
possibly resulting in an accident and /or
personal injury.
Page 210 of 514

209 Controls in detail
Audio system
�Audio system
Audio and telephone*, operation
These instructions are intended to help
you become familiar with your
Mercedes-Benz audio system. They con-
tain useful tips and a detailed description
of the user functions.
Operating safety
Sound system*
Your vehicle is equipped with a sound sys-
tem. The subwoofer is located between the
rear seats.
Warning!
G
In order to avoid distraction which could
lead to an accident, the driver should enter
system settings with the vehicle at a
standstill and operate the system only when
road and traffic conditions permit. Always
pay full attention to traffic conditions first
before operating system controls while
driving.
Bear in mind that at a speed of just 30 mph
(approximately 50 km/h), your car is
covering a distance of 44 feet
(approximately 14 m) every second.
Warning!
G
Any alterations made to electronic
components can cause malfunctions.
The radio, amplifier, CD changer*, satellite
radio*, and telephone* are interconnected.
When one of the components is not opera-
tional or has not been removed/replaced
properly, the function of other components
may be impaired.
This condition might seriously impair the
operating safety of your vehicle.
We recommend that you have any service
work on electronic components carried out
by an authorized Mercedes-Benz Center.
!Make sure no objects fall into the open-
ings of the subwoofer between the rear
seats.
If necessary, contact an authorized
Mercedes-Benz Center to remove any
objects which may have fallen into the
openings.
Page 211 of 514
210 Controls in detailAudio systemOperating and display elements
Page 212 of 514
211 Controls in detail
Audio system
Item
Page
1
CD changer mode selector
AUX mode selector
227
216
2
Single CD mode selector
228
3
Radio mode selector
4
Mute function (radio)
220
Pause (CD)
233
5
Volume distribution
215
6
Sound settings
213
7
Display
8
Alphanumeric keypad
Item
Page
9
Speed dialing memory (tele-
phone) in descending order
a
Accepting a call
(telephone)
238
b
Telephone mode selector
233
c
Speed dialing memory (tele-
phone) in ascending order
235
d
Terminating a call
(telephone)
239
e
CD slot
f
CD ejection
229
Item
Page
g
Soft keys
212
h
Volume
213
j
Switching on/off
212
k
Manual tuning / seek
tuning (radio)
218
Track search, reverse (CD)
232
l
Manual tuning / seek
tuning (radio)
218
Track search,
fast forward (CD)
232


220
Pause (CD)
233
5
Vol")