Page 116 of 514

115 Controls in detail
Locking and unlocking
Trunk emergency release
With the emergency release button, the
trunk can be opened from inside the trunk.
The emergency release button is located
on the inside of the trunk lid.
1Emergency release button�
Briefly press emergency release
button1.
The trunk unlocks and opens slightly.
�
Push up the trunk lid to fully open.
Warning!
G
Monitor the closing procedure carefully to
ensure that no one is in danger of being in-
jured. To prevent possible personal injury,
always keep hands and fingers away from
the trunk opening when closing the trunk.
Be especially careful when small children
are around. To stop the closing procedure,
do one of the following:�
press KEYLESS-GO locking/closing
switch1
�
press trunk closing switch
�
press the Š button on the SmartKey
with KEYLESS-GO
�
press the remote trunk opening or clos-
ing switch (on driver’s door)
Even with the SmartKey with KEYLESS-GO
removed from the vehicle, the trunk closing
switch can be operated. Therefore, do not
leave children unattended in the vehicle, or
with access to an unlocked vehicle. Unsu-
pervised use of vehicle equipment may
cause an accident and/or serious personal
injury.Warning!
G
Only drive with the trunk closed as, among
other dangers such as blocked visibility,
exhaust fumes may enter the vehicle
interior.
Page 129 of 514

128 Controls in detailLightingManual headlamp mode
The low beam headlamps and the parking
lamps can be switched on and off with the
exterior lamp switch.
Automatic headlamp mode
The following lamps switch on and off au-
tomatically depending on the brightness of
the ambient light:�
Low beam headlamps
�
Tail and parking lamps
�
License plate lamps
�
Side marker lamps
�
Turn the exterior lamp switch to
positionU.
With the SmartKey in starter switch
position1 or the KEYLESS-GO*
start/stop button pressed once, only
the parking lamps will switch on and off
automatically.
When the engine is running, the low
beam headlamps, the tail and parking
lamps, the license plate lamps, and the
side marker lamps will switch on and
off automatically.
iWith the SmartKey removed from the
starter switch or the engine turned off
with KEYLESS-GO* and the driver’s
door open, a warning sounds if the
parking lamps or low beam headlamps
are switched on.
The message
Turn off lamps
appears
in the multifunction display.
Warning!
G
If the exterior lamp switch is set toU,�
the headlamps may switch off unexpect-
edly when the system senses bright
ambient light, for example light from
oncoming traffic.
�
the headlamps will not be automatically
switched on under foggy conditions.
To minimize risk to you and to others,
activate headlamps by turning exterior lamp
switch to B when driving or when traffic
and / or ambient lighting conditions require
you to do so.
In low ambient lighting conditions, only
switch from position U to B with the
vehicle at a standstill in a safe location.
Switching from U to B will briefly
switch off the headlamps. Doing so while
driving in low ambient lighting conditions
may result in an accident.
The automatic headlamp feature is only an
aid to the driver. The driver is responsible for
the operation of the vehicle's lights at all
times.
Page 131 of 514
.
�
Pull out the exterior lamp switch to first
stop.
The front fog lamps switch on.
The green indi")
130 Controls in detailLightingFog lampsFront fog lamps
�
Switch on the low beam headlamps
(�page 52).
�
Pull out the exterior lamp switch to first
stop.
The front fog lamps switch on.
The green indicator lamp‡ in the
exterior lamp switch comes on
(�page 127).
�
Push in the exterior lamp switch.
The front fog lamps switch off.
The green indicator lamp‡ in the
exterior lamp switch goes out.
Warning!
G
In low ambient lighting or foggy conditions,
only switch from position U to B with
the vehicle at a standstill in a safe location.
Switching fromU to B will briefly
switch off the headlamps. Doing so while
driving in low ambient lighting conditions
may result in an accident.iFog lamps will operate with the parking
lamps and/or the low beam headlamps
on. Fog lamps should only be used in
conjunction with low beam headlamps.
Consult your State or Province Motor
Vehicle Regulations regarding permis-
sible lamp operation.
iFog lamps cannot be switched on with
the exterior lamp switch in
positionU. For switching on the fog
lamps, turn the exterior lamp switch to
positionB first.
Page 134 of 514

133 Controls in detail
Lighting
Driving rearward
Switching on corner-illuminating front
fog lamps�
Place the gear selector lever in
positionR.
The inverse front fog lamp comes on
automatically depending on the steer-
ing direction and steering angle.
Switching off corner-illuminating front
fog lamps
�
Place the gear selector lever out of
positionR.
The respective front fog lamp goes out.
Hazard warning flasher
The hazard warning flasher can be
switched on at all times, even with the
SmartKey or the SmartKey with
KELESS-GO* removed from the starter
switch or with the SmartKey with
KEYLESS-GO* removed from the vehicle.
The hazard warning flasher switches on
automatically when an air bag deploys.
The hazard warning flasher switch is
located on the upper part of the center
console.
1Hazard warning flasher switchSwitching on hazard warning flasher
�
Press hazard warning flasher
switch1.
All turn signals are flashing.
Switching off hazard warning flasher
�
Press hazard warning flasher switch1
again.iWith the hazard warning flasher
activated and the combination switch
set for either left or right turn, only the
respective turn signals will operate
when the ignition is switched on.iIf the hazard warning flasher has been
activated automatically, press hazard
warning flasher switch1 once to
switch it off.
Page 144 of 514

143 Controls in detail
Control system
Menus, submenus and functions
Menu1
Menu2
Menu3
Menu4
Menu5
Menu6
Menu7
Commands/submenusStandard display
AUDIO
NAV*
Vehicle status
message memory
1
1The vehicle status message memory menu is only displayed if there is a message stored.
Settings
Trip computer
Telephone*
(�page 144)
(�page 145)
(�page 146)
(�page 146)
(�page 148)
(�page 161)
(�page 163)
Run Flat Indicator*
Select radio
station
Show route
guidance in-
structions, cur-
rent direction
traveled
Calling up vehicle
malfunction, warning
and system status
messages stored in
memory
Reset to factory
settings
Fuel consumption
statistics after
start
Load phone
book
Digital speedometer
Select satellite
radio station*
(USA only)
Instrument clus-
ter submenu
Fuel consumption
statistics since
the last reset
Search for
name in
phone book
Call up maintenance
service display
Operate CD
player
Time/Date sub-
menu
Call up range
Check engine oil lev-
el (except CLK 350)
Lighting
submenuVehicle submenuConvenience
submenu
Page 171 of 514

170 Controls in detailAutomatic transmissionDriving tips
Accelerator position
Your driving style influences the
transmission’s shifting behavior:
Less throttle Earlier upshifting
More throttle Later upshifting
Kickdown
Use kickdown when you want maximum
acceleration.�
Press the accelerator past the point of
resistance.
The transmission shifts into a lower
gear.
�
Ease on the accelerator when you have
reached the desired speed.
The transmission shifts up again.Stopping
When you stop briefly, e.g. at traffic lights:
�
Leave the transmission in gear.
�
Hold the vehicle with the brake.
When you stop longer with the engine
idling and/or on a hill:
�
Set the parking brake.
�
Move the gear selector lever to
positionP.Maneuvering
When you maneuver in tight areas,
e.g. when pulling into a parking space:
�
Control the vehicle speed by gradually
releasing the brakes.
�
Accelerate gently.
�
Never abruptly step on the accelerator.
Working on the vehicleWarning!
G
When working on the vehicle, set the
parking brake and move gear selector lever
to positionP. Otherwise the vehicle could
roll away.
Page 183 of 514

182 Controls in detailGood visibilityAuto-dimming rear view mirrors*
The reflection brightness of the exterior
rear view mirror on the driver’s side and
the interior rear view mirror will respond
automatically to glare when�
the ignition is switched on,
and
�
incoming light from headlamps falls on
the sensor in the interior rear view
mirror.
The rear view mirror will not react if
�
reverse gear R is engaged
�
the interior lighting is turned on
Warning!
G
The auto-dimming function does not react if
incoming light is not aimed directly at sen-
sors in the interior rear view mirror.
The interior rear view mirror and the exterior
rear view mirror on the driver’s side do not
react, for example, if the wind screen is
installed.
Glare can endanger you and others.Warning!
G
In case of an accident, liquid electrolyte may
escape from the mirror housing if the mirror
glass breaks.
Electrolyte has an irritating effect. Do not
allow the liquid to come into contact with
eyes, skin, clothing, or respiratory system.
In case it does, immediately flush affected
area with water, and seek medical help if
necessary.
!Electrolyte drops coming into contact
with the vehicle paint finish can be
completely removed only while in the
liquid state and by applying plenty of
water.Warning!
G
Exercise care when using the passen-
ger-side exterior rear view mirror. The mirror
surface is convex (outwardly curved surface
for a wider field of view). Objects in mirror
are closer than they appear. Check your
interior rear view mirror or glance over your
shoulder before changing lanes.
Page 185 of 514
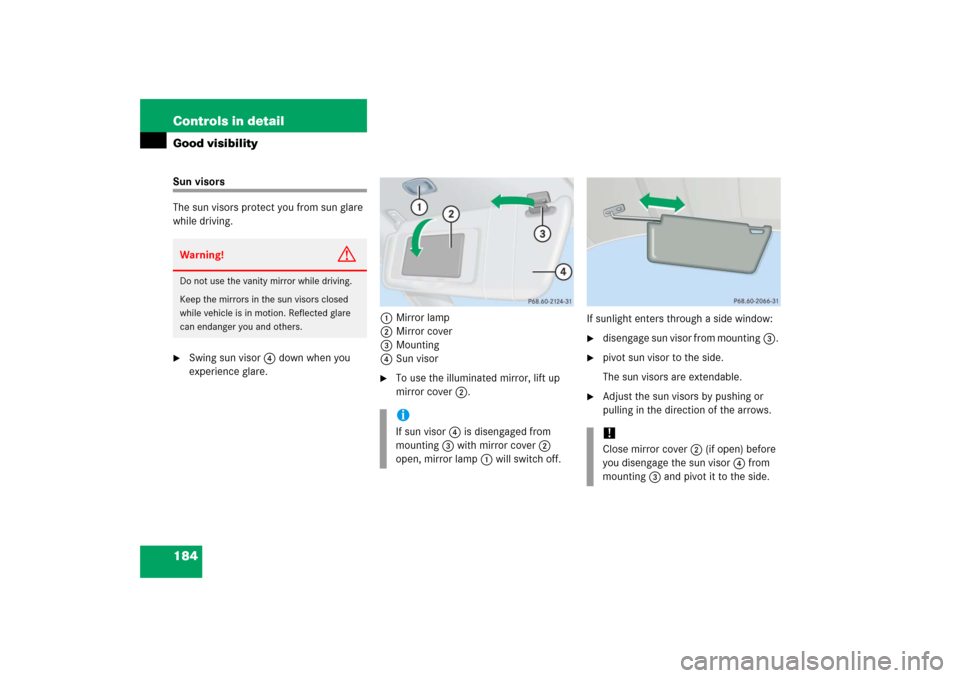
184 Controls in detailGood visibilitySun visors
The sun visors protect you from sun glare
while driving.�
Swing sun visor4 down when you
experience glare.1Mirror lamp
2Mirror cover
3Mounting
4Sun visor
�
To use the illuminated mirror, lift up
mirror cover2.If sunlight enters through a side window:
�
disengage sun visor from mounting3.
�
pivot sun visor to the side.
The sun visors are extendable.
�
Adjust the sun visors by pushing or
pulling in the direction of the arrows.
Warning!
G
Do not use the vanity mirror while driving.
Keep the mirrors in the sun visors closed
while vehicle is in motion. Reflected glare
can endanger you and others.
iIf sun visor4 is disengaged from
mounting3 with mirror cover2
open, mirror lamp1 will switch off.
!Close mirror cover2 (if open) before
you disengage the sun visor4 from
mounting3 and pivot it to the side.