Page 426 of 514

425 Practical hints
Opening/closing in an emergency
�
Press hex wrench down firmly in direc-
tion of arrow3 and hold.
�
Press head restraint down in direction
of arrow4.
�
Pull hex wrench 2 out and take weight
off head restraint.
�
Repeat this procedure on roll bar for
second head restraint.
Soft top emergency operation
If the soft top cannot be automatically
closed, check the following:�
Is the luggage cover engaged in place
(�page 262)?
�
Have the roll bars been released? If so,
lower the roll bars manually
(�page 424).
�
Is the trunk lid closed (
�page 110)?
�
Is there sufficient on-board voltage?
Start the engine if necessary.
These messages will also appear in the
multifunction display (
�page 410).
If automatic operation still does not func-
tion properly, you can close the soft top
manually.
This procedure should be performed with
great care by two persons.
!Manually closing the soft top is a com-
plicated and technically demanding
procedure. Close the soft top manually
in emergency cases only. Otherwise,
visit an authorized Mercedes-Benz
Center. Please read the instructions
fully before beginning operation and
only undertake it with another person
and if you feel fully capable of perform-
ing the tasks involved. Warning!
G
�
It is important that a second person
helps you. Otherwise, you could become
trapped or injured.
�
Remove any wristwatches or jewelry
such as rings or bracelets. Otherwise,
they could get caught in the vehicle
mechanism, causing personal injury to
yourself or damage to the vehicle.
�
Always use the grips provided as indi-
cated. Otherwise you could injure your-
self.
Page 430 of 514

429 Practical hints
Opening/closing in an emergency
�
Place both straps on soft top compart-
ment cover.
�
Take hex wrench out of trunk.
�
Close trunk lid.
You will only have access to the trunk
again when the emergency operation
has been completed.
�
You and your assistant should each
take one of the straps by the handle.
�
With a strong, simultaneous tug on the
loops, pull soft top compartment cover
upward and out to the rear.
iDo not place the SmartKey in the open
trunk. You may lock yourself out.
Vehicles with KEYLESS-GO*: To pre-
vent a possible inadvertent lockout, the
trunk lid will open automatically if a
SmartKey with KEYLESS-GO* is recog-
nized in the area of the rear shelf or in-
side the trunk.!The trunk lid must remain closed during
the next steps in the procedure. Other-
wise the trunk lid and the soft top com-
partment cover may come into contact
with one another and be damaged.Warning!
G
At this point, the remaining procedure
needs to be done by two people. Otherwise
you could be injured.
��
Page 431 of 514

430 Practical hintsOpening/closing in an emergency9Soft top compartment cover�
One person should stand on the left
side of the vehicle and the other on the
right side.
�
Pulling the cover back in one smooth
motion, lift soft top compartment
cover9 into a vertical position until it
stops.aEdge of soft top
�
From left and right sides, reach into
soft top compartment underneath
edge of soft topa.
Warning!
G
In the next step, you and your assistant
should each take hold of the soft top com-
partment cover as shown in the illustration.
Both of you should use your free hand to
support yourselves on the edge of the trunk
lid as shown in the illustration.
If either you or your helper assume a differ-
ent position, one or both of you could be
trapped or injured. !Make sure the soft top storage com-
partment hinges do not fold down dur-
ing this procedure. Otherwise your
vehicle could be damaged.
Warning!
G
Do not place your hands near the upper
windshield area, trunk lid, or between soft
top roof panels and hinges while the soft top
is being raised and locked. Serious personal
injury may occur.
��
Page 434 of 514

433 Practical hints
Opening/closing in an emergency
hLocking �
Insert hex wrench into soft top locking
mechanism screw.
�
Turn the soft top locking mechanism
screw with hex wrench counterclock-
wise in direction of arrowh as far as it
will go.
The soft top is locked onto the wind-
shield frame.
�
Have the soft top operation checked at
an authorized Mercedes-Benz Center
as soon as possible.
Warning!
G
Position hands as indicated by arrows so
that when you press soft top compartment
coverf forward and lower material ten-
sioning framee, your hands cannot be-
come trapped.
!Make sure you turn the hex wrench
counterclockwise as far as it will go.
Otherwise the soft top may not lock
properly.!If, after completing the soft top emer-
gency operation, the trunk cannot be
opened using the remote trunk lid re-
lease switch in the driver’s door,
theŠ button on the SmartKey, or
the trunk lid release handle in the li-
cense plate recess, press the soft top
compartment cover down again as de-
scribed above.
Do not open the trunk with the emer-
gency key, as this could otherwise
damage the trunk lid and the soft top
compartment cover.
Page 435 of 514

434 Practical hintsResetting activated head restraintsResetting activated head restraints
If the active head restraints have been trig-
gered in a rear-end collision, the active
head restraints must be reset. Otherwise,
the active head restraints cannot offer any
additional protection in the event of anoth-
er rear-end collision.
1Head restraint cushion
2Head restraint cover
3Reset tool
4Hole
�
Take the reset tool3 out of the
Mercedes-Benz vehicle literature
pouch.
�
Guide reset tool3 into the hole4 be-
tween the rear head restraint cover2
and the head restraint cushion1.
�
Press the reset tool3 downward until
you hear the active head restraint re-
lease mechanism audibly engage.
�
Pull out reset tool3.
�
Firmly press the head restraint
cushion1 back toward the rear head
restraint cover2 until it engages.
�
Repeat this procedure on the active
head restraint for the second seat.
For information on active head restraints,
see “Active head restraints” (
�page 73).
For information on head restraint adjust-
ment, see “Seats” (
�page 37).
iFor your convenience, we recommend
that you have this work carried out by
an authorized Mercedes-Benz Center.
You will find the reset tool for manually
operating the active head restraints in
the Mercedes-Benz vehicle literature
pouch.
!Be careful not to damage upholstery.
Warning!
G
When pushing back the head restraint cush-
ion, take care that your fingers do not be-
come caught between the head restraint
cushion and the cover. Failing to do so may
lead to injury.
Page 446 of 514
445 Practical hints
Replacing wiper blades
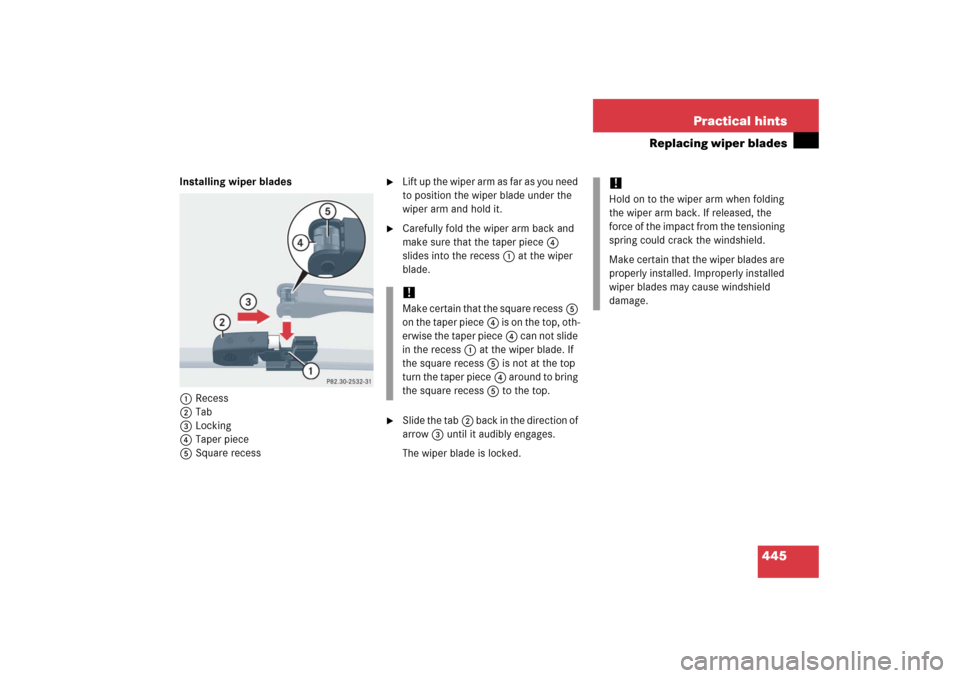
Installing wiper blades
1Recess
2Tab
3Locking
4Taper piece
5Square recess
�
Lift up the wiper arm as far as you need
to position the wiper blade under the
wiper arm and hold it.
�
Carefully fold the wiper arm back and
make sure that the taper piece4
slides into the recess1 at the wiper
blade.
�
Slide the tab2 back in the direction of
arrow3 until it audibly engages.
The wiper blade is locked.!Make certain that the square recess5
on the taper piece4 is on the top, oth-
erwise the taper piece4 can not slide
in the recess1 at the wiper blade. If
the square recess5 is not at the top
turn the taper piece4 around to bring
the square recess5 to the top.
!Hold on to the wiper arm when folding
the wiper arm back. If released, the
force of the impact from the tensioning
spring could crack the windshield.
Make certain that the wiper blades are
properly installed. Improperly installed
wiper blades may cause windshield
damage.
Page 450 of 514
449 Practical hints
Flat tire
Removing the wheel
1Alignment bolt�
Unscrew upper-most wheel bolt and
remove.
�
Replace this wheel bolt with alignment
bolt1 supplied in the tool kit.
�
Remove the remaining bolts.
�
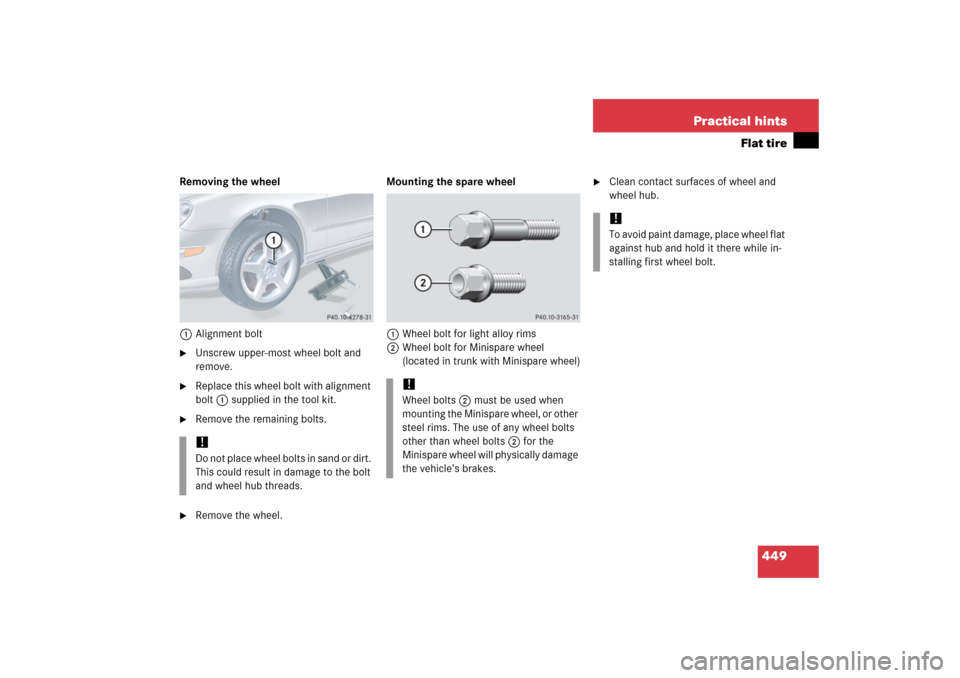
Remove the wheel.Mounting the spare wheel
1Wheel bolt for light alloy rims
2Wheel bolt for Minispare wheel
(located in trunk with Minispare wheel)
�
Clean contact surfaces of wheel and
wheel hub.
!Do not place wheel bolts in sand or dirt.
This could result in damage to the bolt
and wheel hub threads.
!Wheel bolts2 must be used when
mounting the Minispare wheel, or other
steel rims. The use of any wheel bolts
other than wheel bolts2 for the
Minispare wheel will physically damage
the vehicle’s brakes.
!To avoid paint damage, place wheel flat
against hub and hold it there while in-
stalling first wheel bolt.
Page 451 of 514
450 Practical hintsFlat tire
�
Guide the spare wheel onto the align-
ment bolt and push it on.
�
Insert wheel bolts and tighten them
slightly.
�
Unscrew the alignment bolt, install last
wheel bolt and tighten slightly.
Warning!
G
Always replace wheel bolts that are dam-
aged or rusted.
Never apply oil or grease to wheel bolts.
Damaged wheel hub threads should be re-
paired immediately. Do not continue to drive
under these circumstances! Contact an au-
thorized Mercedes-Benz Center or call
Roadside Assistance.
Incorrect wheel bolts or improperly tight-
ened wheel bolts can cause the wheel to
come off. This could cause an accident.
Make sure to use the correct wheel bolts.
Warning!
G
Only use Genuine equipment
Mercedes-Benz wheel bolts. Other wheel
bolts may come loose.
Do not tighten the wheel bolts when the ve-
hicle is raised. Otherwise the vehicle could
fall off the jack.