Page 359 of 489

358 OperationVehicle careHeadliner and shelf below rear window�
Use a soft bristle brush or a dry-sham-
poo cleaner in case of excessive dirt.
Seat belts
�
Only use clear, lukewarm water and
soap.Upholstery
Using aftermarket seat covers or wearing
clothing that have the tendency to give off
coloring (e.g. when wet, etc.) may cause
the upholstery to become permanently dis-
colored. By lining the seats with a proper
intermediate cover, contact-discoloration
will be prevented.
Leather upholstery
�
Wipe leather upholstery with a damp
cloth and dry thoroughly or clean with
Mercedes-Benz approved Leather
Care.
Exercise particular care when cleaning per-
forated leather as its underside should not
become wet.Wood trims
�
Dampen cloth using water and use
damp cloth to clean wood trims in your
vehicle.
!The webbing must not be treated with
chemical cleaning agents. Do not dry
the webbing at temperatures above
176°F (80°C) or in direct sunlight.Warning!
G
Do not bleach or dye seat belts as this may
severely weaken them. In a crash they may
not be able to provide adequate protection.
!Do not use solvents like tar remover or
wheel cleaner nor polishes or waxes as
these may be abrasive.
Page 392 of 489

391 Practical hints
What to do if …?
Display symbol
Display message
Possible cause/consequence
Possible solution
I
Key recognized
in vehicle
A SmartKey with KEYLESS-GO* left in the
vehicle was recognized while locking the
vehicle from the outside.
�
Take the SmartKey out of the vehicle.
Key
do not forget key
This display appears (for a maximum of
60 seconds) if the driver’s door is opened
with the engine shut off and no SmartKey
in the starter switch.
Message is only a reminder.
�
Insert SmartKey in the starter switch.
�
Take the SmartKey with
KEYLESS-GO* with you when leaving
the vehicle.
.
Active Light System
currently
unavailable
The Bi-Xenon cornering lamps system is
malfunctioning.
�
Visit an authorized Mercedes-Benz
Center as soon as possible.
Active Light System
malfunction
Drive to workshop
The Bi-Xenon cornering lamps system is
malfunctioning.
�
Visit an authorized Mercedes-Benz
Center as soon as possible.
Active Light System
Substitute bulb on
The active headlamps are malfunctioning.
Another light is being used.
�
Visit an authorized Mercedes-Benz
Center as soon as possible.
3rd brake lamp
The high mounted brake lamp is malfunc-
tioning.
�
Visit an authorized Mercedes-Benz
Center as soon as possible.
Brake lamp
Drive to workshop
Stop lamp illumination is delayed or lamp
is permanently on.
�
Visit an authorized Mercedes-Benz
Center as soon as possible.
Page 393 of 489

392 Practical hintsWhat to do if …?Display symbol
Display message
Possible cause/consequence
Possible solution
.
Brake lamp, left
The left brake lamp is malfunctioning.
�
Visit an authorized Mercedes-Benz
Center as soon as possible.
Brake lamp, right
The right brake lamp is malfunctioning.
�
Visit an authorized Mercedes-Benz
Center as soon as possible.
Display malfunction
Visit workshop
The display for the lamps or the system is
malfunctioning.
�
Visit an authorized Mercedes-Benz
Center as soon as possible.
Front foglamp, left
The left front fog lamp is malfunctioning.
�
Replace the bulb as soon as possible.
Front foglamp, right
The right front fog lamp is malfunctioning.
�
Replace the bulb as soon as possible.
High beam, left
The left high beam lamp is malfunction-
ing.
�
Replace the bulb as soon as possible.
High beam, right
The right high beam lamp is malfunction-
ing.
�
Replace the bulb as soon as possible.
Light sensor
Drive to workshop
The light sensor is malfunctioning. The
headlamps switch on automatically.
�
In the control system, set lamp opera-
tion to manual (
�page 160).
�
Switch on headlamps using the exteri-
or lamp switch.
�
Visit an authorized Mercedes-Benz
Center as soon as possible.
License plate lamp,
left
The left license plate lamp is malfunction-
ing.
�
Replace the bulb as soon as possible.
Page 395 of 489

394 Practical hintsWhat to do if …?Display symbol
Display message
Possible cause/consequence
Possible solution
.
Reverse lamp, right
The right backup lamp is malfunctioning.
�
Replace the bulb as soon as possible.
Side marker lamp
front left
The front left side marker lamp is malfunc-
tioning.
�
Visit an authorized Mercedes-Benz
Center as soon as possible.
Side marker lamp
front right
The front right side marker lamp is mal-
functioning.
�
Visit an authorized Mercedes-Benz
Center as soon as possible.
Tail lamp left
back-up lamp on
The left tail lamp is malfunctioning. A
back-up bulb is being used.
�
Visit an authorized Mercedes-Benz
Center as soon as possible.
Tail lamp right
back-up lamp on
The right tail lamp is malfunctioning. A
back-up bulb is being used.
�
Visit an authorized Mercedes-Benz
Center as soon as possible.
Turn off lamps
Lamps have been turned on although the
SmartKey in the starter switch is in posi-
tion 0.
�
Turn off the headlamps.
Turn signal,
front left
The left front turn signal lamp is malfunc-
tioning.
�
Replace the bulb as soon as possible.
Turn signal,
front right
The right front turn signal lamp is malfunc-
tioning.
�
Replace the bulb as soon as possible.
Turn signal,
left mirror
The turn signal in the left exterior rear
view mirror is malfunctioning. This mes-
sage will only appear if all light emitting di-
odes have stopped working.
�
Have the LEDs replaced as soon as
possible.
Page 396 of 489

395 Practical hints
What to do if …?
Display symbol
Display message
Possible cause/consequence
Possible solution
.
Turn signal,
right mirror
The turn signal in the right exterior rear
view mirror is malfunctioning. This mes-
sage will only appear if all light emitting di-
odes have stopped working.
�
Have the LEDs replaced as soon as
possible.
Turn signal rear left
back-up lamp on
The left rear turn signal lamp is malfunc-
tioning. A back-up bulb is being used.
�
Replace the bulb as soon as possible.
Turn signal rear
right
back-up lamp on
The right rear turn signal lamp is malfunc-
tioning. A back-up bulb is being used.
�
Replace the bulb as soon as possible.
1
Restraint system
defective
Drive to workshop
The system is malfunctioning.
�
Drive with added caution to the near-
est authorized Mercedes-Benz Center.
Warning!
G
In the event a malfunction of the SRS is indi-
cated as outlined above, the SRS may not be
operational.
For your safety, we strongly recommend
that you visit an authorized Mercedes-Benz
Center immediately to have the system
checked; otherwise the SRS may not be de-
ploy when needed in an accident, which
could result in serious or fatal injury, or it
might deploy unexpectedly and unnecessar-
ily which could also result in injury.
Page 404 of 489
403 Practical hints
Where will I find...?
In case of a flat tire, you may temporarily
use the Minispare wheel when observing
the following restrictions:�
Do not exceed a vehicle speed of
50 mph (80 km/h).
�
Drive to the nearest tire repair facility
to have the flat tire repaired or
replaced as appropriate.
�
Do not operate vehicle with more than
one Minispare wheel mounted.
For more information, see “Rims and tires”
(
�page 445).
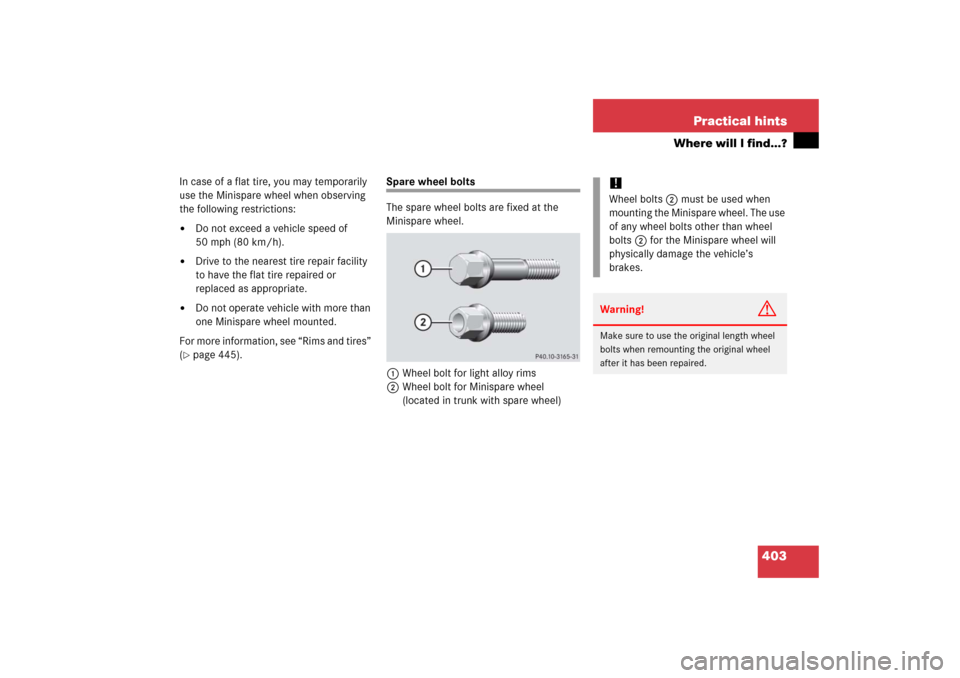
Spare wheel bolts
The spare wheel bolts are fixed at the
Minispare wheel.
1Wheel bolt for light alloy rims
2Wheel bolt for Minispare wheel
(located in trunk with spare wheel)
!Wheel bolts2 must be used when
mounting the Minispare wheel. The use
of any wheel bolts other than wheel
bolts2 for the Minispare wheel will
physically damage the vehicle’s
brakes.Warning!
G
Make sure to use the original length wheel
bolts when remounting the original wheel
after it has been repaired.
Page 408 of 489
407 Practical hints
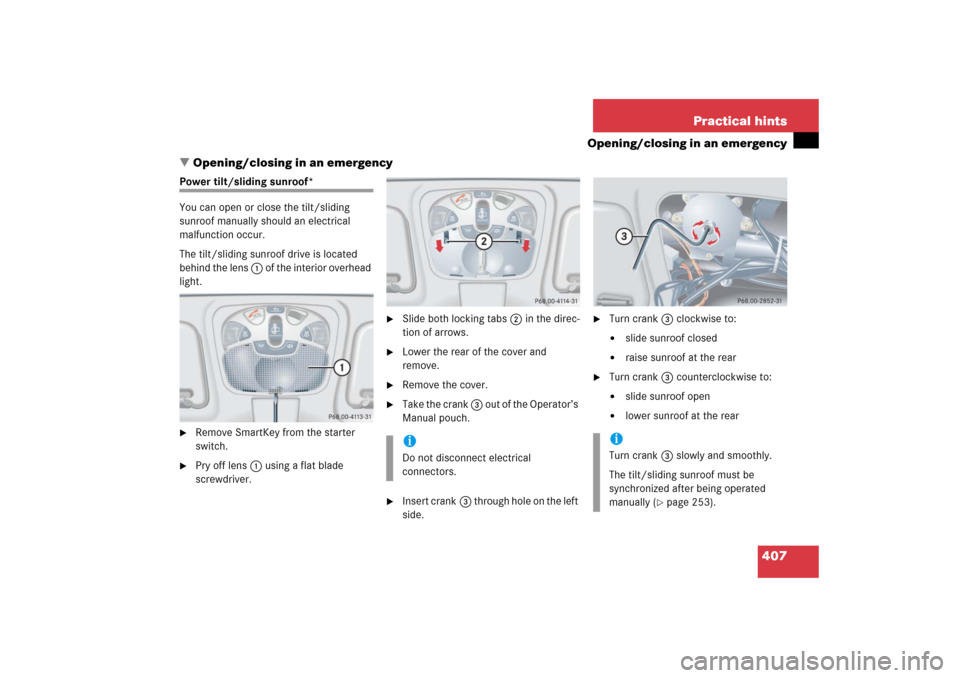
Opening/closing in an emergency
�Opening/closing in an emergency
Power tilt/sliding sunroof*
You can open or close the tilt/sliding
sunroof manually should an electrical
malfunction occur.
The tilt/sliding sunroof drive is located
behind the lens 1 of the interior overhead
light.�
Remove SmartKey from the starter
switch.
�
Pry off lens1 using a flat blade
screwdriver.
�
Slide both locking tabs2 in the direc-
tion of arrows.
�
Lower the rear of the cover and
remove.
�
Remove the cover.
�
Take the crank 3 out of the Operator’s
Manual pouch.
�
Insert crank3 through hole on the left
side.
�
Turn crank3 clockwise to:�
slide sunroof closed
�
raise sunroof at the rear
�
Turn crank3 counterclockwise to:�
slide sunroof open
�
lower sunroof at the rear
iDo not disconnect electrical
connectors.
iTurn crank3 slowly and smoothly.
The tilt/sliding sunroof must be
synchronized after being operated
manually (
�page 253).
Page 412 of 489
411 Practical hints
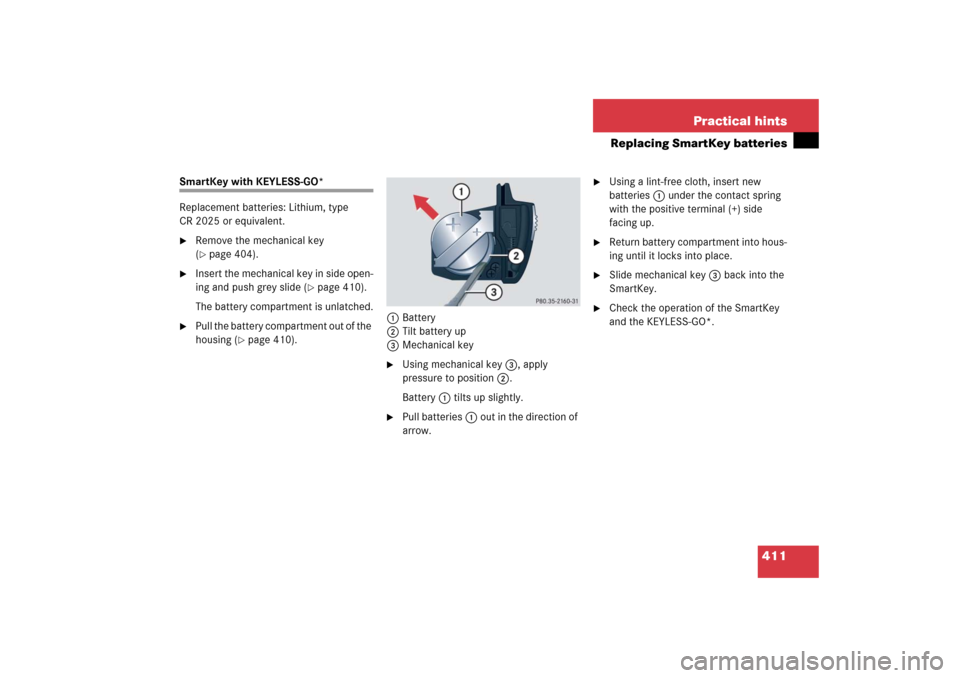
Replacing SmartKey batteries
SmartKey with KEYLESS-GO*
Replacement batteries: Lithium, type
CR 2025 or equivalent.�
Remove the mechanical key
(�page 404).
�
Insert the mechanical key in side open-
ing and push grey slide (
�page 410).
The battery compartment is unlatched.
�
Pull the battery compartment out of the
housing (
�page 410).1Battery
2Tilt battery up
3Mechanical key
�
Using mechanical key3, apply
pressure to position2.
Battery1 tilts up slightly.
�
Pull batteries1 out in the direction of
arrow.
�
Using a lint-free cloth, insert new
batteries1 under the contact spring
with the positive terminal (+) side
facing up.
�
Return battery compartment into hous-
ing until it locks into place.
�
Slide mechanical key 3 back into the
SmartKey.
�
Check the operation of the SmartKey
and the KEYLESS-GO*.