Page 374 of 489
373 Practical hints
What to do if …?
Display message
Possible cause/consequence
Possible solution
ABS
Anti-lock
braking system
inoperative
The charging voltage has fallen below
10 volts and the ABS has switched off.
The brake system is still functioning nor-
mally but without the ABS available.
Once the voltage returns to 10 volts, ABS
switches back on and the message in the
multifunction display should disappear.
If the message in the multifunction dis-
play does not disappear:�
Have the system checked at an autho-
rized Mercedes-Benz Center as soon
as possible.
�
Continue driving with added caution.
Wheels will lock during hard braking,
reducing steering capability.
Failure to follow these instructions in-
creases the risk of an accident.
Page 382 of 489

381 Practical hints
What to do if …?
Display message
Possible cause/consequence
Possible solution
Run Flat Indicator
inactive
Run Flat Indicator* is malfunctioning.
�
Have the Run Flat Indicator* checked by an autho-
rized Mercedes-Benz Center.
Check tires
Then reactivate
Run Flat Indicator
There was a warning message about a
loss in the tire inflation pressure and
the Run Flat Indicator* has not been
reactivated yet.
�
Make sure that the correct tire inflation pressure is
set for each tire.
�
Then reactivate the Run Flat Indicator*.
Run Flat Indicator
unavailable
The Run Flat Indicator* has been
switched off due to an error.
�
Have the Run Flat Indicator* checked by an autho-
rized Mercedes-Benz Center.
Tire pressure
Check tires
The Run Flat Indicator* indicates that
the pressure is too low in one or more
tires.
�
Carefully bring the vehicle to a halt, avoiding
abrupt steering and braking maneuvers. Observe
the traffic situation around you.
�
Check and adjust tire inflation pressure as
required (
�page 328).
�
If necessary, change the wheel (
�page 420).
�
Reactivate the Run Flat Indicator* after adjusting
the tire inflation pressure values (
�page 330).
Warning!
G
Do not drive with a flat tire. A flat tire affects
the ability to steer or brake the vehicle.
You may lose control of the vehicle. Contin-
ued driving with a flat tire will cause exces-
sive heat build-up and possibly a fire.
Page 397 of 489

396 Practical hintsWhat to do if …?Display symbol
Display message
Possible cause/consequence
Possible solution
(
Lock driver’s
seat
The driver seat backrest is not engaged.
Fold back and push the seat backrest un-
til the seat cushion and seat backrest au-
dibly engage into the driving position.
Lock front
passenger seat
The passenger seat backrest is not en-
gaged.
Fold back and push the seat backrest un-
til the seat cushion and seat backrest au-
dibly engage into the driving position.
<
Seat belt system
Drive to workshop
The seat belt system is malfunctioning.
�
Visit an authorized Mercedes-Benz
Center as soon as possible.
_
Steering oil
Visit workshop
The steering gear oil level is too low. There
is a danger of steering gear damage.
�
Have the system checked by an autho-
rized Mercedes-Benz Center.
Warning!
G
If the level of steering gear oil in reservoir is
too low, the steering power assistance could
fail. Much greater effort will then be needed
to turn the steering wheel.
Do not add steering oil without checking the
steering system.
Do not drive the vehicle. Have the system
checked at an authorized Mercedes-Benz
Center as soon as possible.
Page 398 of 489

397 Practical hints
What to do if …?
Display symbol
Display message
Possible cause/consequence
Possible solution
K
Close
sunroof
You have opened the driver’s door with
the SmartKey removed from the starter
switch and the sliding portion of the
tilt/sliding sunroof open.
�
Close the tilt/sliding sunroof
(�page 251).
J
Close
sunroof
You have opened the driver’s door with
the SmartKey removed from the starter
switch and the tilting portion of the
tilt/sliding sunroof open.
�
Close the tilt/sliding sunroof
(�page 251).
L
Tele Aid malfunction
Drive to workshop
One or more main functions of the Tele
Aid system are malfunctioning.
�
Have the Tele Aid system checked by
an authorized Mercedes-Benz Center.
t
Function
Unavailable
This display appears if button t or
s on the multifunction steering wheel
is pressed and the vehicle is not equipped
with a telephone.
Ê
Trunk open
This message will appear whenever the
trunk is open.
�
Close the trunk.
W
Washer fluid
Check level
The fluid level has dropped to about
1/3 of
total reservoir capacity.
�
Add washer fluid (
�page 316).
Page 421 of 489
.")
420 Practical hintsFlat tire
Preparing the vehicle�
Park the vehicle in a safe distance from
moving traffic on a hard, flat surface
when possible.
�
Turn on the hazard warning flasher
(�page 137).
�
Turn the steering wheel so that the
front wheels are in a straight ahead
position.
�
Set the parking brake (
�page 57).
�
Move the gear selector lever toP.
Vehicles with SmartKey:
�
Turn off the engine (
�page 58).
�
Remove the SmartKey from the starter
switch.Vehicles with SmartKey with
KEYLESS-GO*:
�
Turn off the engine by pressing the
KEYLESS-GO* start/stop button on the
gear selector lever once (
�page 58).
�
Open the driver’s door (this puts the ig-
nition in position0 (
�page 36), same
as with the SmartKey removed from
the starter switch). The driver’s door
then can be closed again.
�
Have any passenger exit the vehicle at
a safe distance from the roadway.
Warning!
G
The dimensions of the spare wheel is differ-
ent from those of the road wheels. As a re-
sult, the vehicle handling characteristics
change when driving with a spare wheel
mounted. Adapt your driving style accord-
ingly.
The spare wheel is for temporary use only.
When driving with spare wheel mounted,
ensure proper tire pressure and do not ex-
ceed a vehicle speed of 50 mph (80 km/h).
Drive to the nearest Mercedes-Benz Center
as soon as possible to have the spare wheel
replaced with a regular road wheel.
Never operate the vehicle with more than
one spare wheel mounted.
Do not switch off the ESP
® when a Minis-
pare wheel is mounted.
iOpen door only when conditions are
safe to do so.
Page 426 of 489
 (
�page 400).
�
Store the jack and the other vehicle
tools in the trunk")
425 Practical hints
Flat tire
Before storing the jack, it should be fully
collapsed, with handle folded in (storage
position) (
�page 400).
�
Store the jack and the other vehicle
tools in the trunk.
MOExtended system*
The MOExtended system allows you to
continue driving your vehicle even if there
is a total loss of pressure in one or more
tires.
You may only use the MOExtended system
in conjunction with the Run Flat Indicator*.
!The maximum distance in emergency
mode depends on the vehicle’s load. It
is 30 miles (50 km) if the vehicle is par-
tially loaded and 18 miles (30 km) if the
vehicle is fully loaded.
The point at which the maximum driv-
ing distance begins in emergency
mode is when the warning message
appears in the multifunction display
indicating that there is a loss of tire
inflation pressure.
Do not exceed the maximum speed of
50 mph (80 km/h). Warning!
G
In emergency mode, your vehicle’s driving
characteristics are diminished in such situa-
tions as:�
driving around curves
�
while braking
�
while accelerating rapidly
Therefore, your driving style must be adapt-
ed accordingly. Avoid abrupt steering and
driving maneuvers, as well as driving over
obstacles (road curbs, potholes, or off-road
areas). This is especially important if the ve-
hicle is heavily loaded.
The emergency driving distance that can be
achieved greatly depends on the demands
placed on the vehicle. Depending on speed,
load, driving maneuvers, road conditions,
outside temperature, etc., the distance can
be significantly shorter or, if the vehicle is
driven cautiously, somewhat longer.
Do not continue driving in emergency mode
if�
you notice knocking sounds
�
the vehicle starts to shake
�
smoke develops and you smell rubber
�
ESP
® is intervening continuously
�
you notice tears on the tire sidewalls
After driving in emergency mode, you must
have the rims inspected by an authorized
Mercedes-Benz Center to check if they are
suitable for further use. The failed tire must
be replaced in any case.iWhen replacing individual or all tires on
the vehicle, make sure only matching
tires marked with “MOExtended” are
mounted in the size specified for your
vehicle (
�page 445).
Page 434 of 489

433 Practical hints
Towing the vehicle
Warning!
G
Prior to towing the vehicle with all wheels on
the ground, make certain that the SmartKey
is in starter switch position
2.
If the SmartKey is left in starter switch posi-
tion
0 for an extended period of time, it can
no longer be turned in the switch. In this
case, the steering is locked. To unlock, re-
move SmartKey from starter switch and re-
insert.
If circumstances require towing the vehicle
with all wheels on the ground, always tow
with a tow bar if:
�
the engine will not run
�
there is a malfunction in the power sup-
ply or in the vehicle’s electrical system
as that will be necessary to adequately con-
trol the towed vehicle.
Warning!
G
With the engine not running, there is no
power assistance for the brake and steering
systems. In this case, it is important to keep
in mind that a considerably higher degree of
effort is necessary to brake and steer the ve-
hicle. Adapt your driving accordingly.iTo signal turns while being towed with
the hazard warning flasher in use,
switch on the ignition and activate the
combination switch for the left or right
turn signal in the usual manner – only
the selected turn signal will operate.
Upon canceling the turn signal, the haz-
ard warning flasher will operate again.
!When towing the vehicle with all wheels
on the ground, please note the follow-
ing:
With the automatic central locking acti-
vated and the SmartKey in starter
switch position2, or KEYLESS-GO*
start/stop button in position2, the ve-
hicle doors lock if the left front wheel
as well as the right rear wheel are turn-
ing at vehicle speeds of approx. 9 mph
(15 km / h) or more.
Switch off the tow-away alarm
(�page 95).
To prevent the vehicle door locks from
locking, deactivate the automatic cen-
tral locking (
�page 163).
Towing of the vehicle should only be
done using the properly installed tow-
ing eye bolt. Never attach tow cable,
tow rope or tow rod to the vehicle chas-
sis, frame or suspension parts.
Page 444 of 489
443 Technical data
Layout of poly-V-belt drive
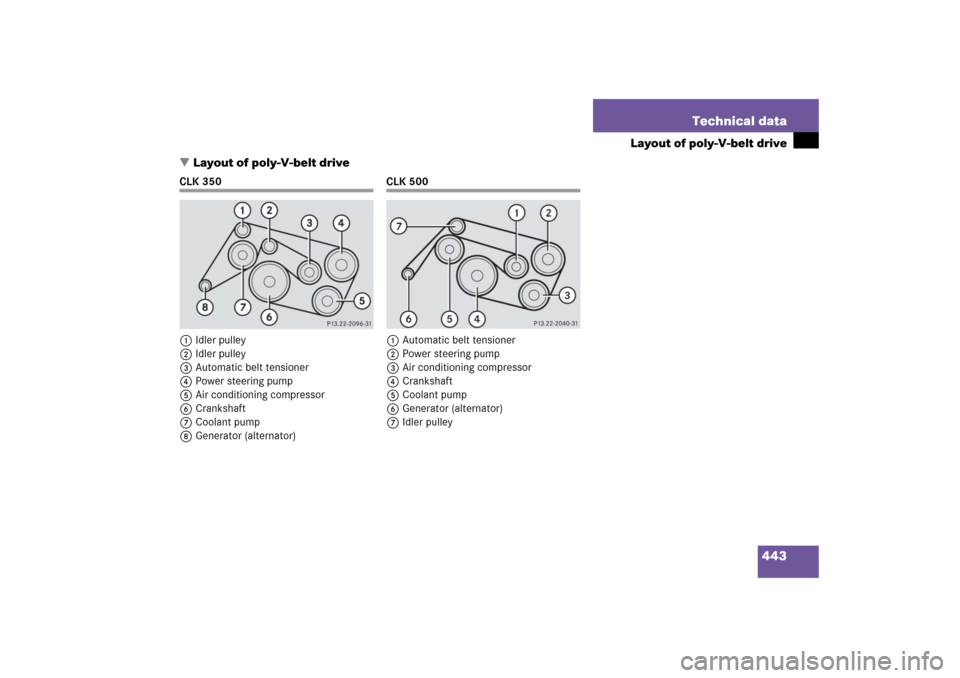
�Layout of poly-V-belt drive
CLK 350
1Idler pulley
2Idler pulley
3Automatic belt tensioner
4Power steering pump
5Air conditioning compressor
6Crankshaft
7Coolant pump
8Generator (alternator)
CLK 500
1Automatic belt tensioner
2Power steering pump
3Air conditioning compressor
4Crankshaft
5Coolant pump
6Generator (alternator)
7Idler pulley