Page 382 of 489

381 Practical hints
What to do if …?
Display message
Possible cause/consequence
Possible solution
Run Flat Indicator
inactive
Run Flat Indicator* is malfunctioning.
�
Have the Run Flat Indicator* checked by an autho-
rized Mercedes-Benz Center.
Check tires
Then reactivate
Run Flat Indicator
There was a warning message about a
loss in the tire inflation pressure and
the Run Flat Indicator* has not been
reactivated yet.
�
Make sure that the correct tire inflation pressure is
set for each tire.
�
Then reactivate the Run Flat Indicator*.
Run Flat Indicator
unavailable
The Run Flat Indicator* has been
switched off due to an error.
�
Have the Run Flat Indicator* checked by an autho-
rized Mercedes-Benz Center.
Tire pressure
Check tires
The Run Flat Indicator* indicates that
the pressure is too low in one or more
tires.
�
Carefully bring the vehicle to a halt, avoiding
abrupt steering and braking maneuvers. Observe
the traffic situation around you.
�
Check and adjust tire inflation pressure as
required (
�page 328).
�
If necessary, change the wheel (
�page 420).
�
Reactivate the Run Flat Indicator* after adjusting
the tire inflation pressure values (
�page 330).
Warning!
G
Do not drive with a flat tire. A flat tire affects
the ability to steer or brake the vehicle.
You may lose control of the vehicle. Contin-
ued driving with a flat tire will cause exces-
sive heat build-up and possibly a fire.
Page 384 of 489

383 Practical hints
What to do if …?
Display symbol
Display message
Possible cause/consequence
Possible solution
2
Brake wear
Visit workshop
The brake pads have reached their
wear limit.
�
Have the brake pads replaced as soon as
possible.
;
(USA only)
!
(Canada only)
Release parking
brake
You are driving with the parking brake
set.
�
Release the parking brake (
�page 50).
3
Brake fluid
Visit workshop
There is insufficient brake fluid in the
reservoir.
�
Risk of accident! Stop the vehicle in a safe
location or as soon as it is safe to do so
and notify an authorized Mercedes-Benz
Center. Do not add brake fluid! This will
not solve the problem.
Warning!
G
Driving with the message “
Brake fluid
Visit workshop
” displayed can result in
an accident. Have your brake system
checked immediately. Do not add brake flu-
id before checking the brake system. Over-
filling the brake fluid reservoir can result in
spilling brake fluid on hot engine parts and
the brake fluid catching fire. You can be se-
riously burned.
!If you find that the brake fluid in the
brake fluid reservoir has fallen to the
minimum mark or below, have the
brake system checked for brake pad
thickness and leaks.
!Brake pad thickness must be visually
checked by a qualified technician at the
intervals specified in the Maintenance
Booklet.
Page 392 of 489

391 Practical hints
What to do if …?
Display symbol
Display message
Possible cause/consequence
Possible solution
I
Key recognized
in vehicle
A SmartKey with KEYLESS-GO* left in the
vehicle was recognized while locking the
vehicle from the outside.
�
Take the SmartKey out of the vehicle.
Key
do not forget key
This display appears (for a maximum of
60 seconds) if the driver’s door is opened
with the engine shut off and no SmartKey
in the starter switch.
Message is only a reminder.
�
Insert SmartKey in the starter switch.
�
Take the SmartKey with
KEYLESS-GO* with you when leaving
the vehicle.
.
Active Light System
currently
unavailable
The Bi-Xenon cornering lamps system is
malfunctioning.
�
Visit an authorized Mercedes-Benz
Center as soon as possible.
Active Light System
malfunction
Drive to workshop
The Bi-Xenon cornering lamps system is
malfunctioning.
�
Visit an authorized Mercedes-Benz
Center as soon as possible.
Active Light System
Substitute bulb on
The active headlamps are malfunctioning.
Another light is being used.
�
Visit an authorized Mercedes-Benz
Center as soon as possible.
3rd brake lamp
The high mounted brake lamp is malfunc-
tioning.
�
Visit an authorized Mercedes-Benz
Center as soon as possible.
Brake lamp
Drive to workshop
Stop lamp illumination is delayed or lamp
is permanently on.
�
Visit an authorized Mercedes-Benz
Center as soon as possible.
Page 393 of 489

392 Practical hintsWhat to do if …?Display symbol
Display message
Possible cause/consequence
Possible solution
.
Brake lamp, left
The left brake lamp is malfunctioning.
�
Visit an authorized Mercedes-Benz
Center as soon as possible.
Brake lamp, right
The right brake lamp is malfunctioning.
�
Visit an authorized Mercedes-Benz
Center as soon as possible.
Display malfunction
Visit workshop
The display for the lamps or the system is
malfunctioning.
�
Visit an authorized Mercedes-Benz
Center as soon as possible.
Front foglamp, left
The left front fog lamp is malfunctioning.
�
Replace the bulb as soon as possible.
Front foglamp, right
The right front fog lamp is malfunctioning.
�
Replace the bulb as soon as possible.
High beam, left
The left high beam lamp is malfunction-
ing.
�
Replace the bulb as soon as possible.
High beam, right
The right high beam lamp is malfunction-
ing.
�
Replace the bulb as soon as possible.
Light sensor
Drive to workshop
The light sensor is malfunctioning. The
headlamps switch on automatically.
�
In the control system, set lamp opera-
tion to manual (
�page 160).
�
Switch on headlamps using the exteri-
or lamp switch.
�
Visit an authorized Mercedes-Benz
Center as soon as possible.
License plate lamp,
left
The left license plate lamp is malfunction-
ing.
�
Replace the bulb as soon as possible.
Page 401 of 489

400 Practical hintsWhere will I find...?Vehicle jackThe vehicle jack is located in the storage
compartment underneath the trunk floor.
Storage position�
Remove vehicle jack from its
compartment.
�
Turn crank handle in direction of arrow
as far as it will go.
Operational position�
Turn crank handle clockwise.
Before storing the vehicle jack in its
compartment:
�
It should be fully collapsed.
�
The handle must be folded in (storage
position).
Warning!
G
The jack is designed exclusively for jacking
up the vehicle at the jack take-up brackets
built into both sides of the vehicle. To help
avoid personal injury, use the jack only to lift
the vehicle during a wheel change. Never
get beneath the vehicle while it is supported
by the jack. Keep hands and feet away from
the area under the lifted vehicle. Always
firmly set parking brake and block wheels
before raising vehicle with jack.
Do not disengage parking brake while the
vehicle is raised. Be certain that the jack is
always vertical (plumb line) when in use,
especially on hills. Always try to use the jack
on level surface. Make sure the jack arm is
fully seated in the jack take-up bracket.
Always lower the vehicle onto sufficient
capacity jackstands before working under
the vehicle.
Page 404 of 489
403 Practical hints
Where will I find...?
In case of a flat tire, you may temporarily
use the Minispare wheel when observing
the following restrictions:�
Do not exceed a vehicle speed of
50 mph (80 km/h).
�
Drive to the nearest tire repair facility
to have the flat tire repaired or
replaced as appropriate.
�
Do not operate vehicle with more than
one Minispare wheel mounted.
For more information, see “Rims and tires”
(
�page 445).
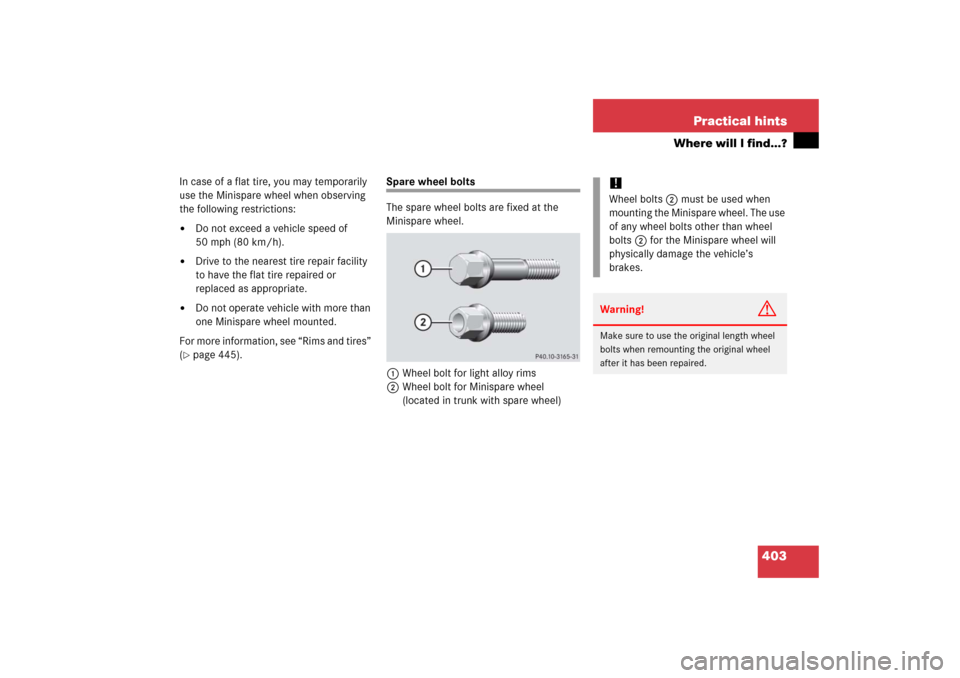
Spare wheel bolts
The spare wheel bolts are fixed at the
Minispare wheel.
1Wheel bolt for light alloy rims
2Wheel bolt for Minispare wheel
(located in trunk with spare wheel)
!Wheel bolts2 must be used when
mounting the Minispare wheel. The use
of any wheel bolts other than wheel
bolts2 for the Minispare wheel will
physically damage the vehicle’s
brakes.Warning!
G
Make sure to use the original length wheel
bolts when remounting the original wheel
after it has been repaired.
Page 414 of 489

413 Practical hints
Replacing bulbs
Rear lamps Notes on bulb replacement
�
Only use 12 volt bulbs of the same type
and with the specified watt rating.
�
Switch lights off before changing a bulb
to prevent short circuits.
�
Always use a clean lint-free cloth when
handling bulbs.
�
Your hands should be dry and free of oil
and grease.
�
If the newly installed bulb does not
come on, visit an authorized
Mercedes-Benz Center.
Have the LEDs and bulbs for the following
lamps replaced by an authorized
Mercedes-Benz Center.
�
Additional turn signal lamps in the exte-
rior rear view mirrors
�
High mounted brake lamp
�
Bi-Xenon* lamps
�
Front fog lamps
�
Front side marker lamps
Lamp
Type
7
High mounted brake
lamp
LED
8
Brake lamp
P 21 W
9
Turn signal lamp
P 21 W
a
Tail, parking and stand-
ing lamp, side marker
P 21/4 W
W 5 W
b
Backup lamp
P 21 W
c
License plate lamps
C 5 W
d
Rear fog lamp, driver’s
side, Tail lamp
P 21/4 W
Warning!
G
Keep bulbs out of reach of children.
Bulbs and bulb sockets can be very hot. Al-
low the lamp to cool down before changing
a bulb.
Halogen lamps contain pressurized gas. A
bulb can explode if you:�
touch or move it when hot
�
drop the bulb
�
scratch the bulb
Wear eye and hand protection.
Because of high voltage in Xenon lamps, it is
dangerous to replace the bulb or repair the
lamp and its components. We recommend
that you have such work done by a qualified
technician.iHave the headlamp adjustment
checked regularly.
Page 418 of 489

417 Practical hints
Replacing bulbs
Replacing bulbs for rear lamps
Before you start to replace a bulb for a rear
lamp, do the following first:�
Turn the exterior lamp switch to
positionM (
�page 131).
Tail lamp unit
�
Open trunk lid.
�
Swing the trim panel covering the cor-
responding rear lights to the side.
1Connector
2Tab
�
Disconnect electrical connector1.
�
Pull tab2 in the direction of the ar-
row.
�
Remove the bulb carrier.
�
Press gently onto the respective bulb
and turn counterclockwise out of its
bulb socket.
�
Press the new bulb gently into its bulb
socket and turn clockwise until it
engages.
1Brake lamp
2Backup lamp
3Rear fog lamp (driver’s side)/tail lamp
4Tail lamp, parking and standing lamp,
side marker lamp
5Turn signal lamp
�
Reinstall the bulb carrier.
Let tab2 engage.
�
Connect the electrical connector1
until it engage.
�
Reinstall trim panel.
License plate lamp
1Screws
�
Loosen both screws1.
�
Remove the license plate lamp.
�
Replace the tubular lamp.
�
Reinstall the license plate lamp.
�
Retighten the screws1.