Page 118 of 456
117 Controls in detailSeats
Lumbar support
You can adjust the contour of the seat’s
lumbar support to help enhance support to
your spine.
The thumbwheels for the driver’s and front
passenger’s seat are located on the outer
side of the seat.
1Thumbwheel�
Switch on the ignition (
�page 34).
�
Set the lumbar support between 0
and 5.
Multicontour seats*
The multicontour seat has inflatable air
cushions built into the seat backrest to
provide additional lumbar and side sup-
port.
The seat backrest cushion height and cur-
vature can be adjusted with switches on
the right side of the seat after switching on
ignition.The switches for the driver and front pas-
senger seat are located on the inner side of
the seat.
1Shoulder region support
2Side bolster adjustment
3Massage function (PULSE)
4Lumbar region support
�
Switch on the ignition (
�page 34).
Shoulder region support
�
Press æ or ç on switch1.
The air cushion inflates or deflates.
Page 123 of 456

122 Controls in detailMemory functionPrior to operating the vehicle, the driver
should check and adjust the seat height,
seat position fore and aft, and seat back-
rest angle if necessary, to ensure adequate
control, reach and comfort. The head re-
straint should also be adjusted for proper
height. See also the section on air bags
(�page 63) for proper seat positioning.
In addition, adjust the steering wheel to
ensure adequate control, reach, operation
and comfort. Both the inside and outside
rear view mirrors should be adjusted for
adequate rear vision.
Fasten seat belts. Infants and small chil-
dren should be seated in a properly se-
cured restraint system that complies with
U.S. Federal Motor Vehicle Safety
Standards 213 and 225 and Canadian
Motor Vehicle Safety Standards 213 and
210.2.With the memory function you can store up
to four different settings.
The following settings are stored when us-
ing the buttons on the driver’s door:
�
Driver’s seat and seat, backrest and
head restraint position
�
Settings for multicontour seat*
�
Steering wheel position
�
Exterior rear view mirror positionThe following settings are stored when us-
ing the buttons on the passenger door:
�
Front passenger seat, backrest and
head restraint position
�
Settings for multicontour seat*Warning!
G
Do not activate the memory function while
driving. Activating the memory function
while driving could cause the driver to lose
control of the vehicle.
Page 124 of 456
123 Controls in detail
Memory function
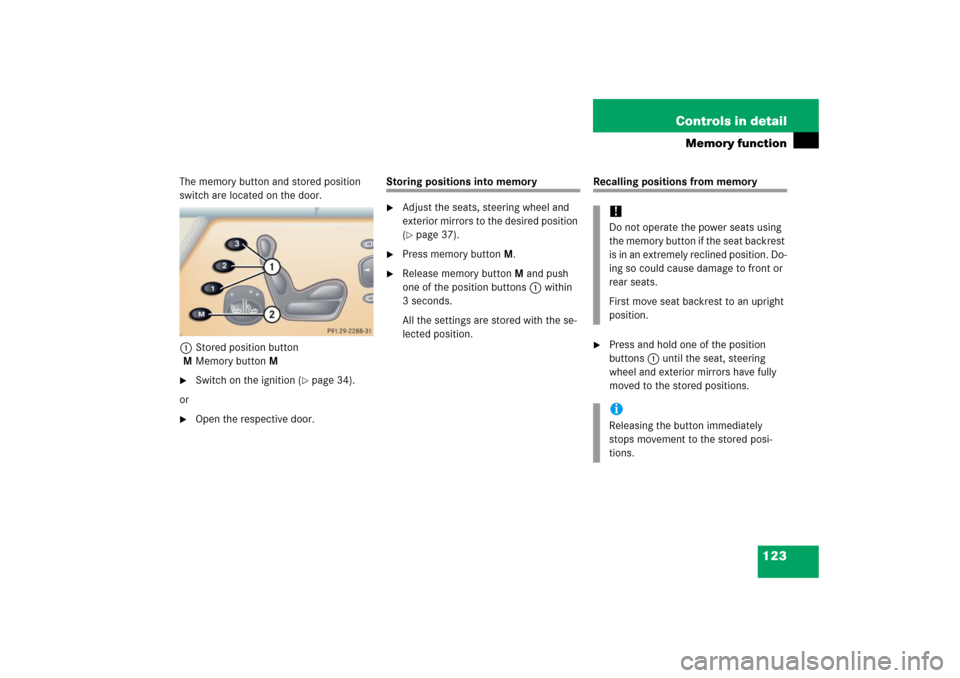
The memory button and stored position
switch are located on the door.
1Stored position button
MMemory button M�
Switch on the ignition (
�page 34).
or
�
Open the respective door.
Storing positions into memory�
Adjust the seats, steering wheel and
exterior mirrors to the desired position
(�page 37).
�
Press memory button M.
�
Release memory button M and push
one of the position buttons1 within
3 seconds.
All the settings are stored with the se-
lected position.
Recalling positions from memory�
Press and hold one of the position
buttons1 until the seat, steering
wheel and exterior mirrors have fully
moved to the stored positions.!Do not operate the power seats using
the memory button if the seat backrest
is in an extremely reclined position. Do-
ing so could cause damage to front or
rear seats.
First move seat backrest to an upright
position.iReleasing the button immediately
stops movement to the stored posi-
tions.
Page 125 of 456

124 Controls in detailMemory functionStoring exterior rear view mirror park-ing position
For easier parking, you can adjust the pas-
senger-side exterior rear view mirror so
that you can see the right rear wheel as
soon as you engage reverse gearR.
For information on activating the parking
position, see “Activating exterior rear view
mirror parking position” (
�page 180).The buttons are located on the driver’s
door.
1Passenger-side exterior rear view mir-
ror button
2Adjustment button
MMemory button M
�
Stop the vehicle in a safe location.
�
Make sure the ignition is switched on
(�page 34).
�
Press button1.
The passenger-side exterior rear view
mirror is selected.
�
Adjust the passenger-side exterior rear
view mirror with button2 so that you
see the rear wheel and the road curb.
�
Press memory button M.
�
Within 3 seconds, press bottom of ad-
justment button2 on ƒ.
The parking position is stored if the
mirror does not move.iIf the mirror does move, repeat the
above steps. After the setting is stored,
you can move the mirror again.
Page 126 of 456

and “Turn signals” (
�page 53)")
125 Controls in detail
Lighting
�Lighting
For information on how to switch on the
headlamps and use the turn signals, see
“Switching on headlamps” (
�page 52)
and “Turn signals” (
�page 53).
Exterior lamp switch
The exterior lamp switch is located on the
dashboard to the left of the steering wheel.
M
Off
Daytime running lamp mode
(�page 127)
U
Automatic headlamp mode
Daytime running lamp mode
(�page 127)
C
Parking lamps (also side marker
lamps, tail lamps, license plate
lamps, instrument panel lamps)
B
Low beam headlamps (or high
beam headlamps when the combi-
nation switch is pushed forward)
and parking lamps.
ˆ
Standing lamps, right (turn left one
stop)
‚
Standing lamps, left (turn left two
stops)
C
Indicator lamp for parking lamps
‡
Indicator lamp for front fog lamps
†
Indicator lamp for rear fog lamp
iIf you drive in countries where vehicles
drive on the other side of the road than
the country in which the vehicle is reg-
istered, you must have the headlamps
modified for symmetrical low beams.
Relevant information can be obtained
at your authorized Mercedes-Benz
Center.
Page 136 of 456
,
i.e. cl")
135 Controls in detail
Instrument cluster
Coolant temperature gauge
During severe operating conditions,
e.g. stop-and-go traffic, the coolant tem-
perature may rise close to 248°F (120°C),
i.e. close to the red zone of the coolant
temperature gauge.
The engine should not be operated with
the coolant temperature above 248°F
(120°C), i.e. in the red zone of the coolant
temperature gauge. Doing so may cause
serious engine damage which is not cov-
ered by the Mercedes-Benz Limited
Warranty.
Trip odometer�
Make sure you are viewing the trip
odometer display.
�
If it is not displayed, press the è or
ÿ button on the multifunction
steering wheel repeatedly until the trip
odometer appears (
�page 137).
�
Press and hold reset buttonJ in the
instrument cluster (
�page 134) until
the trip odometer is reset.
Warning!
G
�
Driving when your engine is badly over-
heated can cause some fluids which
may have leaked into the engine com-
partment to catch fire. You could be se-
riously burned.
�
Steam from an overheated engine can
cause serious burns and can occur just
by opening the hood. Stay away from
the engine if you see or hear steam com-
ing from it.
Turn off the engine, get out of the vehicle
and do not stand near the vehicle until the
engine has cooled down.
iExcessive coolant temperature triggers
a warning in the multifunction display
(�page 348).
Page 138 of 456

137 Controls in detail
Control system
�Control system
The control system is activated as soon as
the SmartKey in the starter switch is
turned to position1 or as soon as the
KEYLESS-GO* start/stop button
(�page 35) is in position1. The control
system enables you to:
�
call up information about your vehicle
�
change vehicle settings
For example, you can use the control sys-
tem to find out when your vehicle is next
due for service, to set the language for
messages in the instrument cluster dis-
play, and much more.
The control system relays information to
the multifunction display.
Multifunction display
1Trip odometer
2Main odometer
iThe displays for the audio systems
(radio, CD player etc.) will appear in
English, regardless of the language
selected.
Warning!
G
A driver’s attention to the road and traffic
conditions must always be his/her primary
focus when driving.
For your safety and the safety of others, se-
lecting features through the multifunction
steering wheel should only be done by the
driver when traffic and road conditions per-
mit it to be done safely.
Bear in mind that at a speed of just 30 mph
(approximately 50 km/h), your vehicle is
covering a distance of 44 feet (approxi-
mately 14 m) every second.
Page 139 of 456
138 Controls in detailControl systemMultifunction steering wheel
The displays in the multifunction display
and the settings in the control system are
controlled by the buttons on the multifunc-
tion steering wheel.
1
Multifunction display in the speed-
ometerOperating the control system
2
Selecting the submenu or setting the
volumeæ
up/to increase
ç
down/to decrease
3
Telephone*s
to take a call
t
to end a call
4
Menu systemsè
for next menu
ÿ
for previous menu
5
Moving within a menuj
for next display
k
for previous display