Page 233 of 456
232 Controls in detailUseful featuresStorage compartment in the glove box
A storage compartment is located in the
cover of the glove box. It can be used to
store cards, pens, a flashlight, etc.
1Storage compartment in glove box�
Lightly press the marking on the lid of
storage compartment1.
The lid opens upward.Storage compartment in front of arm-
rest
1Storage compartment
Opening
The compartment contains a cup holder
(
�page 235).
�
Lightly touch cover plate1.
The cover opens automatically.
Closing
�
Lightly push the cover plate1 up until
it engages in lock.Storage compartment below the front
armrest
Depending on vehicle model and configu-
ration, your vehicle is equipped with a stor-
age compartment below the front armrest.
The storage compartment below the front
armrest is illuminated with the exterior
lamps switched on.
The buttons are located under the cushion
of the armrest.
1Button to open storage compartment
2Button to open storage tray and tele-
phone holder*
Page 235 of 456

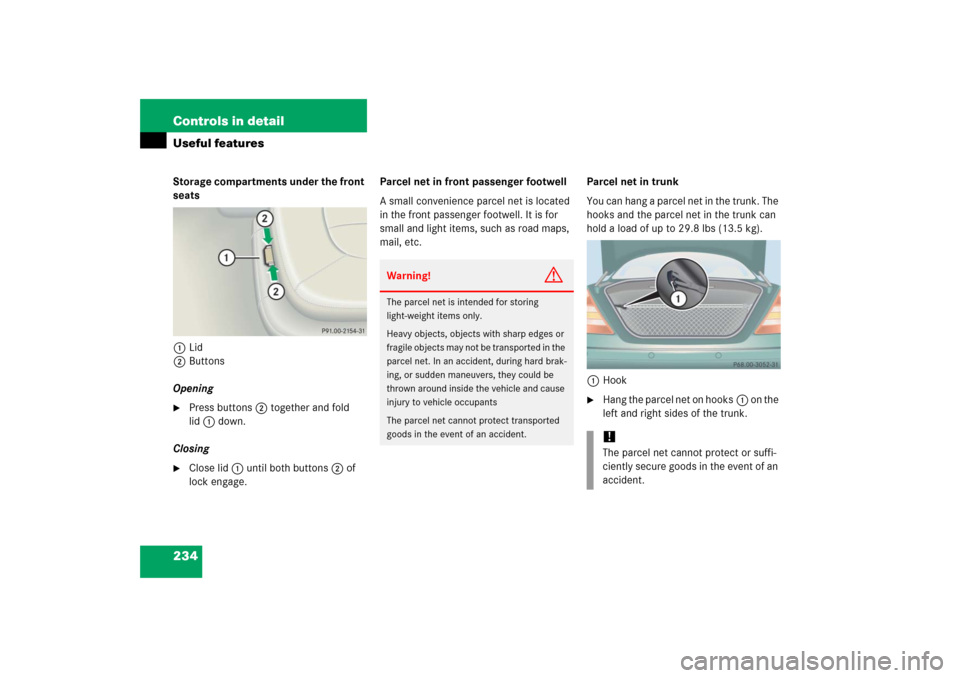
234 Controls in detailUseful featuresStorage compartments under the front
seats
1Lid
2Buttons
Opening�
Press buttons2 together and fold
lid1 down.
Closing
�
Close lid1 until both buttons2 of
lock engage.Parcel net in front passenger footwell
A small convenience parcel net is located
in the front passenger footwell. It is for
small and light items, such as road maps,
mail, etc.Parcel net in trunk
You can hang a parcel net in the trunk. The
hooks and the parcel net in the trunk can
hold a load of up to 29.8 lbs (13.5 kg).
1Hook
�
Hang the parcel net on hooks1 on the
left and right sides of the trunk.
Warning!
G
The parcel net is intended for storing
light-weight items only.
Heavy objects, objects with sharp edges or
fragile objects may not be transported in the
parcel net. In an accident, during hard brak-
ing, or sudden maneuvers, they could be
thrown around inside the vehicle and cause
injury to vehicle occupants
The parcel net cannot protect transported
goods in the event of an accident.
!The parcel net cannot protect or suffi-
ciently secure goods in the event of an
accident.
Page 239 of 456
238 Controls in detailUseful featuresRear seat ashtray
1Latch
Opening ashtray�
Pull at top of cover to open ashtray.
Removing ashtray insert
�
Pull latch1 to disengage ashtray in-
sert and remove it.
Reinstalling the ashtray insert
�
Install ashtray insert.
�
Close the ashtray.
Cigarette lighter
1Cigarette lighter�
Switch on the ignition (
�page 34).
�
Push in cigarette lighter1.
The lighter will pop out automatically
when hot.
Warning!
G
Never touch the heating element or sides of
the lighter; they are extremely hot. Hold the
knob only.
When leaving the vehicle, always remove the
SmartKey or SmartKey with KEYLESS-GO*
from the starter switch, take it with you, and
lock the vehicle. Do not leave children unat-
tended in the vehicle, or with access to an
unlocked vehicle. Unsupervised use of vehi-
cle equipment may cause an accident
and/or serious personal injury.
Page 240 of 456

239 Controls in detail
Useful features
Heated steering wheel* (CL 500 and CL 600)
The steering wheel heating warms up the
leather area of the steering wheel.
The stalk is on the lower left-hand side of
the steering wheel.
1Switching on
2Indicator lamp
3Switching offSwitching on
�
Switch on the ignition (
�page 34).
�
Turn switch at the tip of stalk in the di-
rection of arrow1.
The steering wheel is heated. Indicator
lamp2 comes on.
!The lighter socket can accommodate
12V DC electrical accessories (up to a
maximum of 85 W) designed for use
with the standard “cigarette lighter
plug”. Keep in mind, however, that con-
necting accessories to the lighter sock-
et (for example extensive connecting
and disconnecting, or using plugs that
do not fit properly) can damage the
lighter socket. With the socket dam-
aged, the lighter may no longer be able
to be placed in the heating (pushed-in)
position, or the lighter may pop out too
early with the lighter not hot enough.
iThe steering wheel heating is tempo-
rarily suspended while indicator
lamp2 remains on when�
the temperature of the vehicle inte-
rior is above 86°F (30°C)
�
the temperature of the steering
wheel is above 95°F (35°C)
When these conditions do not apply
anymore, steering wheel heating con-
tinues.
Page 252 of 456

251 Controls in detail
Useful features
Step 3:�
Hold the end of the hand-held remote
control5 of the device you wish to
train approximately 2 to 5 in
(5 to12 cm) away from the signal trans-
mitter button (2, 3 or4) to be pro-
grammed, while keeping the indicator
lamp1 in view.
Step 4:
�
Using both hands, simultaneously
press the hand-held remote control
button6 and the desired signal trans-
mitter button (2, 3 or4). Do not
release the buttons until step 5 is com-
pleted.
The indicator lamp1 will flash, first
slowly and then rapidly.Step 5:
�
After the indicator lamp1 changes
from a slow to a rapidly flashing light,
release the hand-held remote control
button and the signal transmitter but-
ton.
Step 6:
�
Press and hold the just-trained signal
transmitter button (2, 3 or4) and
observe the indicator lamp1.If the indicator lamp1 stays on
constantly, programming is complete
and your device should activate when
the respective signal transmitter
button (2, 3 or4) is pressed and re-
leased.
Step 7:
�
To program the remaining two signal
transmitter buttons, repeat the steps
above starting with step 3.
iThe indicator lamp1 flashes immedi-
ately the first time the signal transmit-
ter button is programmed. If this button
has already been programmed, the in-
dicator lamp will only start flashing af-
ter 20 seconds.
iIf the indicator lamp1 flashes rapidly
for about 2 seconds and then turns to a
constant light, continue with
programming steps 8 through 12 as
your garage door opener may be
equipped with the “rolling code”
feature.
Page 253 of 456

252 Controls in detailUseful featuresRolling code programming
To train a garage door opener (or other
rolling code devices) with the rolling code
feature, follow these instructions after
completing the “Programming” portion
(steps 1 through 6) of this text. (A second
person may make the following training
procedures quicker and easier.)
Step 8:�
Locate “training” button on the garage
door opener motor head unit.
Exact location and color of the button
may vary by garage door opener brand.
Depending on manufacturer, the
“training” button may also be referred
to as “learn”or “smart” button. If there
is difficulty locating the transmitting
button, refer to the garage door opener
operator’s manual. Step 9:
�
Press the “training” button on the ga-
rage door opener motor head unit.
The “training light” is activated.
You have 30 seconds to initiate the follow-
ing two steps.
Step 10:
�
Return to the vehicle and firmly press,
hold for 2 seconds and release the pro-
grammed signal transmitter button
(2, 3 or4).
Step 11:
�
Press, hold for 2 seconds and release
same signal transmitter button a sec-
ond time to complete the training pro-
cess.Step 12:
�
Confirm the garage door operation by
pressing the programmed signal trans-
mitter button (2, 3 or4).
Step 13:
�
To program the remaining two signal
transmitter buttons, repeat the steps
above starting with step 3.iSome garage door openers (or other
rolling code equipped devices) may
require you to press, hold for 2 seconds
and release the same signal transmit-
ter button a third time to complete the
training process.
Page 267 of 456

266 OperationDriving instructionsRoad salts and chemicals can adversely af-
fect braking efficiency. Increased pedal
force may become necessary to produce
the normal braking effect.
Depressing the brake pedal periodically
when traveling at length on salt-strewn
roads can bring road-salt impaired braking
efficiency back to normal.
If the vehicle is parked after being driven
on salt-treated roads, the braking efficien-
cy should be tested as soon as possible af-
ter driving is resumed.
For more information on winter driving, see
“Winter driving” (
�page 313).
Standing water
Warning!
G
Make sure not to encoder any other road
users when carrying out these braking ma-
neuvers.
Warning!
G
If the vehicle becomes stuck in snow, make
sure that snow is kept clear of the exhaust
pipe and from around the vehicle with the
engine running. Otherwise, deadly carbon
monoxide (CO) gases may enter vehicle in-
terior resulting in unconsciousness and
death.
To assure sufficient fresh air ventilation,
open a window slightly on the side of the ve-
hicle not facing the wind.Warning!
G
The outside temperature indicator is not de-
signed to serve as an ice-warning device and
is therefore unsuitable for that purpose. In-
dicated temperatures just above the freez-
ing point do not guarantee that the road
surface is free of ice.
!Do not drive through flooded areas or
water of unknown depth. Before driving
through water, determine its depth.
Never accelerate before driving into
water. The bow wave could force water
into the engine and auxiliary equip-
ment, thus damaging them.
If you must drive through standing wa-
ter, drive slowly to prevent water from
entering the passenger compartment
or the engine compartment. Water in
these areas could cause damage to
electrical components or wiring of the
engine or transmission, or could result
in water being ingested by the engine
through the air intake causing severe
internal engine damage. Any such dam-
age is not covered by the
Mercedes-Benz Limited Warranty.
Page 273 of 456

272 OperationAt the gas stationWindshield washer system and head-
lamp cleaning system
For more information on refilling the wash-
er reservoir, see “Windshield washer sys-
tem and headlamp cleaning system”
(�page 282).
Coolant
For more information, see “Coolant level”
(�page 280) and “Coolants”
(�page 422).Brake fluid
For more information on brake fluid, see
“Brake fluid” (
�page 420).
Engine oil level
For more information on engine oil, see
“Engine oil” (
�page 274).Vehicle lighting
Check function and cleanliness. For more
information on replacing light bulbs, see
“Replacing bulbs” (
�page 378).
For more information, see “Exterior lamp
switch” (
�page 125).
Tire inflation pressure
For information on tire inflation pressure,
see “Checking tire inflation pressure”
(
�page 294).
!If you find that the brake fluid in the
brake fluid reservoir has fallen to the
minimum mark or below, have the
brake system checked for brake pad
thickness and leaks immediately.
Notify an authorized Mercedes-Benz
Center immediately. Do not add brake
fluid as this will not solve the problem.
For more information, see “Practical
hints” (
�page 329).