Page 39 of 456

38 Getting startedAdjustingSeat adjustment
The seat adjustment switches are located
in each door.
1Head restraint height
2Seat height
3Seat cushion tilt
4Seat cushion depth
5Seat fore and aft adjustment
6Seat backrest tilt
�
Switch on the ignition (
�page 34).
or
�
Open the respective door.
Seat fore and aft adjustment
�
Press the switch forward or backward
in the direction of arrow5.
Adjust seat to a comfortable seating
position that still allows you to reach
the accelerator/brake pedal safely.
The position should be as far to the rear
as possible, consistent with ability to
properly operate controls.Seat cushion tilt
�
Press the switch up or down in the di-
rection of arrow3 until your upper
legs are lightly supported.
Seat cushion depth
�
Press the switch forward or backward
in the direction of arrow4 until your
legs are supported comfortably.
Seat backrest tilt
�
Press the switch forward or backward
in the direction of arrow6 until your
arms are slightly angled when holding
the steering wheel.
A child’s risk of serious or fatal injuries is
significantly increased if the child restraints
are not properly secured in the vehicle and
the child is not properly secured in the child
restraint.
iThe memory function (
�page 122) lets
you store the settings for the seat posi-
tion together with the settings for the
steering wheel and the exterior rear
view mirrors.
!When moving the seat, make sure
there are no items in the footwell or be-
hind the seats. Otherwise you could
damage the seats.
��
Page 42 of 456
.
is displayed in the multifunction disp")
41 Getting started
Adjusting
For information on additional convenience
features permitting easy entry and exit,
see “Easy-entry/exit feature”
(�page 112).
is displayed in the multifunction display,
then the respective backrest is not engaged
in its lock. Carefully slow down, and drive
with caution to an area which is in a safe dis-
tance from the roadway. Always provide suf-
ficient room behind the backrest and fold
the backrest all the way back until it locks in
place.
The warning message is no longer displayed
as s oo n a s t he bac kre st is locked in place. If
both backrests are locked in place and the
warning message is still displayed, have the
system checked at an authorized
Mercedes-Benz Center immediately.
When leaving the vehicle, always remove the
SmartKey or SmartKey with KEYLESS-GO*
from the starter switch, take it with you, and
lock the vehicle.
The power seats can also be operated with
the driver’s or passenger door open. Do not
leave children unattended in the vehicle or
with access to an unlocked vehicle. Unsu-
pervised use of vehicle equipment may
cause an accident and/or serious personal
injury.
Never place hands under seat or near any
moving parts during a seat adjustment pro-
cedure.!The automatic seat slide is provided
with a safety feature.
The automatic process is interrupted if
the backrest of the sliding seat is
pushed against an occupant or object.
The seat will slide forward and stop.
Investigate and correct the cause of in-
terruption.
Now use memory button (
�page 123)
or seat adjustment switch (�page 38)
to bring the seat into the desired posi-
tion.
When folding the backrest forward
from a reclined position, and then fold-
ing it back, the backrest stops in a
more upright position for the safety of
any rear-seat passenger. Adjust the
backrest until your arms are slightly an-
gled when holding the steering
wheel (
�page 38).
Page 43 of 456
.
1Adjusting steering column, in or out
2Adju")
42 Getting startedAdjustingSteering wheel Steering wheel adjustment
The stalk for steering wheel adjustment is
located on the steering column (lower left).
1Adjusting steering column, in or out
2Adjusting steering column, up or down
�
Switch on the ignition (
�page 34).
or
�
Open the driver’s door.Adjusting steering column in or out
�
Move stalk forward or back in the direc-
tion of arrow 1 until a comfortable
steering wheel position is reached with
your arms slightly bent at the elbow.
Adjusting steering column up or down
�
Move stalk up or down in the direction
of arrow 2.
Make sure your legs can move freely
and all the displays (incl. malfunction
and indicator lamps) on the instrument
cluster are clearly visible.
For more information, see “Heated steer-
ing wheel* (CL 500 and CL 600)”
(
�page 239).
Warning!
G
Do not adjust the steering wheel while driv-
ing. Adjusting the steering wheel while driv-
ing could cause the driver to lose control of
the vehicle.
When leaving the vehicle, always remove the
SmartKey or SmartKey with KEYLESS-GO*
from the starter switch, take it with you, and
lock the vehicle.
Even with the SmartKey or SmartKey with
KEYLESS-GO* removed from the starter
switch or the SmartKey with KEYLESS-GO*
removed from the vehicle, the steering
wheel adjustment feature can be operated
when the driver’s door is open. Therefore,
do not leave children unattended in the ve-
hicle, or with access to an unlocked vehicle.
Unsupervised use of vehicle equipment may
cause an accident and/or serious personal
injury.
iThe memory function (
�page 122) lets
you store settings for the steering
wheel together with the settings for the
exterior rear view mirrors and the seat
position.
Page 45 of 456
44 Getting startedAdjustingThe buttons are located on the driver’s
door.
1Driver’s side exterior rear view mirror
button
2Passenger-side exterior rear view mir-
ror button
3Adjustment button
�
Switch on the ignition (
�page 34).
�
Press button1 for the left mirror or
button2 for the right mirror.
�
Push adjustment button3 up, down,
left or right according to the desired
setting.
For more information, see “Folding exteri-
or rear view mirrors in and out
automatically” (
�page 180).
!For information on how to reposition
the exterior mirror housing when it was
forcibly pushed forward (hit from the
rear) or forcibly pushed rearward (hit
from the front), see “Folding exterior
rear view mirrors in and out manually”
(�page 181).
iThe memory function (
�page 122) lets
you store the setting for the exterior
rear view mirrors together with the set-
ting for the steering wheel and the seat
position.
At low ambient temperatures, the mir-
rors will be heated automatically.
Page 53 of 456
52 Getting startedDrivingFor more information, see “Driving instruc-
tions” (
�page 259).
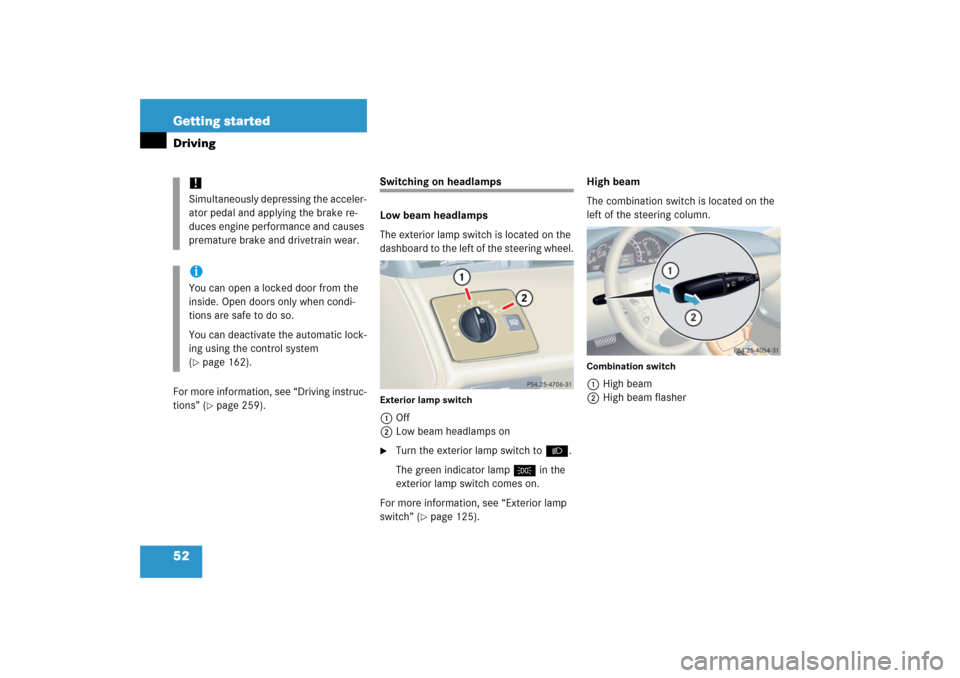
Switching on headlamps
Low beam headlamps
The exterior lamp switch is located on the
dashboard to the left of the steering wheel.Exterior lamp switch1Off
2Low beam headlamps on�
Turn the exterior lamp switch toB.
The green indicator lampC in the
exterior lamp switch comes on.
For more information, see “Exterior lamp
switch” (
�page 125).High beam
The combination switch is located on the
left of the steering column.
Combination switch1High beam
2High beam flasher
!Simultaneously depressing the acceler-
ator pedal and applying the brake re-
duces engine performance and causes
premature brake and drivetrain wear.iYou can open a locked door from the
inside. Open doors only when condi-
tions are safe to do so.
You can deactivate the automatic lock-
ing using the control system
(�page 162).
Page 54 of 456
53 Getting started
Driving
�
Push combination switch in the direc-
tion of arrow1.
The high beam headlamps are switched
on.
The high beam headlamp
indicatorA in the tachometer
comes on.
For more information, see “Lighting”
(
�page 125).
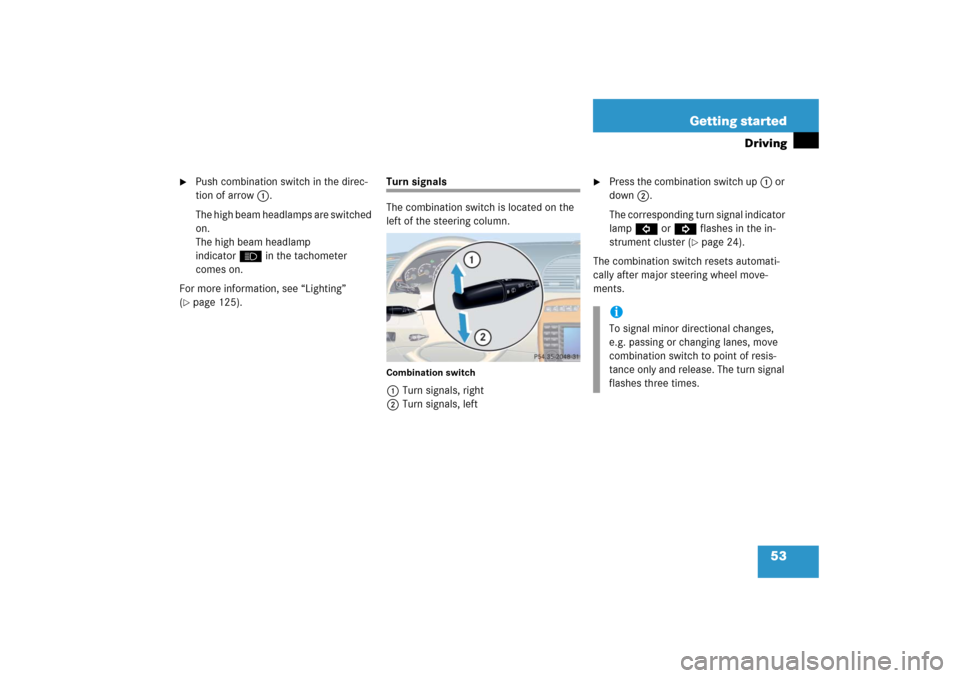
Turn signals
The combination switch is located on the
left of the steering column.Combination switch1Turn signals, right
2Turn signals, left
�
Press the combination switch up1 or
down2.
The corresponding turn signal indicator
lampL orK flashes in the in-
strument cluster (
�page 24).
The combination switch resets automati-
cally after major steering wheel move-
ments.
iTo signal minor directional changes,
e.g. passing or changing lanes, move
combination switch to point of resis-
tance only and release. The turn signal
flashes three times.
Page 55 of 456

54 Getting startedDrivingWindshield wipers
The combination switch is located on the
left of the steering column.Combination switch1Single wipe
Wiping with windshield washer fluid
2Switching on windshield wipers�
Switch on the ignition (
�page 34).Switching on windshield wipers
�
Turn the combination switch to the de-
sired position depending on the inten-
sity of the rain.
0Windshield wipers off
IIntermittent wiping
IINormal wiper speed
IIIFast wiper speedIntermittent wiping
Intermittent wiping interval is dependent
on wetness of windshield.
�
Turn the combination switch to
positionI.
After the initial wipe, pauses between
wipes are automatically controlled by the
rain sensor.
!Do not operate the windshield wipers
when the windshield is dry. Dust that
accumulates on a windshield might
scratch the glass and/or damage the
windshield wipers blades when wiping
occurs on a dry windshield. If it is nec-
essary to operate the windshield wip-
ers in dry weather conditions, always
operate the windshield wipers with
windshield washer fluid (
�page 55).
!Do not leave windshield wipers in
intermittent setting when the vehicle is
taken to an automatic car wash or
during windshield cleaning. Windshield
wipers will operate in the presence of
water sprayed on the windshield, and
windshield wipers may be damaged as
a result.
Page 58 of 456

57 Getting started
Parking and locking
�Parking and locking
You have now completed your first drive.
You have properly stopped and parked
your vehicle. End your drive as follows:Warning!
G
With the engine not running, there is no
power assistance for the brake and the
steering systems. In this case, it is impor-
tant to keep in mind that a considerably
higher degree of effort is necessary to brake
and steer the vehicle.
Warning!
G
Do not park this vehicle in areas where com-
bustible materials such as grass, hay or
leaves can come into contact with the hot
exhaust system, as these materials could be
ignited and cause a vehicle fire.
To reduce the risk of personal injury as a re-
sult of vehicle movement, before turning off
the engine and leaving the vehicle always:�
Keep right foot on brake pedal.
�
Firmly depress parking brake pedal.
�
Move the gear selector lever to
positionP.
�
Slowly release brake pedal.
�
When parked on an incline, turn front
wheels towards the road curb.
�
Turn the SmartKey to starter switch
position0 and remove, or press
KEYLESS-GO* start/stop button
(�page 35).
�
Take the SmartKey or the SmartKey with
KEYLESS-GO* with you and lock vehicle
when leaving.