Page 380 of 456
379 Practical hints
Replacing bulbs
Bulbs Front lamps Rear lamps
Lamp
Type
1
Additional turn sig-
nal lamp
LED
2
Turn signal lamp
1156 NA
3
High beam flasher
H7-55 W
4
Side marker lamp
W5W
5
Fog lamp
HB4-55 W
6
Parking and stand-
ing lamp
W5W
7
Low beam and high
beam lamp
Xenon
1
D2S-35 W
1Bi-Xenon headlamps: For safety reasons (high volt-
age), do not replace the Xenon bulb yourself. Con-
tact your authorized Mercedes-Benz Center.
Lamp
Type
8
High mounted brake
lamp
LED
9
Brake lamp
LED
a
Tail, parking and
standing lamp
P21/4W
Side marker lamp
LED
b
Backup lamp
P21W
c
License plate lamp
C5W
d
Rear fog lamp,
driver’s side
P 21/4 W
e
Turn signal lamp
PY 21 W
Page 381 of 456

380 Practical hintsReplacing bulbsNotes on bulb replacement
�
Only use 12-volt-bulbs of the same
type and with the specified watt rating.
�
Switch lights off before changing a bulb
to prevent short circuits.
�
Always use a clean lint-free cloth when
handling bulbs.
�
Your hands should be dry and free of oil
and grease.
�
If the newly installed bulb does not
come on, visit an authorized
Mercedes-Benz Center.Have the LEDs and bulbs for the following
lamps replaced by an authorized
Mercedes-Benz Center.
�
Additional turn signal lamps in the exte-
rior rear view mirrors
�
Bi-Xenon lamps
�
High mounted brake lamp
�
Brake lamps
�
Front side marker lamps
�
Rear side marker lamps
�
Rear parking lamps
Warning!
G
Keep bulbs out of reach of children.
Bulbs and bulb sockets can get very hot. Al-
low the lamp to cool down before changing
a bulb.
Halogen lamps contain pressurized gas.
A bulb can explode if you�
touch or move it when hot
�
drop the bulb
�
scratch the bulb
Wear eye and hand protection.
Because of high voltage in Xenon lamps, it is
dangerous to replace the bulb or repair the
lamp and its components. We recommend
that you have such work done by a qualified
technician.
iHave the headlamp adjustment
checked regularly.
Page 382 of 456
381 Practical hints
Replacing bulbs
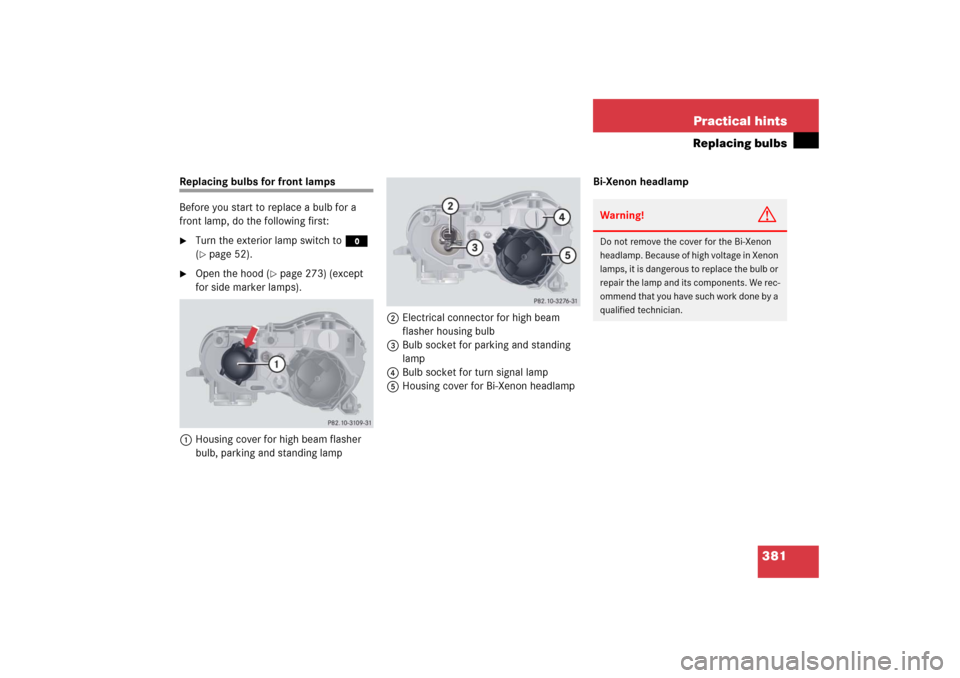
Replacing bulbs for front lamps
Before you start to replace a bulb for a
front lamp, do the following first:�
Turn the exterior lamp switch to M
(�page 52).
�
Open the hood (
�page 273) (except
for side marker lamps).
1Housing cover for high beam flasher
bulb, parking and standing lamp2Electrical connector for high beam
flasher housing bulb
3Bulb socket for parking and standing
lamp
4Bulb socket for turn signal lamp
5Housing cover for Bi-Xenon headlampBi-Xenon headlamp
Warning!
G
Do not remove the cover for the Bi-Xenon
headlamp. Because of high voltage in Xenon
lamps, it is dangerous to replace the bulb or
repair the lamp and its components. We rec-
o mm e nd that y ou ha ve s uc h wo rk do ne b y a
qualified technician.
Page 383 of 456

382 Practical hintsReplacing bulbsHigh beam flasher bulb�
Press ends of housing cover1 tab to-
gether and remove cover.
�
Press connector2 downward.
�
Remove connector2 with the bulb.
�
Insert the new bulb so that the base lo-
cates in the recess on the holder.
�
From below, press connector2 with
bulb upward onto the reflector.
�
Align housing cover1 and click into
place.
Front turn signal bulb
�
Turn bulb socket4 counterclockwise
and pull out.
�
Gently push bulb into bulb socket4,
turn counterclockwise and remove.
�
Insert new bulb in bulb socket4, push
in and twist clockwise.
�
Reinsert bulb socket4 in lamp and
twist clockwise.Parking and standing lamp bulb
�
Press ends of housing cover1 tab to-
gether and remove cover.
�
Pull out the bulb socket3 with the
bulb.
�
Pull the bulb out of the bulb socket3.
�
Insert a new bulb in the socket3.
�
Reinstall the bulb socket3.
�
Align housing cover1 and click into
place.
Front side marker lamp bulbs
Since replacing the side marker lamp bulbs
is a technically highly demanding process,
we recommend you have the side marker
lamp bulbs replaced by an authorized
Mercedes-Benz Center.
Replacing bulbs for rear lamps
Before you start to replace a bulb for a
front lamp, do the following first:�
Turn the exterior lamp switch to M
(�page 52).
�
Open the trunk (
�page 101).
Page 384 of 456
383 Practical hints
Replacing bulbs
Tail lamp assembliesPassenger side1Black socket:
Backup lamp
2Red socket:
Driver’s side: Tail, parking and rear fog
lamp
Passenger’s side: Tail and parking lamp
3Red socket:
Tail, standing and parking lamp
4White socket:
Turn signal lamp
�
Turn the locking knob and move the
trim to the side.
�
Turn bulb socket counterclockwise and
pull out.
�
Gently twist bulb counterclockwise and
pull out of bulb holder.
�
Insert new bulb into the holder and turn
it clockwise.
�
Reinstall bulb socket.
The bulb socket should audibly click.
�
Replace trim and secure with lock. License plate lamp
1Screws
�
Loosen both screws1.
�
Remove the license plate lamp.
�
Replace the bulb.
�
Reinstall the license plate lamp.
�
Retighten screws1.
Page 434 of 456

433 Index
A
ABC 220, 427
Messages in display 339
Setting vehicle level 221
Suspension tuning 220
ABS 80, 427
Indicator lamp 328
Messages in display 341
Accelerator position, Automatic
transmission 169
Accessory weight 309
Accident 56
Active Body Control see ABC
Additional turn signals
Replacing bulbs 379
Air bags 63
BabySmart
TM air bag deactivation
system 74, 427
Children 64
Front 67
Safety guidelines 66
Side impact 67
Window curtain 68
Air cleaner see Air filter
Air conditioning refrigerant 419, 420Air conditioning system see Automatic cli-
mate control
Air conditioning, Cooling 193
Air distribution 188
Air filter
Message in display 341
Air recirculation mode 190
Air vents 185, 196
Air volume 189
Alarm system see Anti-theft alarm system
Alignment bolt (vehicle tool kit) 370,
389, 427
Anticorrosion/antifreeze 423, 424
Antiglare, Rear view mirror 178
Antilock Brake System see ABS
Anti-theft alarm systems
Indicator lamp 86
Anti-theft systems 85
Anti-theft alarm system 85
Immobilizer 85
Tow-away alarm 87
Aquaplaning see Hydroplaning
Armrest 232, 233
Ashtrays 237
Aspect ratio 309AUDIO menu 142
Audio system
CD changer operating mode 145
Auto-dimming, Rear view mirror 178
Automatic central locking, Control
system 110, 162
Automatic climate control 184
Air conditioning refrigerant 420
Air conditioning, Cooling 193
Air distribution 188
Air recirculation mode 190
Air vents 185, 196
Air volume 189
Charcoal filter 191
Control panel 185
Deactivating system 187
Defogging 188
Defrosting 189
MAXCOOL maximum cooling 189
Rear window defroster 193
Residual engine heat and ventilation
(REST) 194
Setting the temperature 187
Automatic headlamp mode 126
Automatic lighting control, Interior
lighting 131
Page 435 of 456
 177
Gear ranges 170
Gear selector lever posit")
434 IndexAutomatic locking when driving 110
Automatic transmission 48, 165
Accelerator position 169
Driving tips 169
Emergency operation (Limp Home
Mode) 177
Gear ranges 170
Gear selector lever position 48, 165,
167
Gear shifting malfunctions 177
Kickdown 169
Kickdown, manual shift program
CL 55 AMG and CL 65 AMG 177
Manual (One-touch) gearshifting 172
Manual shift program CL 55 AMG and
CL 65 AMG 175
Shift program mode selector
switch 171
Starting the engine 48
Steering wheel gearshift control
CL 55 AMG and CL 65 AMG 173
Transmission fluid level 279
Warning sounds (vehicles with
KEYLESS-GO*) 59B
BabySmart
TM
Air bag deactivation system 74
Compatible child seats 427
Self-test 74
Backrest
Power seats 37
Power seats, Multicontour* 117
Backrest supports
Shoulder region (Multicontour
seats*) 117
Backup lamps
Replacing bulbs 379, 383
Bar 309
BAS 81, 427
Batteries, SmartKey
Checking battery condition 93
Replacing 376
Battery, SmartKey with KEYLESS-GO*
Checking battery condition 99
Replacing 377
Battery, Vehicle 281, 391
Charging 392
Disconnecting 392
Jump starting 394
Message in display 345Reconnecting 393
Reinstalling 392
Removing 392
Bead 309
Beverage holder see Cup holder
Bi-Xenon headlamps see Headlamps
Block heater (Canada only) 314
Brake Assist System see BAS
Brake fluid 420
Brake warning lamp 329
Checking 271
Message in display 346
Brake lamp
High mounted 379
Messages in display 354
Replacing bulbs 379
Brake pads
Message in display 346
Brakes 260
High-performance brake system
(CL 65 AMG only) 261
Warning lamp 329
Break-in the vehicle 258
Bulbs, replacing
Side marker lamps, front 382
Bulbs, replacing see Replacing bulbs
Page 439 of 456

438 IndexEngine oil 274, 420
Adding 278
Additives 420
Changing 278, 420
Checking level 274
Consumption 274
Filler neck 278, 279
Messages in display 275, 276, 351
Recommended engine oils and oil
filter 420
Viscosity 428
ESP
®
82, 429
Messages in display 342
Warning lamp 332, 333
ETD 71, 429
Safety guidelines 66
Exterior rear view mirrors 43
Auto-dimming on the driver’s
side 178
Parking position 124, 180
Parking position for 164
Power folding 180
Storing parking position 124F
Filler neck, Engine oil 278, 279
First aid kit 369
Flat tire 386
Jacking up the vehicle 387
Lowering the vehicle 390
Mounting the spare wheel 386
Preparing the vehicle 386
Flexible Service System see FSS
Fluids
ABC fluid 279
Automatic transmission 279, 418
Brake fluid 272, 418, 420
Capacities 418
Engine coolant 280, 419, 422
Engine oil 418, 420
Hydraulic system for ABC 418
Power steering fluid 418
Windshield washer system and head-
lamp cleaning system 282, 419,
425
Fog lamps 128, 379
Messages in display 355, 357
Replacing bulbs 379, 383Front air bags 67
Front lamps see Headlamps
Front passenger front air bag 63, 67
Front passenger front air bag off indicator
lamp 74, 336
Front seat head restraints see Head re-
straints
FSS (Canada vehicles) 315, 429
Fuel 271, 419, 421
Additives 422
Capacities, Fuel tank 419
Consumption statistics after
start 151
Consumption statistics since last
reset 152
Filling the tank 270
Fuel filler flap and cap 270, 374
Fuel gauge 25, 331
Fuel reserve warning lamp 25, 331
Requirements, Octane rating 271,
419, 421
Technical data 419, 421
Fuel cap
Engine malfunction indicator
lamp 331
Message in display 360