Page 130 of 456
129 Controls in detail
Lighting
Combination switch
The combination switch is located on the
left side of the steering column.
1High beam
2High beam flasherHigh beam
�
Turn exterior lamp switch to
positionB or toU
(�page 125).
�
Push the combination switch in the di-
rection of arrow1 to switch on the
high beam.
The high beam indicatorA on the
instrument cluster comes on
(�page 24).
�
Pull the combination switch back to its
original position to switch off the high
beam.
The high beam indicatorA on the
instrument cluster goes out.High beam flasher
�
Pull the combination switch briefly in
the direction2.
Page 339 of 456
338 Practical hintsWhat to do if …?
On the pages that follow, you will find a
compilation of the most important warning
and malfunction messages that may ap-
pear in the malfunction display.
For your convenience the messages are di-
vided into two sections:�
Text messages (
�page 339)
�
Symbol messages (
�page 345)
iSwitching on the ignition causes all in-
strument cluster lamps (except high
beam headlamp indicator lamp and
turn signal indicator lamps unless acti-
vated) as well as the multifunction dis-
play to come on. Make sure the lamps
and multifunction display are in work-
ing order before starting your journey.
Page 356 of 456

355 Practical hints
What to do if …?
Display
Possible cause/consequence
Possible solution
.
BRAKE LIGHT LEFT
SUBSTITUTE LAMP ON
The left brake lamp is malfunctioning. A
substitute bulb is being used.
�
Visit an authorized Mercedes-Benz
Center as soon as possible.
BRAKE LIGHT RIGHT
SUBSTITUTE LAMP ON
The right brake lamp is malfunctioning. A
substitute bulb is being used.
�
Visit an authorized Mercedes-Benz
Center as soon as possible.
DISPLAY DEFECTIVE
VISIT WORKSHOP
The display for the lamps or the system is
malfunctioning.
�
Visit an authorized Mercedes-Benz
Center as soon as possible.
FRONT FOGLAMP, LEFT
CHECK LIGHT
The left front fog lamp is malfunctioning.
�
Visit an authorized Mercedes-Benz
Center as soon as possible.
FRONT FOGLAMP, RIGHT
CHECK LIGHT
The right front fog lamp is malfunctioning.
�
Visit an authorized Mercedes-Benz
Center as soon as possible.
HIGH BEAM, LEFT
CHECK LIGHT
The left high beam lamp is malfunction-
ing.
�
Replace the bulb as soon as possible.
HIGH BEAM, RIGHT
CHECK LIGHT
The right high beam lamp is malfunction-
ing.
�
Replace the bulb as soon as possible.
LICENSE PLATE L, L
CHECK LIGHT
The left license plate lamp is malfunction-
ing.
�
Replace the bulb as soon as possible.
LICENSE PLATE L, R
CHECK LIGHT
The right license plate lamp is malfunc-
tioning.
�
Replace the bulb as soon as possible.
Page 380 of 456
379 Practical hints
Replacing bulbs
Bulbs Front lamps Rear lamps
Lamp
Type
1
Additional turn sig-
nal lamp
LED
2
Turn signal lamp
1156 NA
3
High beam flasher
H7-55 W
4
Side marker lamp
W5W
5
Fog lamp
HB4-55 W
6
Parking and stand-
ing lamp
W5W
7
Low beam and high
beam lamp
Xenon
1
D2S-35 W
1Bi-Xenon headlamps: For safety reasons (high volt-
age), do not replace the Xenon bulb yourself. Con-
tact your authorized Mercedes-Benz Center.
Lamp
Type
8
High mounted brake
lamp
LED
9
Brake lamp
LED
a
Tail, parking and
standing lamp
P21/4W
Side marker lamp
LED
b
Backup lamp
P21W
c
License plate lamp
C5W
d
Rear fog lamp,
driver’s side
P 21/4 W
e
Turn signal lamp
PY 21 W
Page 382 of 456
381 Practical hints
Replacing bulbs
Replacing bulbs for front lamps
Before you start to replace a bulb for a
front lamp, do the following first:�
Turn the exterior lamp switch to M
(�page 52).
�
Open the hood (
�page 273) (except
for side marker lamps).
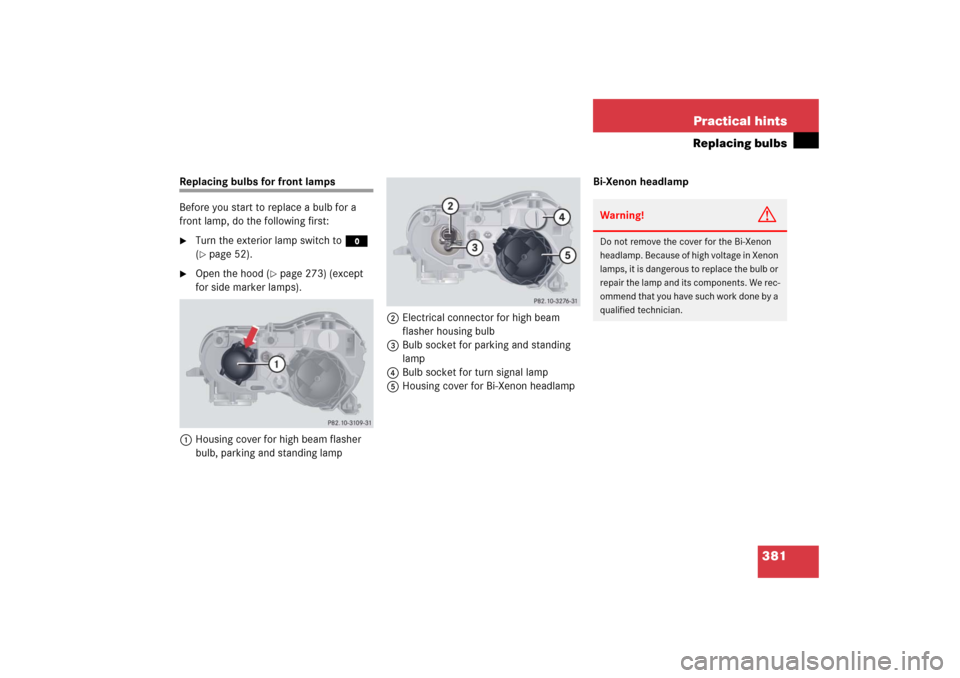
1Housing cover for high beam flasher
bulb, parking and standing lamp2Electrical connector for high beam
flasher housing bulb
3Bulb socket for parking and standing
lamp
4Bulb socket for turn signal lamp
5Housing cover for Bi-Xenon headlampBi-Xenon headlamp
Warning!
G
Do not remove the cover for the Bi-Xenon
headlamp. Because of high voltage in Xenon
lamps, it is dangerous to replace the bulb or
repair the lamp and its components. We rec-
o mm e nd that y ou ha ve s uc h wo rk do ne b y a
qualified technician.
Page 383 of 456

382 Practical hintsReplacing bulbsHigh beam flasher bulb�
Press ends of housing cover1 tab to-
gether and remove cover.
�
Press connector2 downward.
�
Remove connector2 with the bulb.
�
Insert the new bulb so that the base lo-
cates in the recess on the holder.
�
From below, press connector2 with
bulb upward onto the reflector.
�
Align housing cover1 and click into
place.
Front turn signal bulb
�
Turn bulb socket4 counterclockwise
and pull out.
�
Gently push bulb into bulb socket4,
turn counterclockwise and remove.
�
Insert new bulb in bulb socket4, push
in and twist clockwise.
�
Reinsert bulb socket4 in lamp and
twist clockwise.Parking and standing lamp bulb
�
Press ends of housing cover1 tab to-
gether and remove cover.
�
Pull out the bulb socket3 with the
bulb.
�
Pull the bulb out of the bulb socket3.
�
Insert a new bulb in the socket3.
�
Reinstall the bulb socket3.
�
Align housing cover1 and click into
place.
Front side marker lamp bulbs
Since replacing the side marker lamp bulbs
is a technically highly demanding process,
we recommend you have the side marker
lamp bulbs replaced by an authorized
Mercedes-Benz Center.
Replacing bulbs for rear lamps
Before you start to replace a bulb for a
front lamp, do the following first:�
Turn the exterior lamp switch to M
(�page 52).
�
Open the trunk (
�page 101).
Page 428 of 456

Active, computer-controlled system
that hydraulically adjusts the suspen-
sion at all four wheels in response to
various driving situations.
ABS
(A
n")
427 Technical terms
ABC
(A
ctive B
ody C
ontrol)
Active, computer-controlled system
that hydraulically adjusts the suspen-
sion at all four wheels in response to
various driving situations.
ABS
(A
ntilock B
rake S
ystem)
Prevents the wheels from locking up
during braking so that the vehicle can
continue to be steered.
Accessory weight
(
�page 309)
Air pressure
(�page 309)
Alignment bolt
Metal pin with thread. The centering
pin is an aid used when changing a tire
to align the wheel with the wheel hub.
Aspect ratio
(�page 309)BabySmart
TM air bag deactivation
system
This system detects if a special system
compatible child restraint seat is in-
stalled on the front passenger seat. The
system will automatically deactivate
the passenger front air bag when such
a seat is properly installed
(the58indicator lamp in the
center console comes on and remains
illuminated).
BabySmartTM compatible child seats
Special restraint system for children.
The sensor system for the front pas-
senger seat prevents deployment of
the passenger front air bag if a
BabySmartTM compatible child seat is
installed. See an authorized
Mercedes-Benz Center for availability.
Bar
(
�page 309)BAS
(B
rake A
ssist S
ystem)
System for potentially reducing braking
distances in emergency braking situa-
tions. The system is activated when it
senses an emergency based on how
fast the brake is applied.
Bead
(
�page 309)
Bi-Xenon headlamps
Headlamps which use an electric arc as
the light source and produce a more in-
tense light than filament headlamps.
Bi-Xenon headlamps produce low
beam and high beam.
CAC
(Customer A
ssistance C
enter)
Mercedes-Benz customer service cen-
ter, which can help you with any ques-
tions about your vehicle and provide
assistance in the event of a break-
down.
Page 441 of 456

440 IndexHeadliner, cleaning 325
Heated seats 119
Heated steering wheel* 239
High beam flasher 52, 129
Replacing bulbs 379, 382
High beam headlamps
Indicator lamp 25
Messages in display 355
Replacing bulbs 379
Switching on 52, 129
High mounted brake lamp 379
High-performance brake system
(CL 65 AMG only) 261
Hood 273
Message in display 353
Horn 23
HVAC see Automatic climate control
Hydroplaning 263I
Identification labels 406
Certification 406
Emission control information 406
Vacuum line routing 406
Identification number, Vehicle (VIN) 406
Ignition 34, 36
Immobilizer 85
Indicator lamps see Lamps, indicator and
warning
Infant and child restraint systems see Chil-
dren in the vehicle
Inflation pressure see Tires, Inflation pres-
sure
Inside door handle 100
Instrument cluster 24, 134, 429
Cleaning 324
Illumination brightness 134
Lamps 328
Message in display 350
Multifunction display 137
Instrument lighting see Instrument cluster,
Illumination brightnessInstrument panel see Instrument cluster
Instruments and controls see Cockpit
Interior lighting 131
Delayed switch-off 161
Interior rear view mirror
43, 178
Antiglare 178
Auto-dimming 178
Interior storage spaces see Storage com-
partments