2006 MERCEDES-BENZ CL COUPE radio
[x] Cancel search: radioPage 302 of 555
281
Con
trols
On-board computer
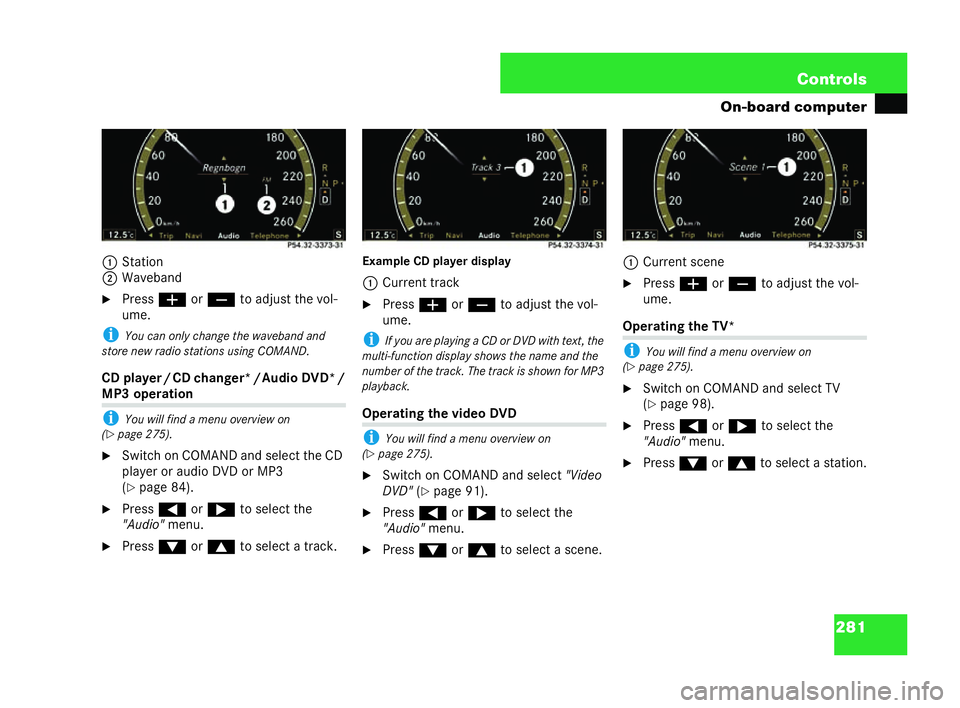
1 Stat ion
2 Wave band
�6 Press æorç toadjust thev ol-
ume.
i Youcan only change thewa veba nd and
st ore new radio stations using COMAND.
CD player /CDch an ger */Audio DVD* / MP3
operati on
i You will find a menu over view on
( �= page 275).
�6 Switchon COMA ND andse lect the CD
pl ay er or audio DVD or MP3
( �= page 84).
�6 Press (or& to sele ctthe
"Audio" menu.
�6 Press %or$ tosele ctatrac k. Exampl
eCD pl ayer displ ay
1 Curr ent tra ck
�6 Press æorç toadjust the vol-
ume.
i Ifyou are playing a CDorDV Dw ith te xt, the
multi-func tion display shows thename and the
number of thetrack. The trac kiss hown for MP3
pl ayback. Operating
the vid eoDVD
i Youw ill find a menuoverview on
(�= page 275).
�6 Switchon CO MA ND and sele ct"Video
DVD" (
�= page 91).
�6 Press (or& tosele ct the
"Audi o"menu.
�6 Press %or$ toselect ascen e. 1
Curr entsc ene
�6 Press æorç toadjust the vol-
ume. Opera
ting the TV*
i Youw ill find a menu over view on
(�= page 275 ).
�6 Switchon COMA ND and select TV
( �= page 98).
�6 Press (or& toselect the
"Au dio" men u.
�6 Press %or$ toselect a stat ion.
P54.32-3373-31 P54.32-3374-31 P54.32-3375-31216_R
E_2006-12a.book Seit e281 Montag, 2. Oktob er2006 12:06 12
Page 308 of 555
287
Con
trols
On-board computer Setting per
manent Speedtr onic
Fo rho w to set Spe edtroni c,please ref erto
th e" Drivin gsyste ms"se ction
( �= pa ge 311).
Hiding or show ing the ad ditional speed- ome
ter
Yo uca nsh ow anaddit ional di gital speed-
om eter inthem ulti-f un ction disp lay. The
sp eed isdispl ayed inmiles per hour. Vehi-
cle swith a milesspeedom eter: the addi-
tiona l spee dome ter indicates km /h.
�6 Press (or& to sele ctthe
"Sett ings" menu.
�6 Press %or$ to sele ct
"A ux. speedo meter" .
�6 Press #.
�6 Press #again if yo uwi sh tochan ge
th ecu rrent stat us.
Th ead dition alspeedom eter isac tiv at-
ed or deactivated acco rding to its pre-
viou s stat e. Ac
tivating anddeactivating the radar se
nsor syst em*
If yo ur vehi cle is equip pedwith a 24GHz
radar sensor system, youca n deactivate or
ac tiva te it.
! Youm ustdeac tivatethe24 GHz rada rs en-
sor sys temi nce rtain coun tries and nearto radio
ast ronomical inst allations (
�=page 528) .
�6 Press (or& tosele ct the "Set-
ting s"menu.
�6 Press %or$ tosele ct"Radar
sensor" .
�6 Press #.
�6 Press #againif yo uwi sh tochan ge
th ecu rre ntstat us.
If yo u deac tiva te the radar se nsorsystem,
the following systems ared eactivated:
�! Distr onic Plus*
�! BAS Pl us*
�! Park As sist*
�! Parkin gGu ida nce*
�! Dista nce warning*
�! PRE-SAFE ®
Brake*
i The set tings are re tained eve naf te ryo u re-
st art the engine. i
OnlyAMG vehicl eshave this funct ion.
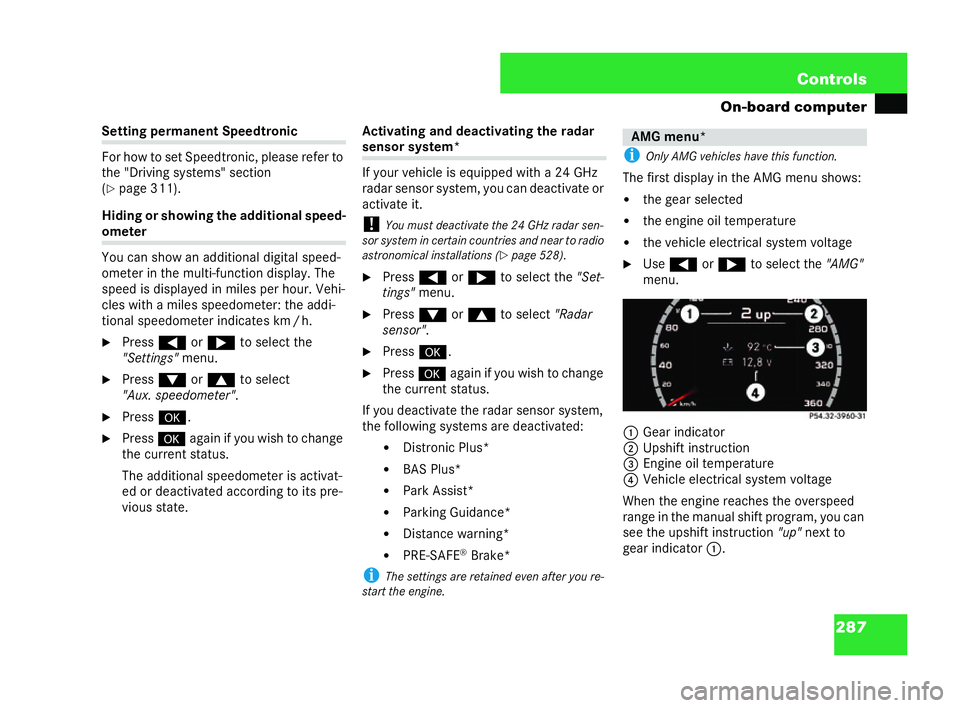
The first disp layintheAM Gme nushows:
�! the ge arsele cted
�! the engine oil te mperatu re
�! theve hicle elec tric al syst emvoltage
�6 Use ( or& to sele ctthe "AMG"
menu.
1 Gear indi ca tor
2 Upshift instruc tion
3 Engin eoil te mp erature
4 Vehi cle electri calsystem vol tage
Wh enthe engi nereac hesthe overspe ed
ra ng ein the man ual shift pr ogram, youc an
see the upshift in str uction "up" next to
gear indic ator 1 . AMG
menu*
P54.32-3960-31 216_R
E_2006-12a.book Seit e287 Montag, 2. Oktob er2006 12:06 12
Page 321 of 555
300 Con
trols
Driving systems
Distroni cPlus 1
co ntro ls the speed an dau-
tom atical ly mai ntains th eset dista nce
fr om vehicle stra vellin ginfron t. Distronic
Pl us func tions atspeeds ofbetwee n0 an d
20 0k m/ h.
If aslowe r-mov ing vehicl e isdetected in
front, Distr onicPlus cau sesyour vehicle to
brake and thus maint ain apre setd istan ce
fr om theve hicle infron t.
!Youm ustd eactivat ethe radar sens orsys-
tem incertain count ries and near radio as tro-
no mical installations (
�=page 287).
If th ere is no vehicleinfront, Distro nicPlus
op erates in thesa me wayas cruise control
( �= page 290).
i Donot use Di stronic Plus when drivingon a
steep uphill or downh ill gr adi ent. Distr
onic Plu s* 1N
ot available in all cou ntrie s. G
Risk of acc ident Distronic
Plus ison ly an aid des igne dto as-
sist dri ving. Youar er esponsibl efo ryo ur
ve hicle’ sd istance from other vehicl es,the
speed of your vehicle an d for br akingin
go od ti me.
Distronic Plus does not reac t to:
�! pedest rians
�! stationary obstac lesin theroad, e.g.
station aryor par kedv ehic les
�! oncom ing veh icles and cross traf fic
Distronic Plus may not detect narrow vehi-
cl es travelling in fr ont,e.g. motorc yclesand
ve hicles trav elling on adi ffe rent line. Th
erefore alwayspay atte nt ionto the tr affic
conditions, ev enwhen Distronic Plus is act i-
vated. You ma yot herw ise fail to rec ognise
da ngers in ti me, cau sean accid entan di n-
ju re your selfan dot he rs. G
Risk of accident Dist
ronicPlu s cannot de tect roa dand traf fic
conditions. Deact ivat eDi stron icPlus indriv-
ing situatio nsin whic hitma inta inst he
spe edor accele rates to th esetspe edbe-
ca use ithas lo stthe vehicle trav elling in
fr on t,in particul ar:
�! beforebe nds
�! infilt er lan es
�! when chan ging into a la newith fa sttraf-
fic
�! on re routed lanes, e.g. motor waywo rks Distron
icPlus cannot take weather cond i-
tion sin to acco un t.De activate Distro nicP lus
or do not activa te it:
�! on slip pery roa dsurfaces, snow or ice.
Th ew heelsma ylose their grip when the
dr iver brak es or accelerate sth e ve hicle.
The vehi cle co uld go intoask id.
�! when the sensorsare dirty or there is
poo rvisib ilit y,e.g. due tofog, rain or
snow. The proximity control may be im-
pa ired
Al wa yspay attention to thetraf ficc ondi-
tion s,even when Distro nicPlus isac tivated.
You ma y otherw ise fail to re cogn ise dange rs
in ti me, causean accid entan dinjure you r-
se lfand others. 216_R
E_2006-12a.book Seit e300 Montag, 2. Oktob er2006 12:06 12
Page 338 of 555
317
Con
trols
Driving sys tems Deactivating
/activa ting
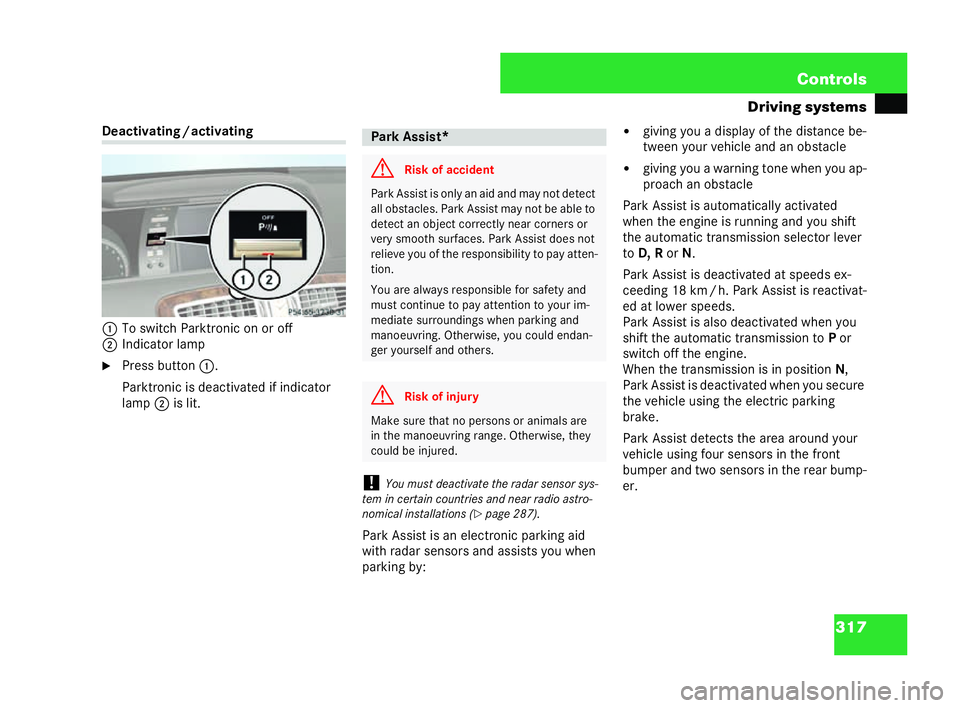
1 Toswitch Parktroni con or off
2 Indic ator la mp
�6 Press button 1.
Pa rktroni cis deacti vated if ind icat or
lamp 2islit.
!Youm ustdeac tivatetheradar sens or sys-
te m in certain count riesand near radio ast ro-
nomic alins talla tions (
�=pag e287).
Par k As sist is an electro nic park ing aid
with radar sens orsan d assists you wh en
parki ngby: �!
giving youadi splay ofthe di stan ce be-
twe en yo urvehicl ean dan obs tacle
�! giving youa wa rning tone whenyouap-
proach anobs tacle
Pa rk Ass isti sau tom atically activa ted
when th een gine isrunning and yous hift
the autom atic tr ansmission selector lever
to D, R orN.
Pa rk Ass isti sde activated atspee dsex-
ceed ing 18 km /h.Pa rk Assist is reac tiva t-
ed at lowe rsp eeds.
Park Assist is also deact ivat ed when you
shi ftthe autom atic tr ansm ission to Por
swit ch off theen gine.
Wh enthe tra nsmi ssioni sin po sition N,
Pa rkAss isti sdeactivated when you se cure
the vehicle usingthe electri cparki ng
brake.
Park Assist detectsth ear ea around your
ve hicle using four sensor s inthef ront
bu mp erand two sensor sinthe rear bu mp-
er.
P5
4.65-3230-31 Pa
rk Assist * G
Risk ofaccide nt Pa
rkAs sis tis only an ai dand ma y no tde tect
all obstacl es.Pa rk Assist may not be abl eto
de tect an object cor rectly ne ar corn ers or
ve ry sm ooth su rfac es.Pa rk Assist does not
reli eve youo fthe res ponsibilit yto pa yatten-
tion.
Yo uare always responsib lefor safety and
mu st continu eto pay attentio nto your im-
medi atesu rroundi ngswh en pa rking an d
ma noe uvring .O therwi se ,yo ucou lden da n-
ger yoursel fan dot hers. G
Risk ofinju ry Make su
re thatno pe rsons or ani mals are
in the manoe uvring rang e. Ot herw ise, they
cou ldbe inju re d. 216_
RE_2006-12a.book Seit e317 Montag, 2. Oktob er2006 12:06 12
Page 341 of 555
320 Con
trols
Driving systems
Pa rking Guidan ce is anelectro nicparki ng
ai d with aradar sensor system. It meas-
ures theroad spa ceon both sides of your
veh icle by me ansof th eradar sensor sys-
tem. An appropriate parking spaceis indi-
ca ted and ste ering instructi onsgiven to
park in this space. !
Youm ustd eactivat ethe radar sens orsys-
tem incertain count ries and near radio as tro-
nomical installations. Furt herinf orm ation can be
found in the index under "Radar sen sor system –
swi tchingon /o ff".
Use Parki ng Guidanc efo r parki ngspa ces
wh ich are:
�! parallel to the dire ction of tra vel
�! onstraight roads ,i.e. not on corners
�! onthesa me leve l as thero ad ,i.e. not
on pa veme nts ,fo rin sta nce. Flat kerbs
ma yno tb eidentified byParking Guid-
an ce. Pa
rkin gGu idan ce G
Risk of accident Pa
rking Guidance is onl yan ai dan dma yin-
di cat eparking spaces which ar einap prop ri-
at e, e. g. where parking is forb idde n,infront
of driv eways, on unsuitabl esurfaces etc.
Pa rking Guidance disp lays the parking
sp ace sym bolicall yinthe instr umentclust er
as it was whe nth epa rking sp acewa sin itia l-
ly me asured when the vehi cle dr ove past it.
Su bsequen tch an ges to the parki ngspac e
ar enot ta kenin to acco un t,e. g. ifthe vehicle
pa rking in front ofor behind it chang es its
pos itionor obstacl esare moved into the
par king space .Mo ving ob jects arenot dis-
pl ay ed, e. g. pedest rian sor passing veh icles.
Pa rking Guidance does not relieve you of
yo ur responsibil ity to pay attention. Yo uma y
ca usean ac cide nt or injure yourself or oth-
er s if you rely purely onParking Guidance.
Yo uar ea lway sre sponsi ble fo r saf etyan d
mu stpayatte ntion to yo urimme diatesur-
ro und ings when parkinga nd manoeuvr ing. G
Risk of inju ry Make su
rethat no pe rsons or animals are
in the ma noeuvring ra nge. Ot herwis e,they
co uld be injur ed. 216_R
E_2006-12a.book Seit e320 Montag, 2. Oktob er2006 12:06 12
Page 363 of 555

342 Con
trols
Auxilia ryhea ting /ventilation*
Th eindicator lamp sin the button maylight
up in blu e,red or yellow.
�6 Make sure tha tthe engine is notru n-
ning.
�6 Todeactivate /activate: briefly press
up per or lower se ction of rocker
sw itch 1.
Th ered or blue indi cator lamp in rock er
button 1islit. Th eau xiliary heati ng or
vent ilati on is sw itch ed on. Yo
uma yper form the following usingt he
remote contr ol:
�! switc hthe auxiliary heating/
venti lation on /off
�! check th esta tusof the auxiliary
heating /ventila tion
�! sele ctadeparture time
�! set a departure ti me
Th e remot econt rol has a maximum range
of app roxima tely 300 metres.The range
ma ybe redu ced by:
�! sou rces of radio inter fere nce
�! solido bjects betwe enthe re mote con-
tr ol an d the vehicle
�! the re mote control being inan unf a-
vour ablepo sition in rel ation to th eve-
hicle
�! transmit ting from an enclose dspace
i Theo ptim umrange can only be ac hieved
if you holdtheremot eco ntrol vertically upwards
when you press one ofthe bu ttons.Y our ve hi-
cl e’s equipment include sone remot eco ntrol.
Two more remot eco ntrol smay be used for ea ch ve
hicl e.Forfu rthe r information, consu lt a quali-
fied spe cialist workshop, e. g.a Mercede s-Benz
Ser vice Centre.
i Whenthe ba tteries in the remote control are
nearly disc harged, abatte ry icon appears on the
rig ht ofthe disp lay. Re place the remot eco ntrol
ba tteries (
�=page 475).
1 Displ ay
2 Tocallup the statu sor set departu re
time
3 OFF button
4 ON button
5 Tocallup the statu sor set departu re
time In
dica tor la mp Auxiliary
heating Blue Auxili
aryvent ila-
tion switche don Red Auxili
aryhe ating
switc hedon Yellow Swi
tch-on time
presele cted
( �= page 214) Rem
ote co ntrol
P83.70-4945-31216_R
E_2006-12a.book Seit e342 Montag, 2. Oktob er2006 12:06 12
Page 384 of 555
363
Con
trols
Features Sw
itch ingof fcool ing
�6 Press switch 3toOF F.
Th e in dica torlamp in the sw itch goes
out. Setting a low
cooli ng level
�6 Pressthe ri ght-hand side of sw itch 1. Setting a
high coolin gl evel
�6 Press the le ft-h an d side of switch 1. Caring
forthe coolb ox
If yo uar enot using th ecool boxfor along
pe riod, yoush ou ldsw itch itoff, defrost it
an dclea nit. Then le avethe lid open for a
whi le. Rem
ovingthe coolbox
Yo uca nre mo ve the coolb oxfor
mai nten ance orto in stall the skibag
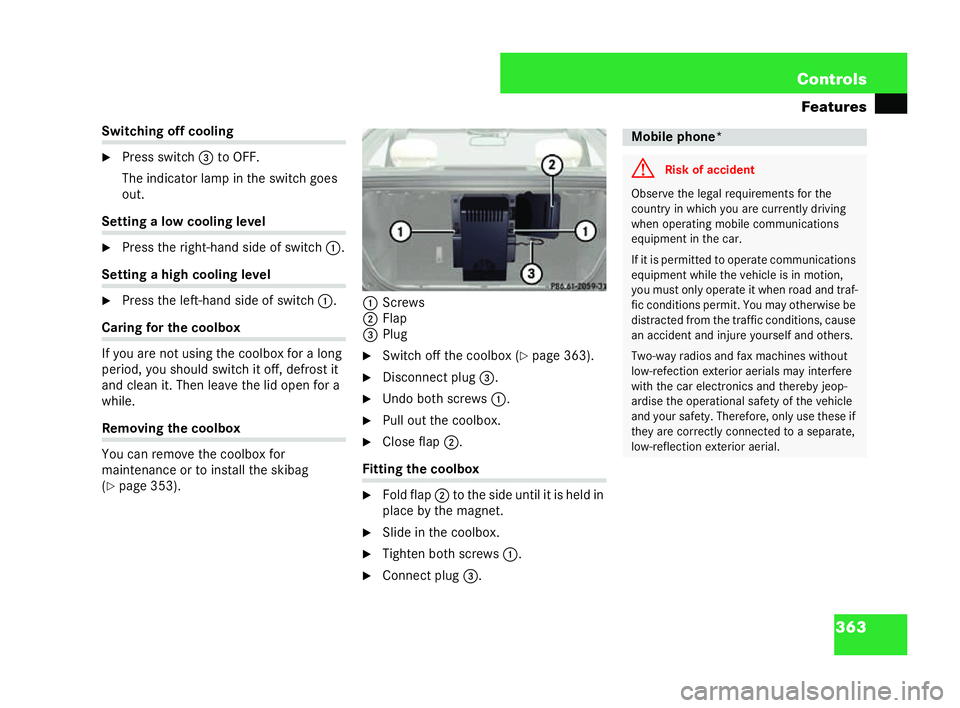
( �= pa ge 353). 1
Screws
2 Flap
3 Plug
�6 Switch off the coolbox ( �=page 363).
�6 Disc onnec t plug3.
�6 Undo both screws 1.
�6 Pullout theco olbox.
�6 Clos eflap 2. Fit
ting the coolbox
�6 Foldflap 2 totheside un tilit is he ldin
place bythe mag net.
�6 Slid ein theco olbo x.
�6 Tighten both screws 1.
�6 Conne ctplug 3.
P86.61-2059-31 Mobile
phone* G
Risk of acc ident Obs
erve the legal requirements for the
count ryinwh ich yo uarecurren tly dri ving
when operating mobile communi cations
equ ipme ntin the car.
If it is permitted to operatecom munications
equ ipme ntwh ilet he vehicle is in moti on,
you muston ly operate it when roadandtraf-
fi c con dition spe rmit .You may otherwise be
dis trac tedfrom the traf fic condi tion s,cause
an accid entan di njur eyou rselfa nd oth ers.
Two-way radios an dfax ma chines without
low-re fection exterior aerials mayinterf ere
with the carelectr onicsan dth ereb yje op-
ar dise the opera tiona lsafet yof thevehic le
an dyou rsa fety. Therefo re, on ly us ethese if
they are correctl yconne cted to a separate,
low-re flec tion ex terioraerial. 216_R
E_2006-12a.book Seit e363 Montag, 2. Oktob er2006 12:06 12
Page 387 of 555
366 Con
trols
Fea tures Fi
ttin gadi ffere nt br acket
If yo ur mo bile ph one is notcomp atible with
the exis ting bracket, re movethisb rack et
an d then fit the new one.
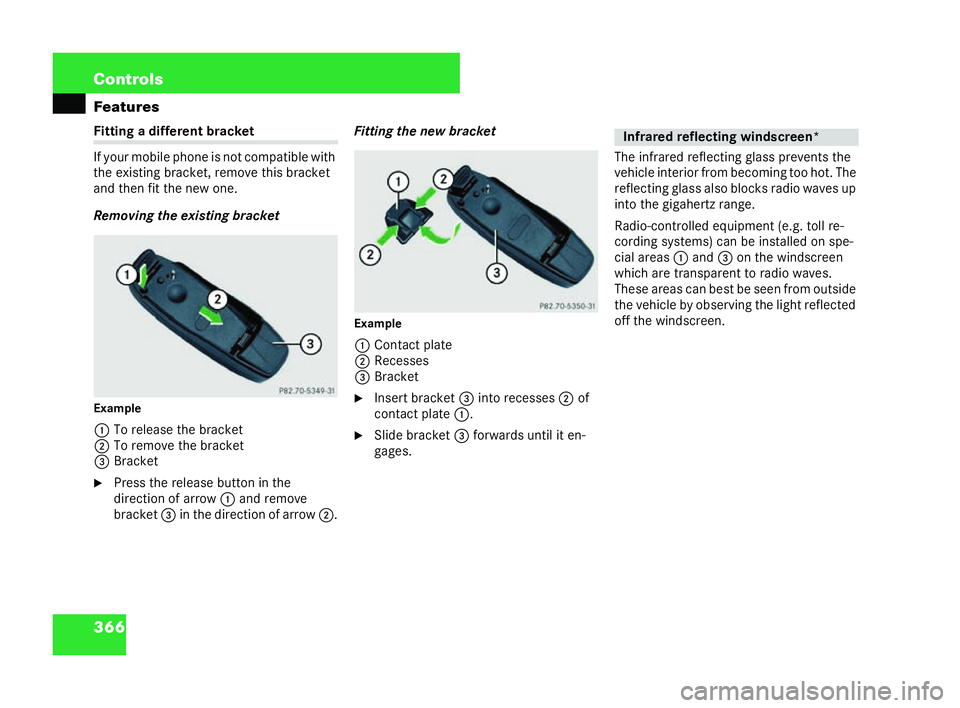
Remo ving the exi stingbr ac ket
Example 1 To release the bracket
2 To remove the brac ket
3 Bracket
�6 Press there lease buttoninthe
dire ction of arrow 1and re move
bracket 3inthe dire ction of arrow 2. Fitt
ingth ene w bracket
Example 1 Contac tplate
2 Recesses
3 Bracket
�6 Inse rt br acke t3 into recesses 2of
co ntac tplate 1.
�6 Slide bracket 3forw ards untiliten-
gages. Th
e in frar ed reflec ting glass preventsth e
vehicl ein te rior from becom ing too hot. The
ref lect ing gla ss alsobl ocks radio wa ves up
into the giga hertz range.
Ra dio-c ontrol led equipment (e.g. tol lre-
co rding syst ems) ca nbe inst alled onspe-
ci al areas 1and 3onthewi nd screen
whi chare tran sparen ttoradi o waves.
Th ese ar eas can bestbe seen fr om outside
the vehicle by observin g thelight re flected
of fthe wind screen. In
frar edreflec ting windscre en* 216_R
E_2006-12a.book Seit e366 Montag, 2. Oktob er2006 12:06 12