Page 102 of 473

101 Controls in detail
Locking and unlocking
Closing the trunk
1Handle
2Handles
�Lower trunk lid by pulling firmly on
handle1 or handles2.
�Close trunk lid with hands placed flat
on trunk lid.
Warning!G
To prevent possible personal injury, always
keep hands and fingers away from the trunk
opening when closing the trunk. Be espe-
cially careful when small children are
around.
When leaving the vehicle, always remove the
SmartKey from the starter switch, take it
with you, and lock the vehicle. Do not leave
children unattended in the vehicle, or with
access to an unlocked vehicle. Unsuper-
vised use of vehicle equipment may cause
an accident and/or serious personal injury.
Warning!G
Only drive with the trunk closed as, among
other dangers such as blocked visibility, ex-
haust fumes may enter the vehicle interior.
i
Do not place the SmartKey in the open
trunk. You may lock yourself out.
i
If the vehicle was previously centrally
locked, the trunk will lock automatical-
ly after closing it. The turn signals will
flash three times to confirm locking.
Page 105 of 473

104 Controls in detail
Locking and unlocking
Locking and unlocking from the inside
You can lock or unlock the doors and the
trunk from inside using the central locking
or unlocking switch. This can be useful, for
example, if you want to lock the vehicle
before starting to drive.
You cannot lock or unlock the fuel filler flap
with the central locking or unlocking
switch.The switches are located in the center
console.
1Central locking switch
2Central unlocking switch
Warning!G
When leaving the vehicle, always remove the
SmartKey from the starter switch, take it
with you, and lock the vehicle. Do not leave
children unattended in the vehicle, or with
access to an unlocked vehicle. Unsuper-
vised use of vehicle equipment may cause
an accident and/or serious personal injury.
i
You can open a locked door from the
inside. Open door only when conditions
are safe to do so.
If the vehicle was previously centrally
locked using the SmartKey, it will not
unlock using the central unlocking
switch2.
If the vehicle was previously locked
with the central locking switch1
�while in the selective remote con-
trol mode, only the door opened
from the inside is unlocked.
�while in the global remote control
mode, the complete vehicle is
unlocked when a door is opened
from the inside.
Page 107 of 473
.
Front seat active head restraintsYou cannot remove the active head re-
straints on the driver’s and")
106 Controls in detail
Seats
For information on seat adjustment, see
“Adjusting” (
�page 35).
Front seat active head restraintsYou cannot remove the active head re-
straints on the driver’s and passenger’s
seat.
For removal of the active head restraints
we recommend that you contact an autho-
rized Mercedes-Benz Center.
For information on head restraint
adjustment, see “Seats” (
�page 35).
For information on active head restraints,
see “Active head restraint” (
�page 71).
Rear seat head restraints
Warning!G
For your protection, drive only with properly
positioned head restraints.
Adjust head restraint so that the head re-
straint supports the back of the head at eye
level. This will reduce the potential for injury
to the head and neck in the event of an ac-
cident or similar situation.
Do not drive the vehicle without the seat
head restraints. Head restraints are
intended to help reduce injuries during an
accident.
i
Adjust the head restraint in such a way
that it is as close to the head as
possible.
Warning!G
For safety reasons, always drive with the
rear head restraints in the upright position
when the rear seats are occupied.
Keep the area around head restraints clear
of articles (e.g. clothing) to not obstruct the
folding operation of the head restraints.
Page 108 of 473

1Release button
Raising
�Manually adjust the height of the head
restraint by pulling it upward.
If the head restraint is fully re")
107 Controls in detail
Seats
Head restraint height (rear outer seats)
1Release button
Raising
�Manually adjust the height of the head
restraint by pulling it upward.
If the head restraint is fully retracted,
push release button1 and pull the
head restraint out.
Lowering
�To lower the head restraint, push
release button1 and push down on
the head restraint.Folding head restraints back with
release button
The rear seat head restraints can be folded
backward for increased visibility.
1Release button
�Push release button1.
The head restraint will fold backward.
i
Adjust the head restraint in such a way
that it is as close to the head as
possible.
Warning!G
For your protection, drive only with properly
positioned head restraints.
Adjust head restraint so that the head re-
straint supports the back of the head at eye
level. This will reduce the potential for injury
to the head and neck in the event of an ac-
cident or similar situation.
Do not drive the vehicle without the seat
head restraints. Head restraints are
intended to help reduce injuries during an
accident.
i
You can also fold the rear outer seat
head restraints back using the switch
in the center console (
�page 108).
Page 109 of 473
108 Controls in detail
Seats
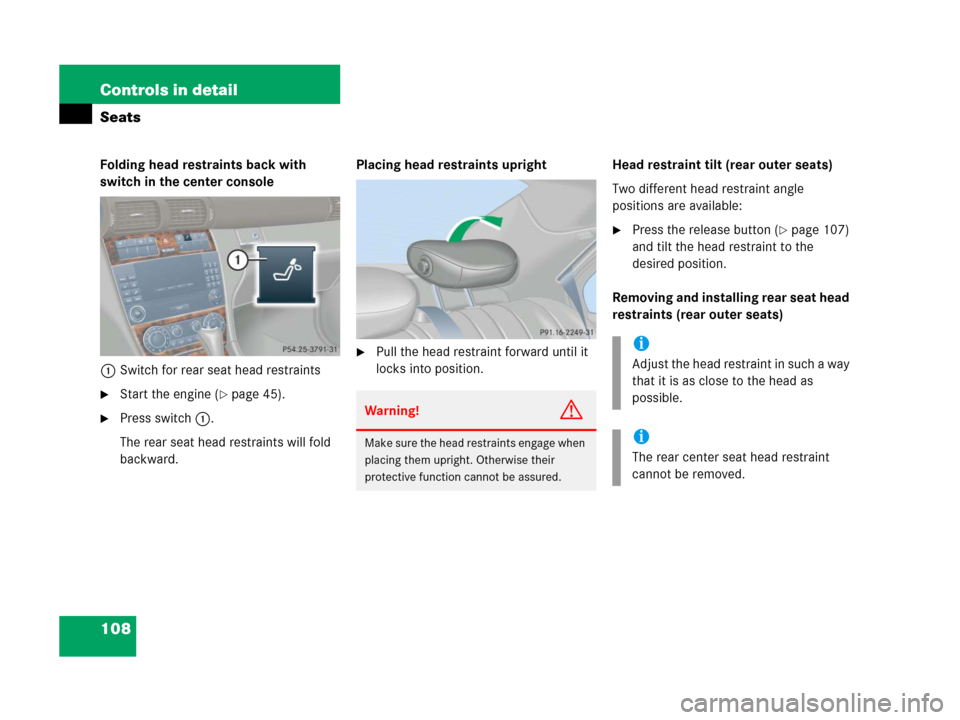
Folding head restraints back with
switch in the center console
1Switch for rear seat head restraints
�Start the engine (�page 45).
�Press switch1.
The rear seat head restraints will fold
backward.Placing head restraints upright
�Pull the head restraint forward until it
locks into position.Head restraint tilt (rear outer seats)
Two different head restraint angle
positions are available:
�Press the release button (�page 107)
and tilt the head restraint to the
desired position.
Removing and installing rear seat head
restraints (rear outer seats)
Warning!G
Make sure the head restraints engage when
placing them upright. Otherwise their
protective function cannot be assured.
i
Adjust the head restraint in such a way
that it is as close to the head as
possible.
i
The rear center seat head restraint
cannot be removed.
Page 110 of 473
.
�Pull head restraint to its highest
position.
�Push release button1 and pull out")
109 Controls in detail
Seats
1Release button
Removing rear seat head restraints
�Fold back head restraint (�page 107).
�Pull head restraint to its highest
position.
�Push release button1 and pull out
head restraint.
Installing rear seat head restraints
�Insert head restraint and push it down
until it engages.
�Push button1 and adjust head
restraint to desired position.
Lumbar support*
The curvature of the driver’s seat can be
adjusted to help enhance lower back sup-
port and seating comfort.
1Adjustment lever
�Move adjustment lever1 in direction
of arrows until you have reached a
comfortable seating position.
Warning!G
For your protection, drive only with properly
positioned head restraints.
Adjust head restraint so that the head re-
straint supports the back of the head at eye
level. This will reduce the potential for injury
to the head and neck in the event of an ac-
cident or similar situation.
Do not drive the vehicle without the seat
head restraints. Head restraints are intend-
ed to help reduce injuries during an acci-
dent.
Do not interchange head restraints from
front and rear seat.
Page 112 of 473

111 Controls in detail
Memory function
�Memory function
Prior to operating the vehicle, the driver
should check and adjust the seat height,
seat position fore and aft, and seat back-
rest angle if necessary, to ensure adequate
control, reach and comfort. The head re-
straint should also be adjusted for proper
height. See also the section on air bags
(
�page 61) for proper seat positioning.
In addition, adjust the steering wheel to
ensure adequate control, reach, operation
and comfort. Both the interior and exterior
rear view mirrors should be adjusted for
adequate rear vision.
Fasten seat belts. Infants and small chil-
dren should be seated in a properly se-
cured restraint system that complies with
U.S. Federal Motor Vehicle Safety
Standards 213 and 225 and Canadian Mo-
tor Vehicle Safety Standards 213
and 210.2.With the memory function you can store up
to three different settings.
The following settings are stored for the
driver’s seat when using the buttons on the
driver’s door:
�Driver’s seat, backrest and head
restraint position
�Steering wheel position
�Exterior rear view mirrorsThe following settings are stored for the
front passenger seat when using the but-
tons (if so equipped depending on vehicle
equipment configuration) on the passen-
ger door:
�Front passenger seat, backrest and
head restraint position
Warning!G
Do not activate the memory function while
driving. Activating the memory function
while driving could cause the driver to lose
control of the vehicle.
Page 116 of 473

115 Controls in detail
Lighting
Manual headlamp mode
The low beam headlamps and the parking
lamps can be switched on and off with the
exterior lamp switch.
Automatic headlamp mode
The following lamps switch on and off
automatically depending on the brightness
of the ambient light:
�Low beam headlamps
�Tail and parking lamps
�License plate lamps
�Side marker lamps
�Turn the exterior lamp switch to
positionU.
With the SmartKey in starter switch
position1, only the parking lamps will
switch on and off automatically.
When the engine is running, the low
beam headlamps, the tail and parking
lamps, the license plate lamps, and the
side marker lamps will switch on and
off automatically.
i
With the SmartKey removed from the
starter switch and the driver’s door
open, a warning sounds if the parking
lamps or low beam headlamps are
switched on.
The message
Switch off lights.
appears in the multifunction display
Warning!G
If the exterior lamp switch is set toU,
�the headlamps may switch off unexpect-
edly when the system senses bright
ambient light, for example light from
oncoming traffic.
�the headlamps will not be automatically
switched on under foggy conditions.
To minimize risk to you and to others,
activate headlamps by turning exterior lamp
switch toB when driving or when traffic
and / or ambient lighting conditions require
you to do so.
In low ambient lighting conditions, only
switch from positionU toB with the
vehicle at a standstill in a safe location.
Switching fromU toB will briefly
switch off the headlamps. Doing so while
driving in low ambient lighting conditions
may result in an accident.
The automatic headlamp feature is only an
aid to the driver. The driver is responsible for
the operation of the vehicle’s lights at all
times.