Page 162 of 473

161 Controls in detail
Automatic transmission
Automatic shift program
The program mode selector switch is
located on the lower part of the center
console.
1Program mode selector switch
M Manual For manual gear shifting,
see “Manual shift pro-
gram” (
�page 165)
C Comfort For comfort driving
S Sport For standard drivingThe current gear selector lever position
and the selected program mode (
C/S) are
indicated in the multifunction display
(
�page 156).
�Press program mode selector
switch1 repeatedly until the letter of
the desired program mode appears in
the multifunction display.
SelectCfor comfort driving:
�The vehicle starts out in second
gear (both forward and reverse) for
gentler starts. This does not apply if
full throttle is applied or gear
range1 is selected.
�Traction and driving stability are
improved on icy roads.
�Upshifts occur earlier even when
you give more gas. The engine then
operates at lower rpms and the
wheels are less likely to spin.
!
Never change the program mode when
the gear selector lever is out of
positionP. This could result in a
change of driving characteristics for
which you may not be prepared.
i
The last selected program
mode (CorS) is switched on when the
engine is restarted.
Page 166 of 473

165 Controls in detail
Automatic transmission
Manual shift program
In addition to the automatic shift
programC orS, your vehicle is equipped
with the manual shift programM.
In the manual program modeM,
system-controlled automatic gearshifting
is switched off and you need to change the
gears by manually upshifting or downshift-
ing using the steering wheel gearshift but-
tons to the left and right of the steering
wheel (
�page 163) or the gear selector
lever.The program mode selector switch is
located on the lower part of the center
console.
1Program mode selector switch
M Manual For manual gear shifting
C Comfort For comfort driving
S Sport For standard driving
!
Allow engine to warm up under low
load use. Do not place full load on the
engine until the operating temperature
has been reached.
Shift into reverse gearR or parking
positionP only when the vehicle is
stopped.
Avoid spinning of a drive wheel for an
extended period when driving off on
slippery road surfaces. This may cause
serious damage to the drivetrain which
is not covered by the Mercedes-Benz
Limited Warranty.
Page 173 of 473
.
Always raise the sunshade ful")
172 Controls in detail
Good visibility
Rear window sunshade*
The switch is located in the center console.
1Rear window sunshade switch
�Switch on the ignition (�page 33).
Always raise the sunshade fully for its
support against the window frame.
Raising or lowering the sunshade
�Press switch1 briefly.
The sunshade is raised or lowered com-
pletely.
Stopping the raising or lowering
procedure
�Press switch1 again.
The sunshade stops.
Warning!G
When operating the rear window sunshade,
make sure there is no danger of anyone be-
ing harmed by the raising or lowering proce-
dure.
The raising or lowering procedure can be
immediately halted by briefly pressing the
switch.
Briefly press switch again to raise or lower
the rear window sunshade completely.
Warning!G
When leaving the vehicle, always remove the
SmartKey from the starter switch, take it
with you, and lock the vehicle. Do not leave
children unattended in the vehicle, or with
access to an unlocked vehicle. Unsuper-
vised use of vehicle equipment can cause an
accident and/or serious personal injury.
!
Make sure the movement of the rear
window sunshade is not restricted by
objects on the rear window shelf. Oth-
erwise, the sunshade or the objects
could be damaged.
Page 184 of 473
183 Controls in detail
Climate control
Rear passenger compartment
adjustable air vents
The air conditioning for the rear passenger
compartment is controlled via the climate
control panel (
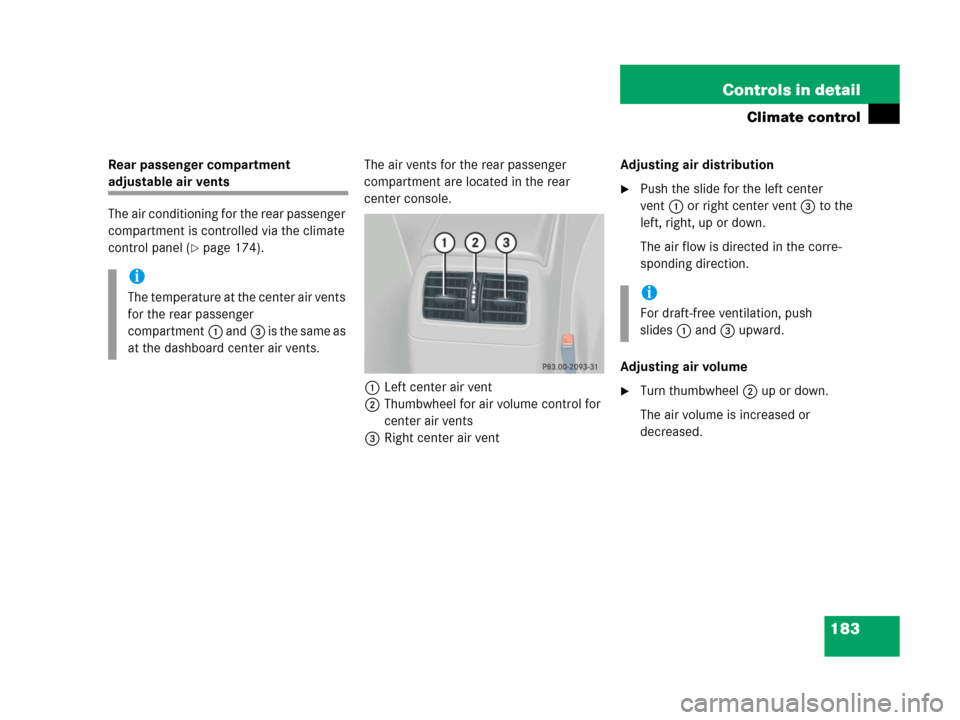
�page 174).The air vents for the rear passenger
compartment are located in the rear
center console.
1Left center air vent
2Thumbwheel for air volume control for
center air vents
3Right center air ventAdjusting air distribution
�Push the slide for the left center
vent1 or right center vent3 to the
left, right, up or down.
The air flow is directed in the corre-
sponding direction.
Adjusting air volume
�Turn thumbwheel2 up or down.
The air volume is increased or
decreased.
i
The temperature at the center air vents
for the rear passenger
compartment1 and3 is the same as
at the dashboard center air vents.i
For draft-free ventilation, push
slides1 and3 upward.
Page 197 of 473

Deactivating
�Press button9 (�page 185).
The indicator lamp on the button goes
out.
The residual heat is automatically turned
off:
�w")
196 Controls in detail
Automatic climate control* (Canada only)
Deactivating
�Press button9 (�page 185).
The indicator lamp on the button goes
out.
The residual heat is automatically turned
off:
�when the ignition is switched on
�after about 30 minutes
�if the battery voltage drops
Rear passenger compartment
adjustable air vents
The air conditioning for the rear passenger
compartment is controlled via the auto-
matic climate control panel (
�page 185).The air vents for the rear passenger
compartment are located in the rear
center console.
1Left center air vent
2Thumbwheel for air volume control for
center air vents
3Right center air ventAdjusting air distribution
�Push the slide for the left center
vent1 or right center vent3 to the
left, right, up, or down.
The air flow is directed in the
corresponding direction.
Adjusting air volume
�Turn thumbwheel2 up or down.
The air volume is increased or
decreased.
i
The temperature at the center air vents
for the rear passenger
compartment1 and3 i s t h e s a m e a s
at the dashboard center air vents.
i
For draft-free ventilation, push
slides1 and3 upward.
Page 261 of 473
260 Controls in detail
Useful features
Cup holder in rear seat armrest
1Cup holder
Opening cup holder
�Briefly press the front of cup holder1.
The cup holder slides out slightly.
�Pull out the cup holder until it stops.Closing cup holder
�Slide cup holder back until it engages.
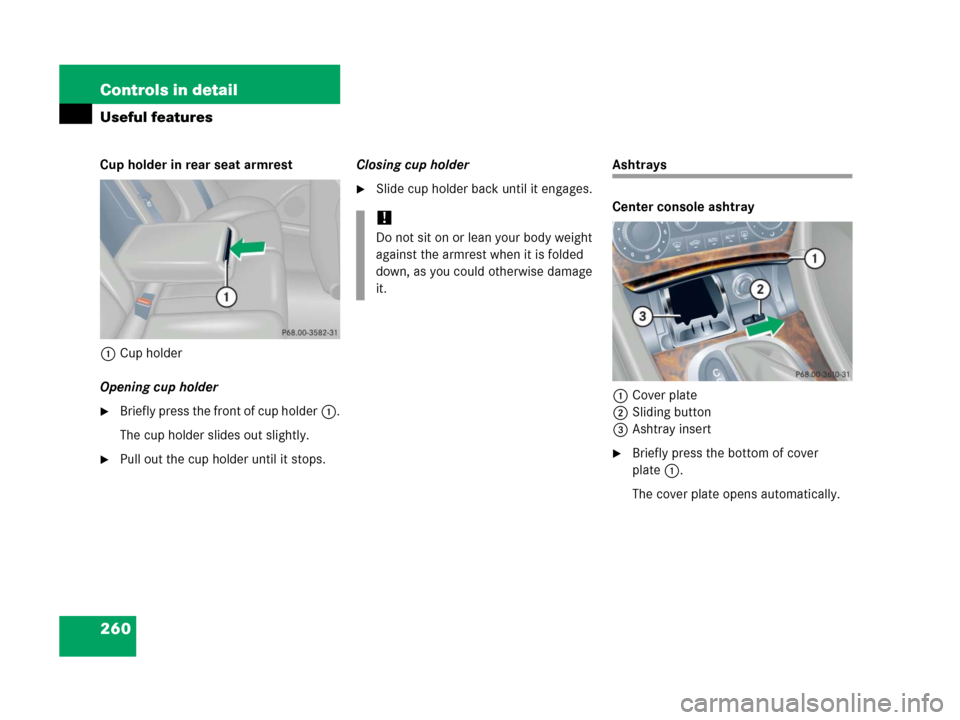
Ashtrays
Center console ashtray
1Cover plate
2Sliding button
3Ashtray insert
�Briefly press the bottom of cover
plate1.
The cover plate opens automatically.
!
Do not sit on or lean your body weight
against the armrest when it is folded
down, as you could otherwise damage
it.
Page 358 of 473

357 Practical hints
What to do if …
Lamp in center console
ProblemPossible cause/consequenceSuggested solution
56The front passenger front
air bag off indicator lamp
comes on and remains illu-
minated.A BabySmartTM child seat is installed on
the front passenger seat. Therefore the
passenger front air bag is switched off.
The system is malfunctioning when
there is no BabySmartTM child seat
installed on the front passenger seat.
�Have the system checked as soon as
possible by an authorized Mercedes-Benz
Center.
The front passenger front
air bag off indicator lamp
does not come on or does
not remain illuminated with
a BabySmart
TM child seat
properly installed on the
front passenger seat.
The system is malfunctioning.�Make sure there is nothing between seat
cushion and child seat and check
installation of the child seat.
�If the front passenger front air bag off
indicator lamp remains out, have the
system checked as soon as possible by an
authorized Mercedes-Benz Center.
Do not use the BabySmart
TM restraint to
transport children on the front passenger
seat until the system has been repaired.
Page 388 of 473
 is required to open the trunk lid.
The trunk lid lock is located n")
387 Practical hints
Unlocking/locking in an emergency
Unlocking and opening the trunk
A minimum height clearance of 5.71 ft
(1.74 m) is required to open the trunk lid.
The trunk lid lock is located next to the
handle above the rear license plate recess.
1Unlocking in an emergency
2Handle�Insert the mechanical key into the
trunk lid lock until it stops.
�Turn the mechanical key
counterclockwise to position1.
The trunk lid unlocks.
�Pull on handle2.
The trunk opens.
�Turn the mechanical key back and
remove it from the trunk lid lock.
Locking the vehicle
If you can not lock the vehicle with the
SmartKey, do the following:
�Close the passenger door, the rear
doors and the trunk.
�Press the central locking switch in the
center console (
�page 104).
�Check to see whether the locking
knobs on the doors have moved down.
�If necessary push them down manually.
�Remove the mechanical key out of the
SmartKey (
�page 386).
�Check whether the trunk is locked.
�If necessary, lock the trunk with the
mechanical key (
�page 103).
�Close the driver’s door.
Except for the driver’s door, the vehicle
should now be locked.
!
The trunk lid swings open upwards
automatically. Always make sure there
is sufficient overhead clearance.
��