Page 344 of 473

343 Operation
Vehicle care
Engine cleaning
Prior to cleaning the engine compartment,
make sure to protect electrical compo-
nents and connectors from the intrusion of
water and cleaning agents.
Corrosion protection, such as MB Anticor-
rosion Wax, should be applied to the en-
gine compartment after every engine
cleaning. Before applying, all control
linkage bushings and joints should be
lubricated. The poly-V-belt and all pulleys
should be protected from any wax.
Vehicle washing
In the winter, thoroughly remove all traces
of road salt as soon as possible.
When washing the vehicle underbody, do
not forget to clean the inner sides of the
wheels.Hand-wash
Do not use hot water or wash your vehicle
in direct sunlight.
�Only use a mild car wash detergent,
such as Mercedes-Benz approved Car
Shampoo.
�Thoroughly spray the vehicle with a dif-
fused jet of water.
Direct only a very weak spray towards
the ventilation intake.
�Use plenty of water and rinse the
sponge and chamois frequently.
�Rinse with clean water and thoroughly
dry with a chamois.
Do not allow cleaning agents to dry on
the finish.Automatic car wash
You can have your car washed in an auto-
matic car wash from the start. Automatic
car washes without brushes are prefera-
ble.
If the vehicle is very dirty, prewash it be-
fore running it through the automatic car
wash.
!
Do not clean your vehicle in an auto-
matic touchless car wash which uses
caustic spray. Otherwise the caustic
spray will damage the paint or orna-
mental moldings.
Page 366 of 473
365 Practical hints
What to do if …
Symbol messages
Display symbolDisplay messagePossible cause/consequencePossible solution
#Battery Alternator
Visit workshopThe battery is no longer charging.
Possible causes:
�broken poly-V-belt
�alternator malfunctioning
�Stop immediately and check the
poly-V-belt in a safe location or as
soon as it is safe to do so.
If it is broken:
�Do not continue to drive. Otherwise
the engine will overheat due to an
inoperative water pump which may
result in damage to the engine. Notify
an authorized Mercedes-Benz Center.
If it is intact:
�Drive immediately to the nearest
authorized Mercedes-Benz Center.
Low voltage
Charge batteryThe battery has insufficient voltage.�Start the engine (�page 45).
Low voltage
Consumers offThe battery has insufficient voltage.�Turn off unnecessary electrical
consumers.
Page 382 of 473

381 Practical hints
Where will I find ...?
1Vehicle jack
2Collapsible wheel chock and spare
wheel bolts
3Towing eye bolt
4Alignment bolt
5Wheel wrench
6Spare fuses and valve extractor
7Electric air pumpVehicle jackThe vehicle jack is located in the storage
compartment underneath the trunk floor.
Storage position
�Turn crank handle in the direction of ar-
row as far as it will go.
Warning!G
The jack is designed exclusively for jacking
up the vehicle at the jack take-up brackets
built into both sides of the vehicle. To help
avoid personal injury, use the jack only to lift
the vehicle during a wheel change. Never
get beneath the vehicle while it is supported
by the jack. Keep hands and feet away from
the area under the lifted vehicle. Always
firmly set parking brake and block wheels
before raising vehicle with jack.
Do not disengage parking brake while the
vehicle is raised. Be certain that the jack is
always vertical (plumb line) when in use,
especially on hills. Always try to use the jack
on level surface. Make sure the jack arm is
fully seated in the jack take-up bracket.
Always lower the vehicle onto sufficient
capacity jackstands before working under
the vehicle.
Page 390 of 473
389 Practical hints
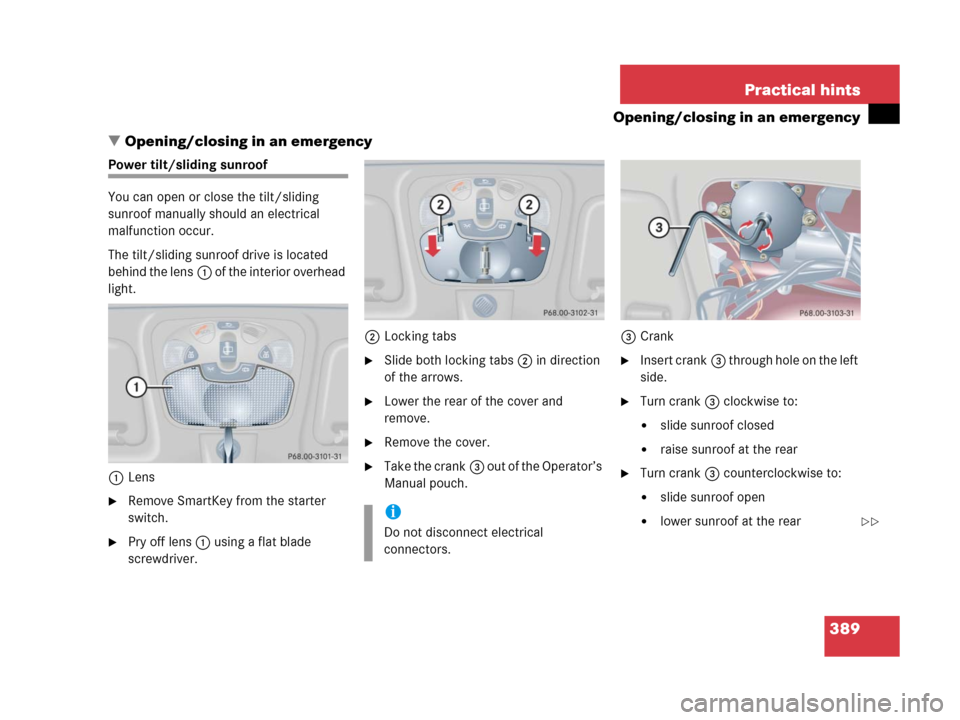
Opening/closing in an emergency
�Opening/closing in an emergency
Power tilt/sliding sunroof
You can open or close the tilt/sliding
sunroof manually should an electrical
malfunction occur.
The tilt/sliding sunroof drive is located
behind the lens1 of the interior overhead
light.
1Lens
�Remove SmartKey from the starter
switch.
�Pry off lens1 using a flat blade
screwdriver.2Locking tabs
�Slide both locking tabs2 in direction
of the arrows.
�Lower the rear of the cover and
remove.
�Remove the cover.
�Take the crank3 out of the Operator’s
Manual pouch.3Crank
�Insert crank3 through hole on the left
side.
�Turn crank3 clockwise to:
�slide sunroof closed
�raise sunroof at the rear
�Turn crank3 counterclockwise to:
�slide sunroof open
�lower sunroof at the reari
Do not disconnect electrical
connectors.��
Page 399 of 473

398 Practical hints
Replacing bulbs
Low beam bulb
�Press the clamp on housing cover1
and remove it.
�Pull the electrical connector off.
�Turn bulb socket4 counterclockwise
and take out the bulb.
�Insert the new bulb so that its socket
locates in the recess of the lamp
housing.
�Turn bulb socket4 clockwise until it
engages.
�Plug the electrical connector onto the
bulb.
�Align housing cover1 and press until
it engages.High beam bulb
�Press the clamp on housing cover2
and remove it.
�Pull the electrical connector off.
�Turn bulb socket5 counterclockwise
and take out the bulb.
�Insert the new bulb so that its socket
locates in the recess of the lamp
housing.
�Turn bulb socket5 clockwise until it
engages.
�Plug the electrical connector onto the
bulb.
�Align housing cover2 and press until
it engages.Front turn signal lamp bulb
�Turn bulb socket3 with the bulb
counterclockwise and remove it.
�Press gently onto the bulb and turn it
counterclockwise out of bulb
socket3.
�Press new bulb gently into bulb
socket3 and turn clockwise until it
engages.
�Place bulb socket3 back into the
lamp and turn it clockwise.
Parking and standing lamp bulb
�Press the clamp on housing cover2
and remove it.
�Pull out bulb socket6 with the bulb.
�Pull the bulb out of bulb socket6.
�Press the new bulb into bulb socket6.
�Press bulb socket6 back into the
lamp.
�Align housing cover2 and press until
it engages.
Page 400 of 473
399 Practical hints
Replacing bulbs
Bi-Xenon* headlamp
1Housing cover for Bi-Xenon headlamp
2Housing cover for high beam flasher,
parking and standing lamp3Bulb socket for turn signal lamp bulb
4Bulb socket for high beam flasher bulb
5Bulb socket for parking and standing
lamp bulbHigh beam flasher bulb
�Press the clamp on housing cover2
and remove it.
�Pull the electrical connector off.
�Turn bulb socket4 counterclockwise
and take out the bulb.
�Insert the new bulb so that its socket
locates in the recess of the lamp
housing.
�Turn bulb socket4 clockwise until it
engages.
�Plug the electrical connector onto the
bulb.
�Align housing cover2 and press until
it engages.
Warning!G
Do not remove the cover1 for the
Bi-Xenon headlamp. Because of high voltage
in Bi-Xenon lamps, it is dangerous to replace
the bulb or repair the lamp and its compo-
nents. We recommend that you have such
work done by a qualified technician.
Page 405 of 473
.")
404 Practical hints
Flat tire
Preparing the vehicle
�Park the vehicle in a safe distance from
moving traffic on a hard, flat surface
when possible.
�Turn on the hazard warning flasher
(
�page 119).
�Turn the steering wheel so that the
front wheels are in a straight ahead
position.
�Set the parking brake (�page 54).
�Move the gear selector lever toP.
�Turn off the engine (�page 56).
�Remove the SmartKey from the starter
switch.
�Have any passenger exit the vehicle at
a safe distance from the roadway.
Mounting the spare wheel
Preparing the vehicle
Prepare the vehicle as described
(
�page 404).
�Take the collapsible tire, wheel wrench,
wheel bolts, jack, and electric air pump
out of the trunk (
�page 380).
Warning!G
The dimensions of the spare wheel with col-
lapsible tire are different from those of the
road wheels. As a result, the vehicle han-
dling characteristics change when driving
with a spare wheel mounted. Adapt your
driving style accordingly.
The spare wheel is for temporary use only.
When driving with spare wheel mounted,
ensure proper tire pressure and do not ex-
ceed a vehicle speed of 50 mph (80 km/h).
Drive to the nearest Mercedes-Benz Center
as soon as possible to have the spare wheel
replaced with a regular road wheel.
Never operate the vehicle with more than
one spare wheel mounted.
Do not switch off the ESP
® when a spare
wheel is mounted.
i
Open doors only when conditions are
safe to do so.
Page 409 of 473
.1Flap")
408 Practical hints
Flat tire
�Unscrew the alignment bolt, install last
wheel bolt and tighten slightly.Inflating the collapsible tire
�Take the electric air pump out of the
trunk (
�page 381).1Flap
2On/off switch
3Electrical plug
4Air hose with pressure gauge and vent
screw
5Union nut
�Open flap 1 on electric air pump.
�Pull out electrical plug 3 and air hose
with pressure gauge 4.
�Remove the valve cap from the
collapsible tire valve.
�Screw union nut5 onto the collaps-
ible tire valve.
Warning!G
Only use genuine equipment
Mercedes-Benz wheel bolts. Other wheel
bolts may come loose.
Do not tighten the wheel bolts when the
vehicle is raised. Otherwise the vehicle
could fall off the jack.
Warning!G
Inflate collapsible tire only after the wheel is
properly mounted.
Inflate the collapsible tire using the electric
pump (
�page 408) before lowering the
vehicle.
Warning!G
Observe instructions on air pump label.
!
Do not lower the vehicle before
inflating the collapsible tire. Otherwise
the rim may be damaged.
��