Page 338 of 473

337 Operation
Winter driving
Block heater (Canada only)
The engine is equipped with a block
heater.
The electrical cable may be installed at an
authorized Mercedes-Benz Center.
Snow chains
Snow chains should only be driven on
snow-covered roads at speeds not to
exceed 30 mph (50 km/h). Remove chains
as soon as possible when driving on roads
without snow.
Please observe the following guidelines
when using snow chains:
�Use of snow chains is not permissible
with all wheel/tire combinations.
�Snow chains should only be used on
the rear wheels. Follow the manufac-
turer’s mounting instructions.
�Only use snow chains that are
approved by Mercedes-Benz. Your
authorized Mercedes-Benz Center will
be glad to advise you on this subject.
�Use of snow chains may be prohibited
depending on location. Always check
local and state laws before installing
snow chains.
Warning!G
If you use your spare tire when winter tires
are fitted on the other wheels, be aware that
the difference in tire characteristics may
very well impair turning stability and that
overall driving stability may be reduced.
Adapt your driving style accordingly.
Have the spare tire replaced with a winter
tire at the nearest authorized
Mercedes-Benz Center.
i
When driving with snow chains, you
may wish to deactivate the ESP®
(
�page 84) before setting the vehicle
in motion. This will improve the
vehicle’s traction.
!
Some tire sizes do not leave adequate
clearance for snow chains. To help
avoid serious damage to your vehicle or
tires, use of snow chains is not permis-
sible with the following tire sizes:
�225/40 ZR18 92Y XL
�245/35 ZR18 92Y XL
�145/70 - 17 92P (collapsible tire)
Page 381 of 473
380 Practical hints
Where will I find ...?
First aid kit
The first aid kit is located in the trunk on
the left side secured by a hook and loop
fastener.
1First aid kit
2Hook and loop fastener
�Unfasten hook and loop fastener2.
�Remove first aid kit1.
Vehicle tool kit
The vehicle tool kit is located in the storage
compartment underneath the trunk floor.
The following is included:
�Towing eye bolt
�Wheel wrench
�Alignment bolt
�Vehicle jack
�Spare fuses
�Valve extractor
�Protective wrap
�Collapsible wheel chock
�A pair of gloves Removing the vehicle tool kit
�Lift up trunk floor cover and engage
trunk floor handle in upper edge of
trunk.
1Spare wheel with collapsible tire
2Vehicle tool kit (under collapsible tire)
3Retaining screw
�Loosen retaining screw3 by turning it
counterclockwise.
�Remove collapsible tire1.
�Remove vehicle tool kit2.
i
Check expiration dates and contents
for completeness at least once a year
and replace missing/expired items.
Page 382 of 473

381 Practical hints
Where will I find ...?
1Vehicle jack
2Collapsible wheel chock and spare
wheel bolts
3Towing eye bolt
4Alignment bolt
5Wheel wrench
6Spare fuses and valve extractor
7Electric air pumpVehicle jackThe vehicle jack is located in the storage
compartment underneath the trunk floor.
Storage position
�Turn crank handle in the direction of ar-
row as far as it will go.
Warning!G
The jack is designed exclusively for jacking
up the vehicle at the jack take-up brackets
built into both sides of the vehicle. To help
avoid personal injury, use the jack only to lift
the vehicle during a wheel change. Never
get beneath the vehicle while it is supported
by the jack. Keep hands and feet away from
the area under the lifted vehicle. Always
firmly set parking brake and block wheels
before raising vehicle with jack.
Do not disengage parking brake while the
vehicle is raised. Be certain that the jack is
always vertical (plumb line) when in use,
especially on hills. Always try to use the jack
on level surface. Make sure the jack arm is
fully seated in the jack take-up bracket.
Always lower the vehicle onto sufficient
capacity jackstands before working under
the vehicle.
Page 384 of 473

383 Practical hints
Where will I find ...?
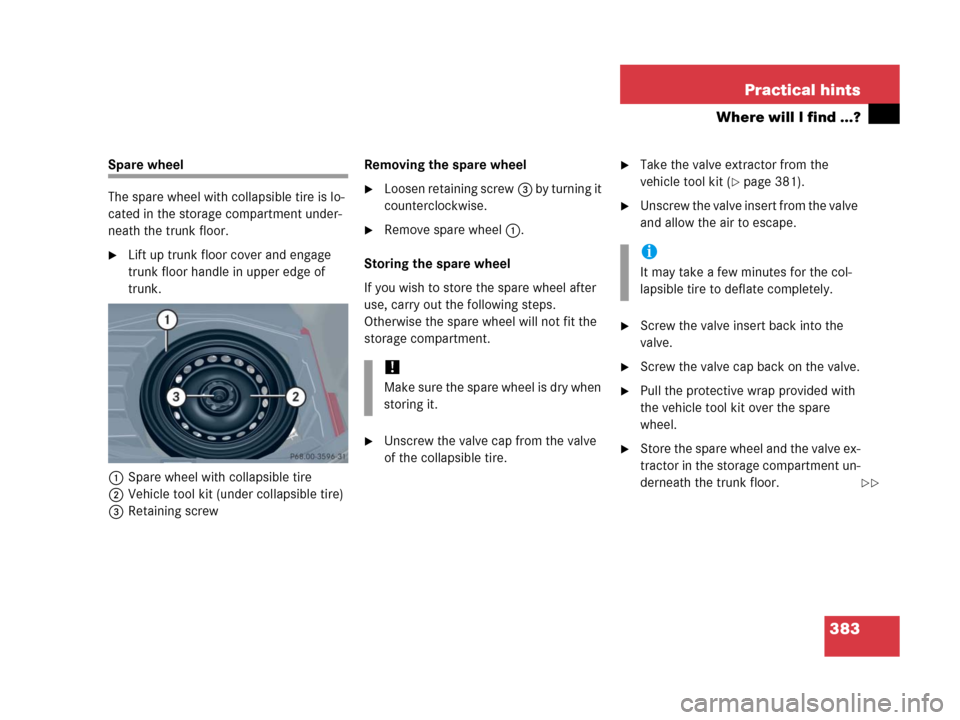
Spare wheel
The spare wheel with collapsible tire is lo-
cated in the storage compartment under-
neath the trunk floor.
�Lift up trunk floor cover and engage
trunk floor handle in upper edge of
trunk.
1Spare wheel with collapsible tire
2Vehicle tool kit (under collapsible tire)
3Retaining screwRemoving the spare wheel
�Loosen retaining screw3 by turning it
counterclockwise.
�Remove spare wheel1.
Storing the spare wheel
If you wish to store the spare wheel after
use, carry out the following steps.
Otherwise the spare wheel will not fit the
storage compartment.
�Unscrew the valve cap from the valve
of the collapsible tire.
�Take the valve extractor from the
vehicle tool kit (
�page 381).
�Unscrew the valve insert from the valve
and allow the air to escape.
�Screw the valve insert back into the
valve.
�Screw the valve cap back on the valve.
�Pull the protective wrap provided with
the vehicle tool kit over the spare
wheel.
�Store the spare wheel and the valve ex-
tractor in the storage compartment un-
derneath the trunk floor.
!
Make sure the spare wheel is dry when
storing it.
i
It may take a few minutes for the col-
lapsible tire to deflate completely.
��
Page 385 of 473

384 Practical hints
Where will I find ...?
�Pierce the protective wrap with
retaining screw3.
�Secure the spare wheel by turning re-
taining screw3 clockwise.In case of a flat tire, you may temporarily
use the spare wheel with collapsible tire
when observing the following restrictions:
�Do not exceed a vehicle speed of
50 mph (80 km/h).
�Drive to the nearest tire repair facility
to have the flat tire repaired or
replaced as appropriate.
�Do not operate vehicle with more than
one spare wheel mounted.
For more information, see “Rims and Tires”
(
�page 429).
!
To prevent damage, always disengage
trunk floor handle from upper edge of
trunk and lower trunk floor before
closing the trunk.
Warning!G
The dimensions of the spare wheel with
collapsible tire are different from those of
the road wheels. As a result, the vehicle han-
dling characteristics change when driving
with a spare wheel mounted.
The spare wheel with collapsible tire should
only be used temporarily, and should be re-
placed with a regular road wheel as quickly
as possible.
��
Page 386 of 473
385 Practical hints
Where will I find ...?
Spare wheel bolts
1Wheel bolt for light alloy rims
2Wheel bolt for spare wheel (located in
trunk with spare wheel)!
Wheel bolts2 must be used when
mounting the spare wheel. The use of
any wheel bolts other than wheel
bolts2 for the spare wheel will physi-
cally damage the vehicle’s brakes.
Warning!G
Make sure to use the original length wheel
bolts when remounting the original wheel
after it has been repaired.
Page 405 of 473

404 Practical hints
Flat tire
Preparing the vehicle
�Park the vehicle in a safe distance from
moving traffic on a hard, flat surface
when possible.
�Turn on the hazard warning flasher
(
�page 119).
�Turn the steering wheel so that the
front wheels are in a straight ahead
position.
�Set the parking brake (�page 54).
�Move the gear selector lever toP.
�Turn off the engine (�page 56).
�Remove the SmartKey from the starter
switch.
�Have any passenger exit the vehicle at
a safe distance from the roadway.
Mounting the spare wheel
Preparing the vehicle
Prepare the vehicle as described
(
�page 404).
�Take the collapsible tire, wheel wrench,
wheel bolts, jack, and electric air pump
out of the trunk (
�page 380).
Warning!G
The dimensions of the spare wheel with col-
lapsible tire are different from those of the
road wheels. As a result, the vehicle han-
dling characteristics change when driving
with a spare wheel mounted. Adapt your
driving style accordingly.
The spare wheel is for temporary use only.
When driving with spare wheel mounted,
ensure proper tire pressure and do not ex-
ceed a vehicle speed of 50 mph (80 km/h).
Drive to the nearest Mercedes-Benz Center
as soon as possible to have the spare wheel
replaced with a regular road wheel.
Never operate the vehicle with more than
one spare wheel mounted.
Do not switch off the ESP
® when a spare
wheel is mounted.
i
Open doors only when conditions are
safe to do so.
Page 408 of 473

407 Practical hints
Flat tire
Mounting the spare wheel
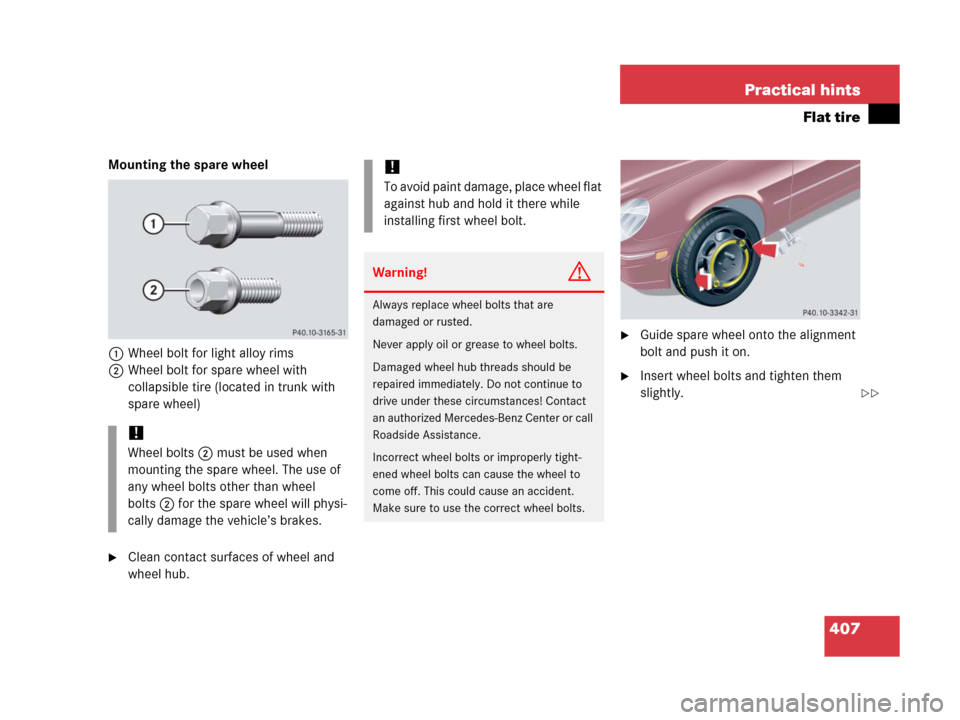
1Wheel bolt for light alloy rims
2Wheel bolt for spare wheel with
collapsible tire (located in trunk with
spare wheel)
�Clean contact surfaces of wheel and
wheel hub.
�Guide spare wheel onto the alignment
bolt and push it on.
�Insert wheel bolts and tighten them
slightly.
!
Wheel bolts2 must be used when
mounting the spare wheel. The use of
any wheel bolts other than wheel
bolts2 for the spare wheel will physi-
cally damage the vehicle’s brakes.
!
To avoid paint damage, place wheel flat
against hub and hold it there while
installing first wheel bolt.
Warning!G
Always replace wheel bolts that are
damaged or rusted.
Never apply oil or grease to wheel bolts.
Damaged wheel hub threads should be
repaired immediately. Do not continue to
drive under these circumstances! Contact
an authorized Mercedes-Benz Center or call
Roadside Assistance.
Incorrect wheel bolts or improperly tight-
ened wheel bolts can cause the wheel to
come off. This could cause an accident.
Make sure to use the correct wheel bolts.
��